Hello, I'm having a hard time trying to re-assemble my pool light after i replaced the bulb.
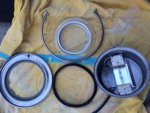
I have a Sta-brite Sunbrite 05502 fixture. i removed the fixture from the pool and replaced the bulb.
I then got called out of town for 6 weeks on the job. I feel silly about this but i can't remember the correct way to re-assembly it.
Ive tried......It just doesnt seem to fit right no matter how i do it, and I'm afraid if i assemble it wrong water will leak it.
Does anyone know if the gasket (i bought a new one) goes on first over the face plate and lens?
Then does the fixture just sit on the gasket or under it?
Everything i found on the internet seems to show the parts of the fixture, but the directions for re-assemble are not complete.
ive learned a lot roaming the forums.....Thanks in advance for the help!