ManiacalMama

Bronze Supporter
Jul 18, 2017
224
Antelope, CA
Pool Size
13500
Surface
Plaster
Chlorine
Salt Water Generator
SWG Type
CircuPool RJ-30 Plus
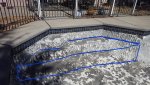
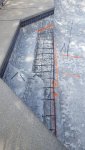
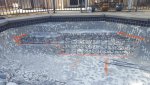
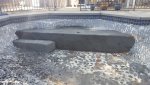
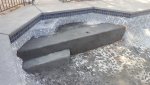
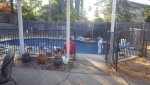
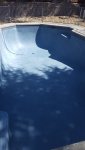
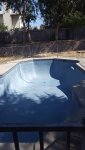
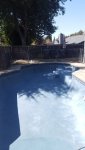
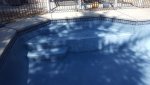
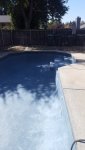
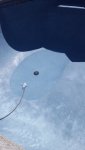
Our original plain white replaster project has turned into a medium gray quartz, tile cleaning and adding a small cabo shelf

pool.jpg

20190829_083921.jpg

20190829_083943.jpg

20190829_120623.jpg

20190829_180730.jpg

20190830_112714.jpg.

I know y'all like pictures so here's some to start, I'll update as the project progresses!
 
You are going to add a cabo shelf before you re-plaster? So interesting, thanks for the pictures and the video! Looking forward to the updates.
Yes, the cabo shelf will be going in where the steps are at, at the second step level. Not much else has happened yet as we had the long weekend. They were running a 4% discount if we got booked in August so the work started in those last couple of days just to get that discount LOL

We had the leak detection guy come out and we have a leak in the skimmer line between the pool and equipment pad, so now we will also be needing that work done too.

I'm really excited to see everything transform!
 
  • Like
Reactions: RuralTexas
I have almost the identical steps layout in my pool and plan on doing a similar cabo shelf on my pool this winter. What depth will the shelf be under the water? Can you take pictures of the way the shelf is formed. I plan on DIY my shelf and would like to see how it is done.
 
I have almost the identical steps layout in my pool and plan on doing a similar cabo shelf on my pool this winter. What depth will the shelf be under the water? Can you take pictures of the way the shelf is formed. I plan on DIY my shelf and would like to see how it is done.
It will be about 12" from that second step level to the waterline (the middle of the tiles). It's 15" right now before plaster.

I will take pictures once they've built the shelf, and will take pictures while they build it if I can. Here is my very amateur mock up of how it should look:
 

Attachments

  • 69516727_421946145092171_4887850963861241856_n.jpg
    69516727_421946145092171_4887850963861241856_n.jpg
    361.1 KB · Views: 55
Some rebar progress of the cabo shelf. They will finish it up and pour the concrete tomorrow.
 

Attachments

  • 20190909_151714.jpg
    20190909_151714.jpg
    637.7 KB · Views: 53
  • 20190909_151805.jpg
    20190909_151805.jpg
    621 KB · Views: 54
I think you are doing a great addition to your pool. What will be the surface dimensions of the cabo shelf? We gave a shelf a lot of thought and ended up doing a bit of a "cabo step". It has turned out to be our 3 yr old grandson's favorite play spot in the pool. 16.5" of water, he finds all kinds of ways to play on it.

And today is concrete day for you!IMG_6824.jpg
 
I think you are doing a great addition to your pool. What will be the surface dimensions of the cabo shelf? We gave a shelf a lot of thought and ended up doing a bit of a "cabo step". It has turned out to be our 3 yr old grandson's favorite play spot in the pool. 16.5" of water, he finds all kinds of ways to play on it.

And today is concrete day for you!View attachment 118121
Yes, they are out there right now!
The cabo shelf will end up being pretty small, I believe about 7 x 3. I was wanting it to follow the lines of the pool without eating into what little swimming space we have. It'll probably be big enough to put a chair, or some type of lounge seat on it. I have a 13 month old grandson that is going to enjoy it immensely!
 
  • Like
Reactions: RuralTexas
Concrete poured...
Also, skimmer line leak was found and fixed. We figure this pool is as old as the house, so about 30 years. Apparently the plumbing was put in and then covered with dirt, and then the concrete decking was poured. They found a wood stake from the concrete form was pounded down into the pipe. In the process of digging and jack hammering to find the leak, they also damaged the pipes for the cleaner and return line, so those are now fixed too :giggle:
 

Attachments

  • 69790675_380340129303236_6373789960423604224_n.jpg
    69790675_380340129303236_6373789960423604224_n.jpg
    606.3 KB · Views: 57
  • 70333848_431469254379383_3689544342269067264_n.jpg
    70333848_431469254379383_3689544342269067264_n.jpg
    612.4 KB · Views: 56

Enjoying this content?

Support TFP with a donation.

Give Support
I have almost the identical steps layout in my pool and plan on doing a similar cabo shelf on my pool this winter. What depth will the shelf be under the water? Can you take pictures of the way the shelf is formed. I plan on DIY my shelf and would like to see how it is done.
I didn't get a chance to take pictures of the actual forms they used, but they were very basic, from the far right corner to that angled turn on the left they used a large sheet of plywood. I sure wish we could have spared more room for a larger shelf, but it'll serve it's purpose.
 
I didn't get a chance to take pictures of the actual forms they used, but they were very basic, from the far right corner to that angled turn on the left they used a large sheet of plywood. I sure wish we could have spared more room for a larger shelf, but it'll serve it's purpose.
Your grandson is going to love it! Glad they found the skimmer leak - and repaired the new damage - its hard to restore anything without getting some dings along the way.
 
Plaster tomorrow!
Today all they did was come and clean up the pile of plaster debris from inside the pool.
I broke down the filter and gave the cartridge a good cleaning and lubed up all the o-rings. I have a new cartridge waiting in the garage that I will install after the bulk of the plaster dust has been filtered out by the old one.
 
All done! I was wrong about the color, but I like this better than what I was imagining, and hubby wasn't thrilled with the idea of gray. Now gotta figure out all the chems and balancing everything.
 

Attachments

  • 69506148_426437167978489_7966621699321888768_n.jpg
    69506148_426437167978489_7966621699321888768_n.jpg
    167.7 KB · Views: 49
  • 69843799_456744901840834_8311180412646850560_n.jpg
    69843799_456744901840834_8311180412646850560_n.jpg
    276.2 KB · Views: 47
  • 69914412_529311601173473_8936594287362048000_n.jpg
    69914412_529311601173473_8936594287362048000_n.jpg
    191.3 KB · Views: 44
  • 69960742_390712191617355_214458695025688576_n.jpg
    69960742_390712191617355_214458695025688576_n.jpg
    203.2 KB · Views: 47
  • 70554617_2374793012775745_1572897855079710720_n.jpg
    70554617_2374793012775745_1572897855079710720_n.jpg
    239.8 KB · Views: 47
  • 70635624_454033518520965_8942202909060235264_n.jpg
    70635624_454033518520965_8942202909060235264_n.jpg
    113.1 KB · Views: 44
Last edited:
Looks like you know what you are doing but just in case....................do NOT stop the water flow. If you do it may cause a ring on the plaster.

That looks so pretty!!

Kim:kim:
Yeah, I was aware of not stopping the water, and the plasterers reiterated it STRONGLY before they left.

I just realized that I'm a little unprepared and need to go get some MA. Any advice on how much I should initially stock up on?
 

Enjoying this content?

Support TFP with a donation.

Give Support
Thread Status
Hello , This thread has been inactive for over 60 days. New postings here are unlikely to be seen or responded to by other members. For better visibility, consider Starting A New Thread.