Skimmer Replacement Bond beam repair deck shear

mikes112

Well-known member
May 28, 2019
85
New Jersey
Moved from here.

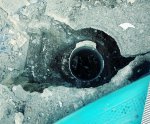
I'm doing the skimmer replacement myself in my concrete pool. It was an old Sylvan pool skimmer that was cracked and the previous owner tried to patch it. My question is sizing. Its 11 inches from the front of the skimmer face to the center of the pipe, which manufacturer would sell this size? And what model? It only has one pipe at the bottom. I tried to preserve as much of the concrete as possible, but I will use the rebar as reccomended in videos as it doesnt look like they used any in the initial pouring. But what concrete should I use exactly? Where to buy it? Where to buy the epoxy to hold the rebar to the bond beam? This is an earlier image. I was able to drill out around the existing skimmer to expose the original pipe the skimmer was glued too, so now if I can get a direct replacement I can glue it in and pour concrete around it. Ill update the latest photo tomorrow.

103514
 
Size model doesn’t matter; it’s all mud work & saw cut what you need to make go away.. once the throat is encased success is in the placement.

That’s quite a laundry list of questions. I cook my own concrete for these jobs.

Who’s videos are you watching? Most are train wrecks I see posted. Darrin Merlob from leaktronics has a good posted online.
Your game plan seems a tad off.. I posted an article one of my buddies wrote in minerJason renovation thread.
 
So I was able to get about two inches of the top of the original pipe exposed. Again does anyone know which manufacture or model skimmer I should get to get the original 11 inches? Or which skimmer is the best or strongest? Also where should I buy the concrete mix? And why isnt the rebar coated like the rebar they use to build bridges where I live? I know some people said I will have to some more demo, yes, but what ever is neccesary to fit in the new skimmer. I also have to buy a hammer drill, and smalldic grinder, but what type of disc for the grinder? 103596
 
Size model doesn’t matter; it’s all mud work & saw cut what you need to make go away.. once the throat is encased success is in the placement.

That’s quite a laundry list of questions. I cook my own concrete for these jobs.

Who’s videos are you watching? Most are train wrecks I see posted. Darrin Merlob from leaktronics has a good posted online.
Your game plan seems a tad off.. I posted an article one of my buddies wrote in minerJason renovation thread.
Mostly videos on Youtube. They reccomend putting rebar around the back of the skimmer to hold it to the bond beam, and drill holes into the bond beam and insert the ends of the rebar and glue them in. I will have to buy a Bosch hammer drill, which model do you reccomend?
 
I used a large shop vac to clean out the hole. I read I need to clean the concrete with acid first before I pour in the rest to fill up around the skimmer? Do I neutralize that before I pour in the rest of the concrete? I also saw them using some type of grinding wheel to get the surface of the concrete flat before the pour on the plaster layer, which grinder do I use for that? I guess thats a grounding wire in the photo, why is it so close to the skimmer? Also how do I know if the pipe below this skimmer is attached to the pipe thats at the bottom of the pool? I dont think it is. I understand that if the water level drops below the level of the skimmer there should be an automatic closing valve in the bottom of the skimmer to make sure the pumps prime doesn't fail so the pump doesn't run dry, should I buy a skimmer with this valve? My other Sylvan skimmer doesn't have that, but should I install one in it?
 

Enjoying this content?

Support TFP with a donation.

Give Support
What mixture concrete to use? Do I put plaster behind the tile and then the thinset mortar on top of that? Should I grind grooves into the surface behind where the tile will be so the thinset or plaster grabs better?
 
So I was able to get about two inches of the top of the original pipe exposed. Again does anyone know which manufacture or model skimmer I should get to get the original 11 inches? Or which skimmer is the best or strongest? Also where should I buy the concrete mix? And why isnt the rebar coated like the rebar they use to build bridges where I live? I know some people said I will have to some more demo, yes, but what ever is neccesary to fit in the new skimmer. I also have to buy a hammer drill, and smalldic grinder, but what type of disc for the grinder?

The guys who've already responded are much more knowledgeable than I am, but I recently replaced a skimmer so I'll try to answer a few of your many questions.

In order:

As mentioned, it doesn't really matter which skimmer you get, you don't need to match the size of the existing one. What you need to do is chip/cut out a lot more concrete and dig down to expose more of the plumbing, after which you can adjust the plumbing to set it where it makes sense, not necessarily based on where the old plumbing is. You'll want at least ~4 inches of space on every side around the skimmer (including below it). The more space you have the easier the work will be. I tried to minimize chipping and digging to minimize the amount of concrete to pour later, which in hindsight was a terrible way to do it.

I like to mix my own concrete, but any medium to high strength concrete mix should work.

The rebar will be (or at least should be) completely encased by concrete by the end of this project, so there's no need for it to be coated.

A circular saw with a diamond masonry cutting blade and a small angle grinder with a diamond grinding cup would both be very helpful. A diamond masonry cutting wheel for the angle grinder could also come in handy.

Mostly videos on Youtube. They reccomend putting rebar around the back of the skimmer to hold it to the bond beam, and drill holes into the bond beam and insert the ends of the rebar and glue them in. I will have to buy a Bosch hammer drill, which model do you reccomend?

Doesn't need to be a Bosch, can be any hammer drill. Since you have a lot of concrete that needs to be chipped out, a combo demo hammer / hammer drill would be very helpful. Harbor Freight has a couple very affordable ones, and while the quality isn't the best, they should be plenty good enough for this job. I personally like to drill the holes at an angle and then insert and bend the rebar, which creates a very strong mechanical bond in addition to the bond from the epoxy. It's easiest to drill the holes downward at about a 45° angle, insert the rebar loops without the skimmer in place, bend the loops down until they're flat, and then plumb the skimmer in. And make sure you get all the debris and dust out of the holes before you epoxy in the rebar, otherwise the epoxy won't bond well.

I used a large shop vac to clean out the hole. I read I need to clean the concrete with acid first before I pour in the rest to fill up around the skimmer? Do I neutralize that before I pour in the rest of the concrete? I also saw them using some type of grinding wheel to get the surface of the concrete flat before the pour on the plaster layer, which grinder do I use for that? I guess thats a grounding wire in the photo, why is it so close to the skimmer? Also how do I know if the pipe below this skimmer is attached to the pipe thats at the bottom of the pool? I dont think it is. I understand that if the water level drops below the level of the skimmer there should be an automatic closing valve in the bottom of the skimmer to make sure the pumps prime doesn't fail so the pump doesn't run dry, should I buy a skimmer with this valve? My other Sylvan skimmer doesn't have that, but should I install one in it?

You do not need to use acid. Using an acid wash that's too strong will actually weaken the top layer of concrete and result in a weaker bond. Just clean the existing concrete very well and make sure it's completely free of dirt, dust, and debris. If you insist on using acid, then yes, it needs to be neutralized with a baking soda solution and then rinsed very well before pouring the new concrete. If you chip things out properly there likely won't be much concrete to worry about bonding to, just the bond beam between the skimmer and the pool.

I'm not sure what surface you're talking about grinding flat. Maybe salvaging the bond beam portion of the throat? In any case, the diamond grinding cup I mentioned above should work for grinding any needed flat spots in the concrete.

I also don't know what plaster layer you're talking about pouring, so I can't really help with that..

It's likely a bonding wire, which is different from a ground wire.

If there's only one pipe below the skimmer, that's your skimmer intake that should run to your pump. If there were two pipes, then one would likely connect to your main drain. I think the valve you're referring to is a diverter valve, which only applies when you have two pipes, so don't worry about it.

What mixture concrete to use? Do I put plaster behind the tile and then the thinset mortar on top of that? Should I grind grooves into the surface behind where the tile will be so the thinset or plaster grabs better?

Any medium or high strength concrete mix should work. I made my own M40 concrete mix, which would be considered a high strength concrete.

You shouldn't need to do anything with plaster. The skimmer throat needs to be encased in and sealed to the concrete, the tile gets applied to the concrete in front of the skimmer throat using a thinset rated for submerged applications. You shouldn't need any grooves in the concrete, just don't make the concrete super smooth when you float it.

Here's the article @PoolguyinCT mentioned above:

Skimmer Replacement, Part 2: In With the New - AQUA Magazine
 
Last edited:
I personally like to drill the holes at an angle and then insert and bend the rebar, which creates a very strong mechanical bond in addition to the bond from the epoxy. It's easiest to drill the holes downward at about a 45° angle, insert the rebar loops without the skimmer in place, bend the loops down until they're flat, and then plumb the skimmer in.

I like that tip a lot Jason!! :goodjob:
 
  • Like
Reactions: mikes112
Thank you Jason for your advice. That's a good idea to drill the holes for the rebar at a 45 degree angle. I did buy the combination drill and hammer this weekend with different tips and high strength rebar epoxy.
"Any medium or high strength concrete mix should work. I made my own M40 concrete mix, which would be considered a high strength concrete."?
What should the proportion be for Portland cement to sand be? 1/3 1/2 1/4??? Or should I just buy store bought premixed and which one? There's not much pouring to do, but I want to do this right. I bought the skimmer this weekend, will get more photos as I do more demo to fit it in.

Kind of a separate issue from the issue with the skimmer install, is the problem I have with the tile bond beam layer which may have caused the skimmer to crack in the first place.
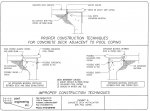
The surface I'm talking about regarding plaster is the front of my bond beam in certain sections of the pool where I have a lot of spalling. I will first repour the concrete in these areas, but then do I plaster over them? Because I should really only plaster or use thinset over porous surfaces. The guy at the pool place said I plaster on the front of the bond beam behind the tile and on top? But then how does the thinset bond to the bond beam where the tile is? What do I use to attache the coping to the top of the bond beam with? Mortar? What type? Or do I plaster to just under the tile level and then use thinset from there on up to attach the tiles and make the pool water tight so there'0615190841b_Film3.jpg0615190841d_Film3.jpgbondbeam correct smaller.jpgs no leaks? There was no expansion joint behind my bond beam between the bond beam and the pool deck, attached it a photo of what it should be. People told me that because it wasn't sealed with this expansion join behind my bond beam that water go in there causing the spalling.
 
I'm not sure what surface you're talking about grinding flat. Maybe salvaging the bond beam portion of the throat? In any case, the diamond grinding cup I mentioned above should work for grinding any needed flat spots in the concrete.
Its the flat tile surface which is uneven and they obviously didn't do a good job attaching the tile so I have to flatten it out and then use the thinset and redo the tile, so I would use a specific grinding tool to get this flat? The spalling is not in all areas behind the tile.
 
Thank you Jason for your advice. That's a good idea to drill the holes for the rebar at a 45 degree angle. I did buy the combination drill and hammer this weekend with different tips and high strength rebar epoxy.
"Any medium or high strength concrete mix should work. I made my own M40 concrete mix, which would be considered a high strength concrete."?
What should the proportion be for Portland cement to sand be? 1/3 1/2 1/4??? Or should I just buy store bought premixed and which one? There's not much pouring to do, but I want to do this right. I bought the skimmer this weekend, will get more photos as I do more demo to fit it in.

If you mix your own I'd go with a high portland content, like a 1 : 0.5 : 1 mix (portland : sand : gravel, ratios by volume not weight), with a water to portland ratio of 0.43 : 1 or less (by weight). Using a bagged mix of "high strength" would work fine too. Your choice, but unless you have masonry sand and gravel handy, the bagged is probably easier.

The surface I'm talking about regarding plaster is the front of my bond beam in certain sections of the pool where I have a lot of spalling. I will first repour the concrete in these areas, but then do I plaster over them?

First you remove the coping, chip away the weak section of bond beam and mud cap, and then saw cut an expansion joint between the decking and bond beam. Then you'll use a high strength concrete or high strength mortar (depending on the thickness required) to build a new mud cap on the bond beam. Once this is done, apply a cementitious waterproofing agent to the bond beam/mud cap behind where the tiles will go. The tiles will be set directly on the existing bond beam where it's still fully intact, and on the new mud cap where it's not.

I will first repour the concrete in these areas, but then do I plaster over them? Because I should really only plaster or use thinset over porous surfaces. The guy at the pool place said I plaster on the front of the bond beam behind the tile and on top? But then how does the thinset bond to the bond beam where the tile is?

Don't use plaster, use concrete or mortar. There's technically not a lot of difference between most plaster mixes and mortar, and plaster is porous just like concrete and mortar, but most plaster mixes are not as strong as a properly mixed and placed concrete or mortar.

What do I use to attache the coping to the top of the bond beam with? Mortar? What type? Or do I plaster to just under the tile level and then use thinset from there on up to attach the tiles and make the pool water tight so there's no leaks?

Coping is usually attached with mortar. The pool experts around here would be better to ask about the type, but if it were me I'd use a relatively high strength mix. The waterline tile should be installed before any plaster work, and the plaster should start at the base of the tile.

There was no expansion joint behind my bond beam between the bond beam and the pool deck, attached it a photo of what it should be. People told me that because it wasn't sealed with this expansion join behind my bond beam that water go in there causing the spalling.

Water itself won't cause spalling of the bond beam, but it can cause the soil behind the bond beam to expand and swell if it has a high clay content, which can put extreme stresses on the bond beam and cause it to crack/break. An expansion joint creates a little give so that if the decking gets pushed into the bond beam and/or coping they don't crack/break, and it also should be waterproof to minimize fluctuations in moisture content that could cause the soil to move.
 
Last edited:
Thanks. Now its time to find the plaster, thinking of using Sider Crete's Sider-Proof FF-PR – Roll-On pool plaster because no one sells any pool plaster in New Jersey! LOL, I'll get the portland cement and sand and stone probably from HD, now I'm emailing a bunch of pool construction companies in NJ to see if theyll sell me the plaster and thinset mortar and grout, unless someone knows where I can buy it here in the desert of New Jersey where no one sells any pool construction supplies for some reason!
 
Thanks. Now its time to find the plaster, thinking of using Sider Crete's Sider-Proof FF-PR – Roll-On pool plaster because no one sells any pool plaster in New Jersey! LOL, I'll get the portland cement and sand and stone probably from HD, now I'm emailing a bunch of pool construction companies in NJ to see if theyll sell me the plaster and thinset mortar and grout, unless someone knows where I can buy it here in the desert of New Jersey where no one sells any pool construction supplies for some reason!

I don't think NJ is much different than anywhere else in regards to pool construction supplies, there are plenty of places that sell them but they only sell to pool builders and plaster contractors who have accounts with them.

Plaster isn't something you buy, it's something you buy the ingredients for and then mix. The basic ingredients for white marcite plaster are white portland cement, marble dust, pozzolans, water, and sometimes various admixes. A lot of the white portland sold by commercial pool supply houses have pozzolans and dry admixes included. The white portland cement is the part that's difficult to source if you're not a pool/plaster contractor. Are you planning on just patching small portions of the existing plaster, or re-plastering the whole pool? If it's the latter, I'd strongly encourage you to reconsider and hire it out. It takes a large team of skilled people to properly plaster a pool.

There are plenty of places other than commercial pool supply houses that sell thinset and grout appropriate for use in pools. I like Laticrete 254 platinum thinset, but any modified thinset rated for submerged applications will work. Similarly, any polymer modified grout rated for submerged use should work fine as well.
 
I know, my contractor friend is using his info to get me the stuff. So aggravated, no one will sell it to the general public. I don't understand, its like a monopoly. Ok, I will try to get the thinset you mentioned I was already at HD and lowes and they all say not submergable in water on any of the thinset products, I was able to contact Quickrete online and they reccomended their thinset multipurpose 1550. I contacted custom building products but they said there mortar is not water proof, do I need to coat the concrete with a waterproffing material before I apply the thinset mortar for the tile? Or are they selling me the wrong mortar? If I use the Laticrete 254 will that waterproof the tile so the pool wont leak through the tile gaps?
 

Attachments

  • data_sheet-thin set multi-purpose 1550.pdf
    90.5 KB · Views: 2

Enjoying this content?

Support TFP with a donation.

Give Support
Thread Status
Hello , This thread has been inactive for over 60 days. New postings here are unlikely to be seen or responded to by other members. For better visibility, consider Starting A New Thread.