Replacing PVC in rough location

Matt2369

New member
Jan 19, 2020
4
Florida
Hello,

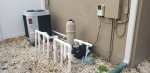
I am new to this forum and my wife and I just moved into our new home. This is the first time I've ever owned and worked on a pool. Since moving in I've learned a lot and was about to do a lot of my own repairs but I am now stuck right here. I noticed my pump was sucking air and I pinpointed where it was coming from. I feel I am fully capable of doing this repair but my question lies in where would I make the cut and how would I take the pvc pipe out of the pump to replace all those connection pieces? Any help would be great. I've attached a photo of where the pump is sucking air from. Thank you


20200119_101118.jpg
 
You will eventually have trouble with one or all of those ball valves (the red handles). And, while others may not concur, I would want a longer straight run in front of the pump, and a longer run after it, ideally with a sweep 90 on top, instead of a regular 90 or a T. I would look at how much trouble it would be to completely reconfigure the whole setup: replacing ball valves with never-lube two-way and three-way valves, using sweep 90s where I could, eliminating 90s where I could, etc.

If you want a quickie fix, you can cut just above the 90 that is to the left of your white arrow, and replace that whole assembly in front of your pump with a coupler, a 90, a 45, a reducer and a coupler that will mate over the outside of your pump's port (you'll be able to eliminate one of those 90s that way). If that all doesn't make sense, we can go into greater detail about what to do.

If eliminating one of the 90s is not important to you, or the 45 I suggested won't quite make that turn, then you can cut that straight section just to the left of that 90 your arrow is pointing at, and replace those two 90s. You'll need the same coupler and reducer at the pump's port I mentioned, one that glues to the outside of the port, instead of the inside as it is now.

If you're in the mood for a more extensive redo, post more pics of your entire pad, and we can advise about the possibilities. There are experts here that could really help you improve your entire setup (I can only stir the pot, I'm not the best cook here). I did something similar, when I "inherited" my first-time pool with the purchase of my house. I used that opportunity to add automation to the pool. And while I didn't at the time know about TFP, so didn't run all my purchase decisions by these experts (and so made a few mistakes), I'm really glad I did the upgrade and added all my bells and whistles, which has made pool care much easier on me than it would have been otherwise.
 
Last edited:
  • Like
Reactions: Matt2369
Alternately, you could see if you can purchase a replacement for the pump's union fitting (the black part right in front of the pump's basket housing) and then just recreate everything as is with new 90s and few short lengths of pipe.

You might check how the pump is bolted to the pad. A break where that arrow points might indicate undue stress at that location, which could have been caused by the pump torquing slightly every time it started up. Be sure the pump is bolted well to the pad so it can't shift around.

Be sure you turn off all the breakers that power your pool before re-plumbing. You don't want that pump inadvertently firing up.
 
  • Like
Reactions: Matt2369
Matt,

The first thing I would try to do is patch the leak area.

With the pump running, add PVC glue right at the point where the pipe meets the fitting. With any kind of luck, the suction from the pump will pull the glue into the fitting. Don't be timid, add a good amount of glue all the way around the junction.

Worse case it does not work and then you will have to start cutting.

If you do end up getting rid of all the 90's it might help with flow, but in the big picture, I really doubt that you would ever be able to tell.

Thanks,

Jim R.
 
  • Like
Reactions: 1Sammy and Matt2369
You will eventually have trouble with one or all of those ball valves (the red handles). And, while others may not concur, I would want a longer straight run in front of the pump, and a longer run after it, ideally with a sweep 90 on top, instead of a regular 90 or a T. I would look at how much trouble it would be to completely reconfigure the whole setup: replacing ball valves with never-lube two-way and three-way valves, using sweep 90s where I could, eliminating 90s where I could, etc.

If you want a quickie fix, you can cut just above the 90 that is to the left of your white arrow, and replace that whole assembly in front of your pump with a coupler, a 90, a 45, a reducer and a coupler that will mate over the outside of your pump's port (you'll be able to eliminate one of those 90s that way). If that all doesn't make sense, we can go into greater detail about what to do.

If eliminating one of the 90s is not important to you, or the 45 I suggested won't quite make that turn, then you can cut that straight section just to the left of that 90 your arrow is pointing at, and replace those two 90s. You'll need the same coupler and reducer at the pump's port I mentioned, one that glues to the outside of the port, instead of the inside as it is now.

If you're in the mood for a more extensive redo, post more pics of your entire pad, and we can advise about the possibilities. There are experts here that could really help you improve your entire setup (I can only stir the pot, I'm not the best cook here). I did something similar, when I "inherited" my first-time pool with the purchase of my house. I used that opportunity to add automation to the pool. And while I didn't at the time know about TFP, so didn't run all my purchase decisions by these experts (and so made a few mistakes), I'm really glad I did the upgrade and added all my bells and whistles, which has made pool care much easier on me than it would have been otherwise.
Thanks Dirk! I thought to myself that I should change out the plumbing in this whole thing but I'm kinda short on time I got hit with a short notice deployment so just trying to get this working good untill I get back then I want to change it all out making it look nicer and run a bit more efficient. You mentioned a lot of good information that I will be looking more into when I do change out those red turn handles.
 
Matt,

The first thing I would try to do is patch the leak area.

With the pump running, add PVC glue right at the point where the pipe meets the fitting. With any kind of luck, the suction from the pump will pull the glue into the fitting. Don't be timid, add a good amount of glue all the way around the junction.

Worse case it does not work and then you will have to start cutting.

If you do end up getting rid of all the 90's it might help with flow, but in the big picture, I really doubt that you would ever be able to tell.

Thanks,

Jim R.
Thanks Jim! That's exactly what I went out to do. I figured hey if this will get me by for now then I'll take it untill I get everything I need to redo the rest of the plumbing!
 
Thanks Dirk! I thought to myself that I should change out the plumbing in this whole thing but I'm kinda short on time I got hit with a short notice deployment so just trying to get this working good untill I get back then I want to change it all out making it look nicer and run a bit more efficient. You mentioned a lot of good information that I will be looking more into when I do change out those red turn handles.
 

Attachments

  • 20200119_154432.jpg
    20200119_154432.jpg
    539.4 KB · Views: 29
Roger that. The good news: you've got plenty of room to work, plenty of pipe coming out of the ground, all well-spaced apart. Refitting will be an easy go, however much of it you decide to do.

When you've got the time, do fill in your signature (read that thread I referred you to), and keep an eye on this guy's thread. He's got virtually the same setup, and he's getting advice over there about redoing his that might give you some things to think about before you do yours:

 
I would cut below the 3 ball valves and rebuild the section from the valves to the pump union if your leak persists. Drop 2 way diverter valves on the pipes and rebuild the connections to the pump.
 

Enjoying this content?

Support TFP with a donation.

Give Support
If the PVC glue trick doesn't work and you decide to replace the plumbing going into the pump, you can replace the two 90s going into the pump with one 45 if you twist the 90 from the drop by 45 degrees (towards the pump).
Thanks for better describing what I had suggested, Keith.

There's something wrong with that joint. It's either been torqued by the pump, or the original plumber didn't prime and/or glue it together correctly, probably both. While I won't argue that filling the gap with glue may or may not stop the leak, at least for a while, I don't understand why you wouldn't just fix it correctly, especially since it's all very accessible. I might try the glue trick on a buried fitting that would require large amounts of labor or cash to access enough to fix correctly, but not when it would be so easy to do it right. PVC is fused together, not really glued. It should be clean and free of defects or rough spots, primed correctly, coated with glue (which is more like solvent than glue), and then slightly twisted together to ensure the softened PVC fuses together throughout the entire area of contact. Squirting glue into a fitting is not that. If that had been done correctly in the first place, you wouldn't have a leak. Now's your chance to correct the original mistake. OK, that's enough of my two cents on that.

I agree with Allen's suggestion to replace the ball valves (now or eventually), but with three-way valves, not two-way valves, as I explained in the thread to which I pointed you. Here's a pic I swiped from another thread. I'd want my plumbing to look like this, with three-ways and sweep 90s, not two-ways (and with three-ways, there's one less valve per manifold):

IMG_1363.JPEG

Both Jim and Allen have significantly more pool knowledge and experience than I do, but I'm still gonna tells it likes I sees it... Armed with options you can figure out which works best for you and your pool... ;)
 
Last edited:
Dirk, the reason I did not suggest @Matt2369 to use two 3-way valves for the 3 pipes is the pipes are fit skimmer, vacuum cleaner, and main drain. I would think Matt needs to turn down the flow from the skimmer and main drain when the cleaner is turned on. It is difficult to get right and understand how to adjust the flow from 3 pipes using two valves. Using 2-way valves will make the constant valve adjusting more understandable.
 
I totally agree that the two-ways would make adjusting easier to do, and easier to comprehend. But I don't like how two-ways can completely close off the water supply to the pump (or coming out of the pump in the case of the return side) if they are all shut off inadvertently, either by children fooling around, or a well-intentioned adult that doesn't know, or remember, what they're doing. Matt should automate the cleaner at some point, like I did mine, and really take advantage of what proper valving and control systems can do for a pool, in terms of convenience. A three-way valve will be significantly more cost-effective to that end. Further, regarding ease of use, in my experience, it took a while to get the balance right with my three-way, but once I did, and once I automated that cleaner valve, I've never had to adjust the valve again. So I contend that, for the most part, the "ease of use" point becomes moot after the initial learning curve. And finally, because I believe that suction cleaner ports can be dangerous, I used my three-way to adjust my cleaner port to "share" suction with my skimmer, and then locked it down like that, so that in the [admittedly unlikely] scenario that a person gets caught by the suction port, the injury or entrapment will be minimized or eliminated because of the suction relieved by the skimmer.

And because I'm automated, my cleaner runs in the middle of the night, and so my suction port is never active during the day (swim time), making it safer still.

I will concede that these concepts are a bit "high-level" for new pool owners, and I'll more than admit that I tend to over-build and over-protect. But I think it's fair to share these concepts with folks that are in a position to utilize them, so that they can make up their own minds about what they want for their pool environment (in terms of safety, convenience and general best practice). I'm still stinging from the mistakes I made early on, because I didn't have access to a resource (like TFP) that could enlighten me. I have to still live with some early mistakes, and I've had to redo things to correct a few others... Matt can avoid some or all of those pitfalls if he's inclined to follow along with this dance. Or he can keep things simple.

Hats off to my sparring partner! :poke:
 
Last edited:
Well now that you explained to @Matt2369 the full story about using 3-way valves versus 2-way valves he can make a more informed decision if he wants a simple setup like he has had or dive into the setup you described.
 
  • Like
Reactions: Dirk
Thread Status
Hello , This thread has been inactive for over 60 days. New postings here are unlikely to be seen or responded to by other members. For better visibility, consider Starting A New Thread.