Pool Build in Northern CA - MORE pictures

kcarlile

Well-known member
Jun 7, 2020
76
Santa Rosa, CA
I've really enjoyed watching everyone else's builds, so I thought I would post some pictures of ours. We're building a rectangular 18x40 pool with 7x8 inset spa and automatic cover. Our dig took 12 days due to rock. We knew we would hit rock, but we didn't expect the amount and size of rock that we found. So, the planned 4 day dig became 12 days. We've just finished rebar and plumbing and are now waiting for inspection before gunite.

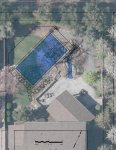
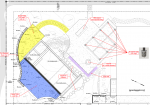
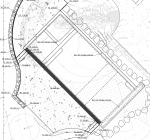
Here's a picture of our backyard before the dig started, along with our original pool plan (before we added an additional 4 ft to the length and expanded the patios). The last picture shows the whole concept for our backyard with new patios, bbq island, and firepit.
Before.jpgoriginalplan.jpgGradingplan.PNG
 
I forgot to add a pic of the "before" before. We used to have a play structure behind the tree that hadn't been used in a really long time. I think the pool is a much better use of space :)
Playstructure.jpg

Here are a few pictures before the build started. We had to remove a few trees and have others trimmed back.
BeforeTrees1.jpg BeforeTrees3.jpg

Here are pictures of Day 1 of the dig! You can already see the rocks and they were just leveling out the pool area at this point..
Day1.jpg Day1pic3.jpg
 
Here are some pictures of the dig process. They found more and more rocks. The rocks look much bigger in person.

Dig Day 2
Day2pic2.jpg Day2pic3.jpg
The pipe in the back is a well/irrigation line that had to be temporarily rerouted.

Dig Day 3
Day3.jpg

Dig Day 4
Day4_2.jpg
Can you see the hole in our fence? When we were having a tree removed, the tree company's equipment fell sideways and took out part of our fence. Luckily, the operator wasn't injured. So now we can add a new fence to our build too. ;-)
 
Day 13
Day13.jpg
Now, that they are done with the rock, the forms around the pool could be completed. Rebar and plumbing has started. This picture is very "orange" due to the smoke in the air from the Northern CA fires.

Day 14
Day14.jpg

Day 15
Day15.jpg Day15pic3.jpg
The wall in the back will be raised 2 feet with 3 sheer descents.

Day 16
Day16pic2.jpg
That's a lot of plumbing.
 
Wow... Looks like you had a pretty rocky start there.. Nice work getting a detailed grading plan. With all that added hardscaping you will need a detailed drainage plan to accept the storm/ surface water.
 

Enjoying this content?

Support TFP with a donation.

Give Support
You obviously didn't have too many concerns about caveins, however that has to be a huge relief to have that part behind you. I am curious about the upper patio. Most of the elevations on the plan you posted are not readable, however it looks like there is a 2-ft drop from the patio straight into the pool with no wall above the patio? Or does the wall stick up above the patio and those drops I see are flush with the patio?

Any chance of posting another pic of the grading plan that's a little more legible?

Thanks, Rich..
 
I've attached a few more pics with the elevations. Hopefully, these are easier to read. We have a two foot wall (RBB) where three sheer descents will come down. The upper patio is at the same level as the top of the wall. So, that patio is even with the top of the wall. We planned it that way so that our kids (teens) could jump off the wall into the deep end. And, that upper patio will serve as a sort of raised sun deck. We plan to put loungers on that patio. We will put a dining table on the lower patio by the spa. Our existing, covered patio closer to our house gets terrible sun in the early evening so we can't eat out there without the sun in our eyes. That existing patio will be an outdoor living room area.


Grading.PNG grading2.PNG
 
Pics are much better, Thanks.. There might be a bit of a safety concern with that 2' drop to the pool, especially at the sun shelf end, However that can easily be addressed later with some heavy concrete planters or some thing similar. I think it is smart to keep it open for now and figure that one out as time goes by.
How deep is the deep end? If you have 8' you could also add a jumping rock up there or a little more altitude. I have about a 4' drop to the water from my water fall and can safely do a deep dive.

A few suggestions on the upper patio... I think with the 2' wall above the pool having a 18" wall behind the patio would look aesthetically pleasing and give some additional seating up there. I would also tweek the grading of the patio. It looks like you have a almost level spot along the wall. You should be able to adjust the slopes so you will not need a drain against that wall. I always shoot for .75% slope for pavers you can go down to .5% with poured concrete. With a max of 1% and try to stay under 1.5% whenever possible. Just my Humble opinion... :)
 
I am late finding this wonderful build! LOVED your yard before! I am betting the new pool yard will be every bit as great!

Did you keep any of the bigger rocks? I think your build is one of the top rocky ones! There is only one other (can't find it right now) that beats yours.............they had to use explosives to blow up the rock! They took a video of it but the way the company did it was not "fun" LOL it only did a muffled boom and a slight rise of the cover they put over it.

You are at the part of the build where I share a set of links I put together for new pools!

The first set is all about what to do and ask about to get a great plaster job. The second set is all about how to care for your pool after you get the plaster.

Plaster links:
Ten Guidelines for Quality Pool Plaster Best one of all
All Plaster Finishes Should Last 20 Years
Not All Color Pigments are Good for Pools How to pick a good color for plaster.
A Plastering 'Watch List' | Professional Watershaping | Watershapes
Trouble Free Pool
Trouble Free Pool

Pool care links:
Print these out:
Pool School - Basic Pool Care Schedule
Pool School - Recommended Levels

Bookmark these:
Pool School - Recommended Pool Chemicals
Trouble Free Pool
Pool School - ABCs of Pool Water Chemistry

Now is also a good time to ask what test kit your PB will be providing so we can fill in any holes.

Kim:kim:
 
Pics are much better, Thanks.. There might be a bit of a safety concern with that 2' drop to the pool, especially at the sun shelf end, However that can easily be addressed later with some heavy concrete planters or some thing similar. I think it is smart to keep it open for now and figure that one out as time goes by.
How deep is the deep end? If you have 8' you could also add a jumping rock up there or a little more altitude. I have about a 4' drop to the water from my water fall and can safely do a deep dive.

A few suggestions on the upper patio... I think with the 2' wall above the pool having a 18" wall behind the patio would look aesthetically pleasing and give some additional seating up there. I would also tweek the grading of the patio. It looks like you have a almost level spot along the wall. You should be able to adjust the slopes so you will not need a drain against that wall. I always shoot for .75% slope for pavers you can go down to .5% with poured concrete. With a max of 1% and try to stay under 1.5% whenever possible. Just my Humble opinion... :)

Our kids would love a jumping rock, but the deep end is only 7 ft deep, so we figured they could just jump off the wall. We are considering making part of that back wall a seat wall. We were planning on adding that to the lower pool patio area near the spa. But, you have a good suggestion, and we might want to keep that upper wall going around the rest of the patio. I'll have my husband model it to see what it looks like. I'll have my husband check the slopes/drainage too. Thanks!
 
I am late finding this wonderful build! LOVED your yard before! I am betting the new pool yard will be every bit as great!

Did you keep any of the bigger rocks? I think your build is one of the top rocky ones! There is only one other (can't find it right now) that beats yours.............they had to use explosives to blow up the rock! They took a video of it but the way the company did it was not "fun" LOL it only did a muffled boom and a slight rise of the cover they put over it.

You are at the part of the build where I share a set of links I put together for new pools!

The first set is all about what to do and ask about to get a great plaster job. The second set is all about how to care for your pool after you get the plaster.

Plaster links:
Ten Guidelines for Quality Pool Plaster Best one of all
All Plaster Finishes Should Last 20 Years
Not All Color Pigments are Good for Pools How to pick a good color for plaster.
A Plastering 'Watch List' | Professional Watershaping | Watershapes
Trouble Free Pool
Trouble Free Pool

Pool care links:
Print these out:
Pool School - Basic Pool Care Schedule
Pool School - Recommended Levels

Bookmark these:
Pool School - Recommended Pool Chemicals
Trouble Free Pool
Pool School - ABCs of Pool Water Chemistry

Now is also a good time to ask what test kit your PB will be providing so we can fill in any holes.

Kim:kim:
Hi Kim - Thanks for the links! And yes, our pool builder actually kept a lot of our rocks off site. He said that we can look at them and bring back any that we want to use for landscaping and other features in our yard.
 
Last edited:
It's been a busy week! The coping started this week. Plus, our landscapers started working on some of the masonry items and plant demo. I've added some pics of our coping and in-progress seat wall.

I think the pool guys will start the ledgestone on the back wall of the pool next week and the masons will probably start the fire pit. And, they are starting to install our new fence next week too (all fence is getting replaced except the existing view fence). The progress has been fun to watch :)

Coping1b.jpg Coping2.jpg wall2b.jpg Wall2.jpg wallfence2.jpg
 
Last edited:
  • Like
Reactions: Turbo1Ton

Enjoying this content?

Support TFP with a donation.

Give Support
Thread Status
Hello , This thread has been inactive for over 60 days. New postings here are unlikely to be seen or responded to by other members. For better visibility, consider Starting A New Thread.