Outdoor kitchen build

schuetteknight

Well-known member
Nov 16, 2019
46
Melbourne, Florida
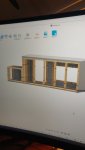
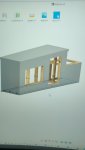
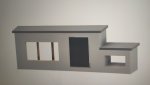
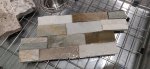
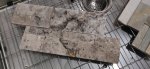
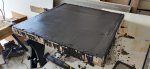
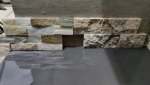
Waiting for the last few parts to come in for my outdoor kitchen build. I plan to use PT lumber for the build. Durarock and stone veneer for the outsize. Concrete counter tops with an undermount sink. I have the big door already waiting for the small door to get delivered.

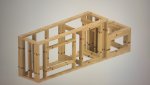
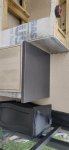
The only change I am going to make from the cad model is I am going to add feet to the bottom instead of having it sitting directly on the deck.
 

Attachments

  • IMG-20200415-WA0004.jpeg
    IMG-20200415-WA0004.jpeg
    109.7 KB · Views: 134
  • IMG-20200415-WA0002.jpeg
    IMG-20200415-WA0002.jpeg
    144.3 KB · Views: 136
  • IMG-20200415-WA0012.jpeg
    IMG-20200415-WA0012.jpeg
    186.1 KB · Views: 136
  • IMG-20200415-WA0010.jpeg
    IMG-20200415-WA0010.jpeg
    136.9 KB · Views: 131
Yeah I plan to pour myself. I have watched probably 100 videos on youtube so I think I'm basically a pro.

I plan to make a form using melomine. Use high strength concrete with flow additive. And a lot of black dye in the mix. Hopefully to get it really dark black/ charcoal grey. I'm not looking for a high polish I want it more "industrial"

Went to Lowe's Tonight. I think we are set on one of these 2 stone veneers I put them I'm my kitchen sink to wet them and see how they look next to the stainless. About 5$ a square foot. I didn't think it was that bad.
 

Attachments

  • IMG_20200511_181948.jpg
    IMG_20200511_181948.jpg
    318.9 KB · Views: 107
  • IMG_20200511_181944.jpg
    IMG_20200511_181944.jpg
    322.9 KB · Views: 109
Have you looked at MichaelBuilds videos on youtube. He has about the easiest counter top methods I have seen, using basic materials. No need to go and buy the high dollar Cheng stuff, or similar. Also, if have a decor and more tile store around you, they have about the cheapest verneer you will find.
 
Have you looked at MichaelBuilds videos on youtube. He has about the easiest counter top methods I have seen, using basic materials. No need to go and buy the high dollar Cheng stuff, or similar. Also, if have a decor and more tile store around you, they have about the cheapest verneer you will find.

The closest floor and decor is like an hour away in Orlando. I might still go over there if I have to make the trip anyway.

I have watched several of the Michael builds videos. It seems like sometimes he uses.high strength concrete mix and sometimes uses mortar mix. I'm not sure what I will use. But one of them. Definitely not the 20$ a bag concrete mix though.
 
Cement board installed. I'm going to build the counters this weekend so that I can have a nice detail with the stone to concrete transition where the BGE will sit.

I'm looking for some sort of composite material that I can make the feet out of. Right now I just screwed a couple of 2x4 together. Any ideas what I can use?

If I can't come up with anything I am going to make some molds when I do my concrete and make concrete feet.

I'm leaving that gap under it so that the deck drain in the concrete deck is not blocked. This Should help me to keep the deck clean.
IMG_20200514_191826.jpg
 
this might sound crazy but can u wrap the feet with same material as what u are covering the cement board with? not sure if that will look wonky but it will match. if not i would match them tot he countertop so its not another random material introduced.
 
When I built mine a while back, I used composite decking material that they sell at Lowes / Home Depot to make the feet. I just cut squares and then bolted them to the bottom. Since they are a composite plastic, they also allowed me to slide the island around a little better, to make the last adjustments. This will be a lot harder of course once the weight of the counters are on top.
 
Had a little time after work today. So I made a trip to HD to get supplies and started making forms for counter tops.

I am using the Michael builds method with standard rapid set mortar mix, quicrete charcoal coloring, and a little extra rebar to go around my sink cutout..

On thing I am trying I found in a different video. I can't find which one now. But I used my wife's cake tool (fondant tool?) To make smoothe the silicone. Apparently this makes a perfect radius and makes it so you don't have to do a super clean job up front. The idea is that the ball makes the radius silicon and the extra silicon seperate pieces . So I can hopefully peel away the extra and have a nice smooth radius. I will report back on how it is tomorrow when I peel off the excess. IMG_20200515_205648.jpgIMG_20200515_205648.jpgIMG_20200515_205801.jpgIMG_20200515_205808.jpgIMG_20200515_205749.jpgIMG_20200515_205648.jpgIMG_20200515_205808.jpgIMG_20200515_205801.jpg
 
The silicon worked nice. I used a utility blade to scrape off the extra and it turned out perfectly. I used 1 bottle of quickrete dye per bag of mortar mix. And I LOVE the color. Idk why but for some reason there is a shadow where I placed the rebar....

I need to decide on tile next leaning towards the right one. But I'm concerned with the porosity growing mildew over time. But I guess a quick pressure wash would take care of that.
 

Attachments

  • IMG_20200516_130819.jpg
    IMG_20200516_130819.jpg
    308.5 KB · Views: 199
  • IMG_20200516_114947.jpg
    IMG_20200516_114947.jpg
    310.2 KB · Views: 203
  • IMG_20200516_130819.jpg
    IMG_20200516_130819.jpg
    308.5 KB · Views: 204
  • IMG-20200516-WA0029.jpeg
    IMG-20200516-WA0029.jpeg
    415 KB · Views: 200

Enjoying this content?

Support TFP with a donation.

Give Support
Yeah I plan to pour myself. I have watched probably 100 videos on youtube so I think I'm basically a pro.

I plan to make a form using melomine. Use high strength concrete with flow additive. And a lot of black dye in the mix. Hopefully to get it really dark black/ charcoal grey. I'm not looking for a high polish I want it more "industrial"

Went to Lowe's Tonight. I think we are set on one of these 2 stone veneers I put them I'm my kitchen sink to wet them and see how they look next to the stainless. About 5$ a square foot. I didn't think it was that bad.
Looks like my quartz tile. We purchased from Lowes. Called Desert Quartz, and looks good next to stainless. 90E705E2-B3C7-45E6-86FF-1A459FDE581F.jpeg5E863752-E806-4F5E-898E-99A86ED5409A.jpeg
 
The silicon worked nice. I used a utility blade to scrape off the extra and it turned out perfectly. I used 1 bottle of quickrete dye per bag of mortar mix. And I LOVE the color. Idk why but for some reason there is a shadow where I placed the rebar....

I need to decide on tile next leaning towards the right one. But I'm concerned with the porosity growing mildew over time. But I guess a quick pressure wash would take care of that.
WOW. that looks awesome. I made a small test counter with rapid set mortar mix and it didn’t come out nearly as good as yours. What type of concrete did you use?
How did you get that shine? It looks beautiful.
thanks,
Joe
 
WOW. that looks awesome. I made a small test counter with rapid set mortar mix and it didn’t come out nearly as good as yours. What type of concrete did you use?
How did you get that shine? It looks beautiful.
thanks,
Joe
I used rapid set mortar mix. But I took my demo hammer to the mould while the mix was wet to ensure all of the bubbles got worked out. When it's dry it's pretty matte. But I bought some wet look sealer hoping to keep the dark color and the shine.
 
  • Like
Reactions: Aquaman7
Looks good! The charcoal color we added seemed to fade a little when it was dry. I poured ours in place just because of the shape

I bought some armor ar350 sealer Hoping it will penetrate and make it stay dark. I haven't applied it yet Cause its been super rainy around here. But I will report back once I do.

I did make 2 mistakes when I made the bigger piece. First I did not have any draft angle on my sink knock out. This made it really hard to get out. Also I did not use the set control to slow down the cure. I should have cause by the time I mixed up my 4th bag the 1st bag was already setting up fast in the mould. I still got a good surface finish but i panicked and forgot the rebar around the sink. These 2 errors led me to break the end off when I was trying to get the sink knock-out removed.

After several colorful words I figured I should try to salvage before I scrap the whole thing. I ended up getting out the 5min JB weld and clamping the whole thing together. The color is really close to the concrete but def not perfect. In the end I decided to roll with it cause I'm lazy. And in the future if it bothers me I will re do it then.
 
  • Like
Reactions: WattsZ

Enjoying this content?

Support TFP with a donation.

Give Support
Thread Status
Hello , This thread has been inactive for over 60 days. New postings here are unlikely to be seen or responded to by other members. For better visibility, consider Starting A New Thread.