Fulshear, Texas - Complete!

.ben

Well-known member
Jul 28, 2020
150
Katy, TX
Pool Size
17000
Surface
Plaster
Chlorine
Salt Water Generator
SWG Type
Hayward Aqua Rite Pro (T-15)
Contract signed!
(Total price is mid $90’s which is in line with other bids)


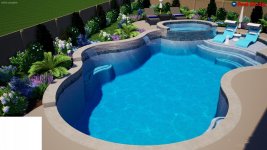
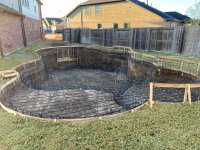
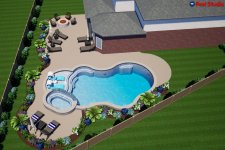
Pool Size ………………………… 40' x 18' 6"
Pool Area ………………………… 595 Square Feet
Pool Shape ………………………… Free Form
Pool Perimeter ………………………… 106 Linear Feet at the Waterline
Pool Depth ………………………… 3' 6" x 5'-6' [to water depth]
Spa ………………………… Deluxe Spa Package 18" Raised; Outside finished in spilt face travertine; Contoured Seats; Roll Edge; Reverse Vanishing Edge spillway finished in Glass/Mosaic Tile ($12 Allowance)
Spa Perimeter ………………………… 28 Linear Feet
Plaster Finish ………………………… Pebble Sheen Level 1
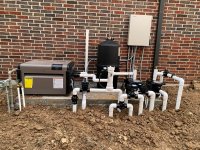
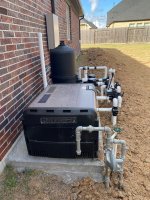
Filtering System ………………………… Hayward Cartridge Filter by Hayward 525
Filter Pump ………………………… Hayward Variable Speed Pump
Booster Pump ………………………… TriStar by Hayward High Performance Pumps 2 HP
Cleaning System ………………………… None (homeowner to purchase robot)
Heater ………………………… 500,000 BTU Hayward H- Series Low NOX Induced Draft Heater
Air Blower ………………………… Hayward Blower 1 HP
Coping ………………………… Cross Cut Travertine 3cm Paver (shell beach)
Waterline Facing ………………………… Glass/Mosaic Tile ($12 Allowance)
Pool steps ………………………… custom to plan
Pool bench ………………………… custom to plan
Sun shelf ………………………… custom to plan
Skimmers ………………………… 2 Hayward automatic Skimmers
Pool returns ………………………… 6 directional (included eyeball fittings)
From PB: 2.5" Suction from pool to equipment schedule 40 pvc; 2" from equipment to pool schedule 40 pvc
Sanitization ………………………… Hayward T-cell-15
Controls ………………………… Hayward Omni Logic(does not include remotes) iPhone/iPad compatible; download Hayward App
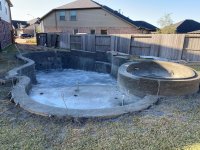
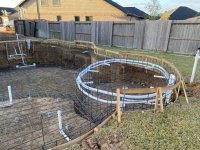
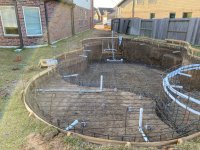
Equipment foundation ………………………… Concrete
Steel reinforcement ………………………… 4 - 1/2" bar bond beam
Floor and walls 8" O.K. with 3/8" rebar
Drain System ………………………… Deck Drain Pipe (4" PVC) to the front curb with pop up
………………………… 8 Area Drain Grates (4" sir)
Maintenance equipment ………………………… 8' - 16' telescoping pole, 35' vacuum, net, brush, etc.…

Visual Feature 1 ………………………… 22' of 12" Raised Beam Wall finished in Spilt Face Travertine; 11' of 6" Raised Beam
Wall finished in Spilt Face Travertine; backside finished in Spilt Face Travertine


Visual Feature 2 ………………………… Three (3) 18" Sheer Descents

Visual Feature 3 ………………………… Finger Ledge

Visual Feature 4 ………………………… One (1) Bubble Jets

Visual Feature 5 ………………………… Spa Spillway

Decking ………………………… Total New Decking 1134 Square feet Finished in Sun Decking Straight;

Existing Decking ………………………… Capping Existing Decking -Capping 188 Square Feet in Sun Decking Straight;

Lighting …………………………………. pool: Two (2) Hayward LED Color Logic Pool Low Voltage Lights

…………………………………. spa: One (1) Hayward LED Color Logic Spa Low Voltage

Unsure if we want to add an additional light in pool. Cost will be $800

Sod ………………………………………………Replace damaged sod due to installation
Landscaping and Sprinklers ………………………… Repair damaged Sprinklers due to excavation
Fence ………………………… Reinstall Fence used for excavation
Sleeves ………………………… Umbrella sleeves
Misc. ………………………… Fill Line
Misc. ………………………… Gas Fire Pit 5' diameter x 18" Raised finished in Spilt Face Travertine Manuel Lite; includes lava rocks, stainless steel fire ring; risers, key
Equipment Location ………………………… All Electrical and Gas Lines and Hookups to the Equipment is included; Client is
responsible to call and upgrade the Gas Meter with CenterPoint once the pool is complete, Typical cost is $350 for this service; Equipment Pad is located on the same side of the yard as the Electrical and Gas Meter

Cleaning Equipment:
8’-16’ telescoping pole, vacuum head, 35’ hose, plastic wall brush, leaf net, 2 in 1 test kit.

Plumbing and Electrical:
All pressurized pool plumbing around pool and at equipment run with Sch. 40 PVC pipe. Gas supply to pool equipment performed by Contractor. Where a backwash line is required it will be run to a sanitary sewer with a p-trap. Electrical to equipment and Lighting performed by Contractor.
 

Attachments

  • render1.jpg
    render1.jpg
    429.2 KB · Views: 214
  • dim plan.jpg
    dim plan.jpg
    292.1 KB · Views: 208
Last edited:
  • Like
Reactions: Jill F and renesme
Edit: Decided to keep these water features
 

Attachments

  • render2 - Copy.jpg
    render2 - Copy.jpg
    320.9 KB · Views: 135
Last edited:
Ben,

Even a 40K cell is a little on the small size for your pool, but it is a big as Hayward goes... We always recommend that a cell be rated for at least 2 x the pool volume.. You need a T-15 (40K ) cell..

I am not a fan of too many water features.. After a week you will find them too noisy to run most of the time.. You need to be able to walk around your whole pool with a leaf rack.. I'd want the plants moved back away for the pool and small "sidewalk" deck in-between the plants and the pool..

Robot for sure as you have noted..

I like the large cartridge filter and VS pump..

2 skimmers and 6 returns are great...

Have you ever been in a gunite spa before???

Thanks,

Jim R.
 
Thanks for the tip about landscaping! All landscaping shown is for example only - it’s not included in the bid and honestly, we have not thought much about landscaping… I like the idea of a sidewalk or maybe a loose rock behind the pool.

Will definitely go with the 40K cell.

We have been in a concrete spa before and found it enjoyable. We are unsure at this point the depth of spa and seat heights and placement of jets.
 
Curious if others have any feedback. We've asked to round the pointy edge near the shelf. I think it'll look better rounded.

We decided no poured concrete behind the pool. We may lay some loose pavers on our own behind the pool to step on while cleaning. They will be hidden behind the wall so it doesn't need to look perfect.

Also decided to keep the look of the stepped raised beam as-is.
 
The layout and design looks beautiful. I'm new to all this and elbow deep in our build. Just pointing a few items that I wish I addressed earlier than later.

1) I wish I went at least 10' wide on the baja shelf, not sure your dims, but we went 8' and it will be tight with two chairs.
2) I've heard umbrella sleeves are nice for add-ons, we did three.
3) Smaller "Bullet lights" on the baja shelf are nice.
4) OmniLogic is very cool software, with lots of bells and whistles. If my PB was more familiar with Hayward equipment I would have chosen that.
5) Two skimmers is a good choice...look at some of the hidden skimmer covers.
6) We were use to an above ground spa, and I wish I looked into some of the therapeutic spa jets. Look up CMP Jet Array. We did a 20" deep spa seat (seat to waterline).
7) Laying that much deck I'd recommend installing (2) 2.5" diameter PVC sleeves under the deck for future running of wires, or irrigation.
8) Didn't see Auto fill/drain. In Texas you will probably want this (high heat and evaporation / heavy rains).
9) Equipment is difficult to get here in CA. I'd recommend ordering ASAP and storing it in your garage if you can.
Thanks for the advice!

Our shelf is just about 10' wide so it sounds like we should be good.
We do plan to install umbrella sleeves. Have not though about exact locations at this time
We do have auto-drain. (I believe it may be required in my city limits). We went back an forth about auto-fill and decided against it. PB will install a manual-fill spigot to make it a little easier to maintain water volume.
 
Curious if others have any feedback. We've asked to round the pointy edge near the shelf. I think it'll look better rounded.

We decided no poured concrete behind the pool. We may lay some loose pavers on our own behind the pool to step on while cleaning. They will be hidden behind the wall so it doesn't need to look perfect.

Also decided to keep the look of the stepped raised beam as-is.
Very nice design and fit for your space.

I think you decided to keep the water features. Based on what I read, you only have the single circulation pump for the pool and all water features. There is a booster pump but it may be allocated only to the suction cleaner and if you remove that the booster pump may be removed as well. So need to verify. When you are in Spa mode, your water features will not be able to operate because they flow back to the pool because in Spa mode, you have suction from the spa and return only to the spa. So if you wish to have the water features on while in spa, you may need to have a second water feature pump and a separate suction for that pump. Something to discuss with your PB before you get to far into the laying the plumbing.

Also, try to enlarge your equipment pad to space out your equipment for easy maintenance and add a light above it.

The Tri Star 2 HP booster pump remained after we removed the suction cleaner. I will make note to ask the PB about using the water features and spa at the same time. Thanks!
 
Excavation to start Thursday or Friday! We were not expecting to get started this soon but happily surprised!

Edit: Friday was confirmed but then got pushed back by "a day" due to rain
 
Last edited:

Enjoying this content?

Support TFP with a donation.

Give Support
Excavation to start Thursday or Friday! We were not expecting to get started this soon but happily surprised!
Hi. I’m also in Katy off of 1093 and 1463. Your plans look really nice. Exciting to hear that dig day is near. Take lots of pictures especially of plumbing and where the pipes are laid around the pool.
I started my build last December and finished at the end of March this year. Lots of delays and then the freeze happened in February. Thankfully there was no damage to the plumbing from the freeze. Hoping you have a smooth process during your build.
 
  • Like
Reactions: HermanTX
Need help with depths and slopes! We want to maximize the amount of "play" area, so we are hoping to keep the 6' portion fairly small. The 6' is just for us to (safely) hop in, and it may be fun for our toddler to swim to the bottom when he is older.

My thought is to have a very gradual slope from 3'-9" to 4'-3" then transition to a steep slope (about 1:3) down to 6'. Does this make sense? We have never owned a pool before.

PDF Attached. We have not discussed this with the PB yet but we told him we wanted to minimize the amount of deep end.
 

Attachments

  • PROFILE SKETCH_two slopes.pdf
    127.3 KB · Views: 42
Need help with depths and slopes! We want to maximize the amount of "play" area, so we are hoping to keep the 6' portion fairly small. The 6' is just for us to (safely) hop in, and it may be fun for our toddler to swim to the bottom when he is older.

My thought is to have a very gradual slope from 3'-9" to 4'-3" then transition to a steep slope (about 1:3) down to 6'. Does this make sense? We have never owned a pool before.

PDF Attached. We have not discussed this with the PB yet but we told him we wanted to minimize the amount of deep end.
I would keep the whole end at 6 feet for jumping in - not just the sliver you have now... or just don't go to 6 feet. It would seem odd to me to have that slope profile in the deep end. Plus when you jump in you would have to aim for the section closest to the wall? That seems a bit off.

But I have only owned diving pools so I have a fairly small shallow end and a large deep end - it is a "swimming" pool after all :) ...
 
  • Like
Reactions: HermanTX
I would keep the whole end at 6 feet for jumping in - not just the sliver you have now... or just don't go to 6 feet. It would seem odd to me to have that slope profile in the deep end. Plus when you jump in you would have to aim for the section closest to the wall? That seems a bit off.

But I have only owned diving pools so I have a fairly small shallow end and a large deep end - it is a "swimming" pool after all :) ...
I would concur with @joepaiii If you have a deep end it has to be big enough from the end of the pool to the middle to be safe or have the deep section in the middle and ramp up to the wall as well as ramp up to the shadow end.
 
Thanks for the tip about landscaping! All landscaping shown is for example only - it’s not included in the bid and honestly, we have not thought much about landscaping… I like the idea of a sidewalk or maybe a loose rock behind the pool.

Will definitely go with the 40K cell.

We have been in a concrete spa before and found it enjoyable. We are unsure at this point the depth of spa and seat heights and placement of jets.
 
Thanks for the feedback on the slopes. I didn't understand how the pool needs to slope until now.

We talked it over with the PB and ended up changing the depth profile from 3'-9" to 5'-6". (Actually starts at 3'-6" at the step but then goes to 3'-9" at the back of the pool). It slopes gradually at first till around 4'-3" then slopes sharper to 5'-6". We are happy with this decision, especially after the dig.

Rebar starting today!
 
  • Like
Reactions: HermanTX
Update:
Gunite applied November 18
Plumbing/Electrical runs completed recently
Glass Tile/Coping to start this week!
 

Attachments

  • 4.jpg
    4.jpg
    793.8 KB · Views: 75
  • 3.JPG
    3.JPG
    875.8 KB · Views: 75
  • 2.JPG
    2.JPG
    847.3 KB · Views: 68
  • 1.JPG
    1.JPG
    951.7 KB · Views: 73
Should the salt-cell be visible at the equipment pad? (No idea what it would look like)
Is there a way to verify that the T-15 is installed (we upgraded to T-15, and PB does not do many SWCG pools)
 

Attachments

  • 5.JPG
    5.JPG
    880.8 KB · Views: 87
Should the salt-cell be visible at the equipment pad? (No idea what it would look like)
Is there a way to verify that the T-15 is installed (we upgraded to T-15, and PB does not do many SWCG pools)
It is a very tidy equipment pad. Great work by the plumber.

The SWCG should be on the exit side of the heater. The picture does not show a top view. See the pipes coming from the heater. There appears to be something on that horizontal pipe, leading to the 3 way valve. Cannot see behind the black 3 way valve. Then it splits the return flow. The left pipe is to the Spa jets (it has a check valve) and on the right side is the return to pool. Now that horizontal pipe shows an inline chlorinator. Maybe the PB is planning to use that for the first 30 days before you can turn on your SWCG. The inline chlorinator is for use of trichlor pucks. You will not use that once you have the SWCG operational.

Take a top view of the equipment pad which shows the inlet and outlet pipes to the heater.
 
Thanks for the explanation Herman! I don't have any photos from the top on hand but I've attached the side pics. It's hard to see the inlet/outlet pipes to the heater in these photos though. I'll have to take a picture from above later.
 

Attachments

  • 6.JPG
    6.JPG
    676.2 KB · Views: 70
  • 7A.JPG
    7A.JPG
    627.2 KB · Views: 70

Enjoying this content?

Support TFP with a donation.

Give Support
Thread Status
Hello , This thread has been inactive for over 60 days. New postings here are unlikely to be seen or responded to by other members. For better visibility, consider Starting A New Thread.