Umm, what's with the novel???
I wanted to write out my story on putting together a very functional (thanks to all the folks here) automated liquid chlorinator for three reasons: (1) I'm proud of it, and I want to thank the folks who helped me; (2) to share the problems I experienced to help others prepare well; and (3) to share specifically what I bought, so that others can use it as a reference when putting together their parts/purchase list to get a full picture ahead of time (note that YMMV for the parts, because your situation may be different).
I hope that I've organized it in a way that many can benefit based on their needs. I doubt many will read it all the way through, I'm completely good with that. If you get *anything* valuable out of this post, I'll be happy.
Without further adieu…
Why Build an Automated Liquid Chlorinator
If you just want to get to the story/problems/list, feel free to skip right over this section…
As with most DIY project, it starts with a need, or a desire to make something nicer or better. I wanted both! In my first full year of pool ownership, I used chlorine pucks and shock. Why? Because I didn't know any better. The pool was operational the first week of Nov, 2018--just in time to not use it. Around mid-summer 2019, I noticed the first signs of algae. It got out of hand very quickly, and I didn't understand why--I had all three of green, mustard, and black algae. I tried shocking it, to no avail.
This is when I discovered TFP! I performed the SLAM, which took about 2 weeks, and was very tedious. I read up on the theory of the SLAM and how I likely got to the point of algae (wasn't keeping enough chlorine to match my CYA, because no local pool company selling you products is going to tell you this). After seeing the results of the SLAM, I decide I was going all liquid bleach from then on out.
Over the next 8 months, proceeded to manually add liquid bleach about every other day in the swim season. I was very studious about it, but I'll admit, it got old after a while. Oh, I also had to do a water replacement this spring, because the CYA was around 90 from the previous summer when I had algae, and I didn't want to keep that much chlorine in my pool. Once COVID-19 hit, and I was working from home for months, I lost my routine and found I had a hard time remembering if/when I added the chlorine--a scary place to be for someone who had a battle with algae.
For some silly reason, I though, "you know, if I had a way to automatically inject chlorine at a certain amount and interval, that would be amazing--wait, that would be a great invention!" Thankfully, it had already been done, so I didn't have to invent anything--I could follow the lead of other clever folks around TFP!
Research & THANK YOUs
Now that I realized many folks had already done this, I started my research. I looked for different people who had created a similar setup (such as @GDN's full story). I also found folks that had automated systems already in place, like an EasyTouch8 (ET/ET8) from Pentair (such as @bdavis466, as well as @GDN's post here), which is what I have. I discovered from Marty (@mknauss) that chlorine loses it's effectiveness with heat (see this page and this post from @chem geek), so I found folks who had buried their barrel (like @RonsPlc posted here and here, and @jonpcar posted here). Once I'd gathered plenty of information, I started spec'ing out my build, because I wanted to ensure I got everything I needed (at least close to it) before I started, so that I could do it all in a day or two.
Planning Ahead, Parts List, and Ordering
I thought I did a pretty good job planning ahead, but there were still several things I missed. Maybe providing an explicit list here will help others.
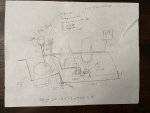
I started with drawings and measurements to know how much of each material I needed. Then I ordered the items I couldn't buy locally, and started making a list of all the parts.
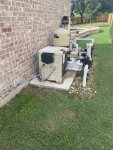
Here's the before pic and drawing...
Measurements
Plumbing - Pump & Drum
Plumbing - Injection
This was probably the most frustrating part of the project--trying to get all the connectors/adapters right for injecting into the pool lines. I measured correctly, but they didn't end up having certain connectors I needed (assumed existed), so I spent probably 1-2 hours trying to put together something that would work. You also have the option of drilling a hole into a pipe, which turns out might actually be easier, but I didn't want to do that. With that in mind, I'll list the parts here, and the explanation later.
Running power
Easy Touch 8 (ET8)
Final Touches at Drum
Tools Used
Problems Encountered
No project I do every goes according to plan. Thus, I figured it might be worth listing the things I didn't plan for.
The Story
I can't write this much without giving some form of a narrative. The idea for this is to walk you through the order in which I did things, and to provide a little more context for some of the info listed above.
Like I said, I planned more for this project than any other home project I've done. I did a ton of research and asking questions ahead of time, because I wanted to get through this as quickly as possible. Thus, I started drawing the plan, doing the measurements, making the list, etc., all of which is noted above.
Part 1 - Burying the Drum
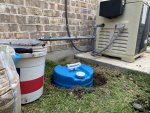
The first step to took was digging the hole for the drum, because I knew that would be the most labor intensive. I measured out where to put it, spray painted around it to mark it off, and started digging. As mentioned in the problems list, I ended up hitting a line when digging, but I was able to adjust with little effort. Thankfully, I didn't hit any big rocks like every other whole I've dug in the past in my yard, which was a huge blessing. (Austin, TX has a lot of limestone.) This took several hours, because I dug a 24" hole. I did this in the afternoon of day 1. It hadn't rained in about of month, so of course, it flash flooded that night. This turned out to be a blessing as well, because it pointed out two things: (1) when water gets around it like that with little liquid in it, it floats; and (2) the dirt adhered to the sides of the drum, making it very difficult to get out, even though it wasn't fully buried. This is when I decided I would put a casing around it to avoid problem #2, and put metal edging around it and build a wood cover for it to address #1. I had to re-dig some of the hole because of the rain, but it didn't take long. I then added the sheet metal and sand, and dropped the drum in. Part 1 complete!
Part 2 - Electrical
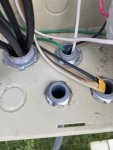
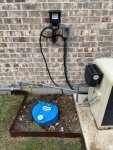
I then started to tackle the electrical portion. Honestly, I was hoping this would be relatively fast, because I've installed receptacles before, and running a conduit can't be that hard right? Mostly right, with the big caveat of fishing the wires through the conduit, and working out the breaker problems (see the problems section above). Rather than tell you what I did, I'm going to tell it as I would have done it to avoid the problems of fishing the line through. So, do NOT start with mounting the conduit. Start with fishing the wire through it. Be sure to leave extra wire on both ends for the outlet and for the ET8 connection. If you have trouble getting it through, use something stiff to fish it through. Once that's done, I then connected the line to the ET8. That way if I miss-measured, I'll have to adjust the placement of the outlet, but I won't have to unmount the outlet b/c it doesn't reach the ET8. Now, when I knocked out the punch-out to create the hole in the ET8, the ring which held the punch-out became loose. This made the connection unstable and showed potential for water getting through. This is when I had to go to the store to find something to cover that, but was thin enough to still screw down the connection. It's the top right connector in the pic below.
Next, I mounted the weatherproof outlet cover. Again, if you don't have a hammer drill, buy one, even if you never think you'll use it again. I've done 2 projects now trying to drill through brick without one, and it just didn't work. I finally decided to buy the cheapest I could find for this project ($22 from Harbor Freight), and it ate through the brick like butter! Didn't need to be fancy, just functional. Also, remember to keep your original measurements in mind. Once I got that mounted, I connected the conduit, cut the excess wire, and installed the receptacle. Finally, I put the plug in the top to keep rain water from standing. Probably not necessary, but I just didn't want to take any chances of a leak since that is a punchout type hole.
Now I mounted the chemical pump. Be sure to orient it the correct way, and if you have the rain mount, put that on. Once this was hooked up, and I finished the instructions from the pump, I tested the power and the pump. This brings me to the ET8 modifications.
Part 3 - EasyTouch 8 Configuration
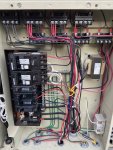
As I stated previously, I didn't want the chemical pump to be able to run without power to the main pump. However, to test the outlet, I just plugged up the wires according to the diagrams I'd found. Note that what I'm about to describe DID NOT WORK, but I want to mentioned it in case anyone else were to try it this way, hopefully they'll find this in a search. I connected the neutral wire of my 120v chemical pump to the neutral bus bar, and one load line from the 220v breaker. This caused the breaker to immediately trip, because you can't steal power from leg of a 220v GFCI breaker. The fix was to plug the neutral wire into the neutral terminal of the GFCI breaker (which, with some reading online will complete a 120v circuit), and voila! We're up and running! However, I'm now hard-wired directly to the power, which is not really what I wanted, but I needed to ensure the outlet and pump worked appropriately. To make this change, I connected a new relay running the LINE side of the main filter pump relay to the LOAD side of the new relay. By using the LINE side of the filter pump, we ensure that no power will get to the new relay unless power was ON for the filter pump relay. I then ran the LINE side of the new relay to the chemical pump. Tested it out by turning the filter pump relay on, then the chemical pump relay, and it worked. Then, I left the chemical pump relay on and turned off the main filter pump. … And we're golden! For details on a full discussion on this troubleshooting and final setup, see this thread.
Part 4 - Chemical Pump, Drum, and Pool Line Injection
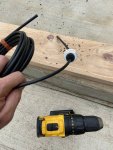
OK, outlet, pump, and ET8 are all installed and working properly. Now I'm ready to drop the line from the chemical pump to the drum. I needed to seal off where I was going to drop in the chemical line, so I used a threaded 3/4" to 1/2" reducer and a rubber stopper/plug. I drilled a hole in the rubber stopper (note that this took a while, because I didn't want it to be too big, but I needed to be able to pull the chemical hose through it). This was a bit of trial and error, slowly making the hole bigger until I could just barely pull the hose through it. Keep in mind the recommendation from the chemical pump instructions to not drop the line to the very bottom on the drum, so as to avoid debris. I then dropped this into the drum, fished the hose through the larger hole in the drum so I could add the filter to the end of it (my pump came with a filter to help avoid debris buildup), and then taped the reducer with plumbing tape, and screwed it into the drum. Chemical line set!
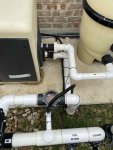
Next, I connected the hose to the other side of the pump for injection into my plumbing line. Again, this wasn't as simple as it should have been. I wasted tons of time trying to make pieces fit without using cement and PCV pipe, because I thought I could get the right number/type of connections/reducers to connect the chemical pump injection check valve. Turns out, I couldn't. YMMV. Once I confirmed all the connections would work, then filled the drum with chlorine and tested the pump before connecting to the pool line. Once chlorine output was confirmed (didn't have any problems here), I connected the injection check valve and was good to go!
For clean-up, I put the casing around the chemical hose and used the tie straps to keep the hose from moving around.
==> PROJECT "COMPLETE" !!!
Part 5 - Finishing Touches
At this point, the project was "done" from the perspective of an automated liquid chlorinator, but I wasn't done. First, I wanted to try to avoid rain/flood water from getting near the drum. Second, I didn't want to have to unscrew the larger cap to the drum every time I wanted to add chlorine, because (a) it was difficult to turn; and (b) every time I take it off, I run the risk of not sealing it well when screwing it back on; which leads to (c) I needed to seal it off well at the connection with the drum, but still allow it to breath, without having to worry about flood water getting in. So, I finished it out address these points.
First, I added the edging. I'd previously measured out how much I needed and bought the materials, so I shaped it as needed and formed a box around the drum. I then filled in around the drum with sand and rock to make it look nice. I now have a solution for general flooding, however, I this doesn't address rain water from the roof (don't have gutters in this area).
Next, I built a wood cover for the drum, so that rain water would run off before dropping into the area where the drum was, which would be a problem for build-up now that I have the edging in place. I created 4 legs with the 4"x4"x8', cut the right size from the plywood, and built a four-legged covering. It's not fancy, but it's good enough. This didn't go quite as planned, either, because I didn't realize my gas pipe for the heater was going right across where I'd planned one of the legs, so I got to redo that part. Wasn't too bad, though, and now I have my covering.
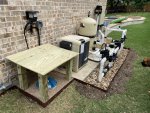
Finally, to solve the sealing / adding chlorine annoyance. I measured how much PVC pipe to cut so that, after the elbow, the top would stick out just past the underside of the wood "cover" I built. I made sure to make it as tall as possible to avoid water, because I didn't want to cement the elbow, to make it easier to seal off at the drum (so I didn't make it tight, and then the elbow be pointing in the wrong direction). I cut the pipe, cemented the threaded/slip adapter to the pipe, and let it dry. Then, I taped the threaded adapter and screwed it into the drum. I then cut the next PVC pipe and put it into the elbow and the elbow on the pipe that's connected to the drum. Last, I added the cap.
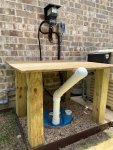
And now, I'm done!
Result
I'm super pleased with how this all turned out. After only 4 weeks of the setup, I took a 1 week trip, and it worked flawlessly while I was gone. The only problem I've had since installation was miscalculating when I add chlorine to the drum, and I went about 12 hours with little to no chlorine in the pool. I won't make that mistake again. You can consider that USER error!
As far as the pump, the ET8, the schedule, and the chlorine, everything has worked without a hitch. I check the water every 2-3 days, and I adjust the schedule, if needed, but it really only took about 2 weeks to get it adjusted just perfectly.
One more thing to keep in mind--if you run the chemical pump during a time when people may be swimming, be sure not to change anything in your automation that would turn off the pump; or, be sure to make a manual adjustment for that day.
Well, if you made it here to the end, bravo! Thanks for allowing me to share my story, I'm quite proud of my automated liquid chlorinator, but I NEVER could have done this without the wonderful folks here on Trouble Free Pools. Thank you to each of you who helped me along the way. I hope this post ends up helping someone else!
I wanted to write out my story on putting together a very functional (thanks to all the folks here) automated liquid chlorinator for three reasons: (1) I'm proud of it, and I want to thank the folks who helped me; (2) to share the problems I experienced to help others prepare well; and (3) to share specifically what I bought, so that others can use it as a reference when putting together their parts/purchase list to get a full picture ahead of time (note that YMMV for the parts, because your situation may be different).
I hope that I've organized it in a way that many can benefit based on their needs. I doubt many will read it all the way through, I'm completely good with that. If you get *anything* valuable out of this post, I'll be happy.
Without further adieu…
Why Build an Automated Liquid Chlorinator
If you just want to get to the story/problems/list, feel free to skip right over this section…
As with most DIY project, it starts with a need, or a desire to make something nicer or better. I wanted both! In my first full year of pool ownership, I used chlorine pucks and shock. Why? Because I didn't know any better. The pool was operational the first week of Nov, 2018--just in time to not use it. Around mid-summer 2019, I noticed the first signs of algae. It got out of hand very quickly, and I didn't understand why--I had all three of green, mustard, and black algae. I tried shocking it, to no avail.
This is when I discovered TFP! I performed the SLAM, which took about 2 weeks, and was very tedious. I read up on the theory of the SLAM and how I likely got to the point of algae (wasn't keeping enough chlorine to match my CYA, because no local pool company selling you products is going to tell you this). After seeing the results of the SLAM, I decide I was going all liquid bleach from then on out.
Over the next 8 months, proceeded to manually add liquid bleach about every other day in the swim season. I was very studious about it, but I'll admit, it got old after a while. Oh, I also had to do a water replacement this spring, because the CYA was around 90 from the previous summer when I had algae, and I didn't want to keep that much chlorine in my pool. Once COVID-19 hit, and I was working from home for months, I lost my routine and found I had a hard time remembering if/when I added the chlorine--a scary place to be for someone who had a battle with algae.
For some silly reason, I though, "you know, if I had a way to automatically inject chlorine at a certain amount and interval, that would be amazing--wait, that would be a great invention!" Thankfully, it had already been done, so I didn't have to invent anything--I could follow the lead of other clever folks around TFP!
Research & THANK YOUs
Now that I realized many folks had already done this, I started my research. I looked for different people who had created a similar setup (such as @GDN's full story). I also found folks that had automated systems already in place, like an EasyTouch8 (ET/ET8) from Pentair (such as @bdavis466, as well as @GDN's post here), which is what I have. I discovered from Marty (@mknauss) that chlorine loses it's effectiveness with heat (see this page and this post from @chem geek), so I found folks who had buried their barrel (like @RonsPlc posted here and here, and @jonpcar posted here). Once I'd gathered plenty of information, I started spec'ing out my build, because I wanted to ensure I got everything I needed (at least close to it) before I started, so that I could do it all in a day or two.
Planning Ahead, Parts List, and Ordering
I thought I did a pretty good job planning ahead, but there were still several things I missed. Maybe providing an explicit list here will help others.
I started with drawings and measurements to know how much of each material I needed. Then I ordered the items I couldn't buy locally, and started making a list of all the parts.
Here's the before pic and drawing...


Measurements
- Estimated placement of chemical pump
- Estimated placement of drum/barrel for chlorine
- If burying, be sure to consider possible plumbing and electrical; might want to start this before you're ready to finish the project, in case you hit something and have to adjust the placement and then have to buy more materials
- Estimated injection point for chlorine injection into plumbing lines
- Measurement for conduit run to chemical pump
- Measurement for Electrical run for power to chemical pump
- Should be longer than the conduit so you have room to connect to receptacle and to ET8 breakers/relays
- Measurement for placement of drum & suction line to chemical pump
- Measurement for chemical pump to injection point into plumbing
- NOTE: Based on your measurements, you may need to buy extra tubing for your chemical pump, so keep that in mind when buying/placing, because I was really close
- One other thought: If you want to make the setup look clean, either make precise measurements up front along the exact path you want to lay the lines, or buy a little extra for headroom to make changes.
Plumbing - Pump & Drum
- *Chemical Pump (Stenner 45MPHP10)
- Rain cover for pump--you don't want this getting wet, so if you don't buy the cover, be sure you can place it in a location to avoid rain
- *Extra tubing, if needed
- Hammer Drill -> If you're drilling into brick, this is a MUST
- Casing for tubing, if you want to cover it to protect it (see pic)
- Tie straps (plastic)
- *Drum for chlorine
- Casing for drum (if burying)
- Sand to put under drum (if burying)
- For drum- Connector for chemical line injection (I got a reducing adapter and a rubber plug)
- For drum - Adapter for the larger plug where chlorine will be poured. This was a threaded male to female slip adapter.
- PVC pipe for connector above
- PVC elbow (see pic) -> This was to make it easier to pour the chlorine
Plumbing - Injection
This was probably the most frustrating part of the project--trying to get all the connectors/adapters right for injecting into the pool lines. I measured correctly, but they didn't end up having certain connectors I needed (assumed existed), so I spent probably 1-2 hours trying to put together something that would work. You also have the option of drilling a hole into a pipe, which turns out might actually be easier, but I didn't want to do that. With that in mind, I'll list the parts here, and the explanation later.
- Threaded cap to replace the rainbow chlorinator
- Threaded male to slip female coupler connecting to the injection point of the rainbow chlorinator (so I didn't have to drill a hole)
- 1" PVC pipe
- Slip to threaded elbow (because I didn't have space to go directly into the line)
- Reducing coupler for connecting the pump injector
- Primer & cement for PVC pipes
Running power
- 3/4" outdoor conduit (25')
- 3/4" (2x) screw-type adapter to connect to the ends of the conduit for the ET8 & outlet
- Outdoor weatherproof receptacle (to match 120v or 220v pump)
- Outdoor receptacle housing
- Outdoor receptacle housing cover
- Cap to plug one of the receptacle housing holes to avoid collecting water
- Electrical wire (yellow)
- Screws to mount the housing cover to a brick wall
- Brackets to mount the conduit against the brick wall
- Screws for the brackets
Easy Touch 8 (ET8)
- Plan your wiring/connection in the ET8 (you may need a breaker; I didn't)
- I thought this would be straight forward, but it wasn't; thankfully, with the help of others on this forum as noted above, I was able to get up and running without extra materials
- Think about whether you want to power the chemical pump no matter what, or if you want to chain it off of your main pain operation (will discuss why later). If you want to run it on separate power, you may need to add a breaker to the ET8.
- Washer for connection b/w conduit and ET8 panel
- I didn't originally plan for this, but when I punched out the whole, the outer ring became loose, so I added a washer to avoid having a weak connection here.
- Wire for altering the internal wiring
- I just used some of the black wire scraps I had from the electrical wire I ran for the receptacle, because I didn't want to pay extra money just to match the red wires
Final Touches at Drum
- 4" x 4" x 8' weather treated wood post
- 1/2" plywood
- Screws / Braces for attaching legs and plywood cover
- Sand for around drum
- Rocks for around drum
- Edging for around drum
Tools Used
- Wire cutters
- Wire strippers
- Drill & drill bit for rubber plug
- Hammer drill
- Hammer and chisel/something to knock out the punch-out in the ET8
- Shovel
- Wheel barrow
- PVC cutter or saw
- Plumbing tape
- PVC primer/cement
Problems Encountered
No project I do every goes according to plan. Thus, I figured it might be worth listing the things I didn't plan for.
- I hit an electrical line when digging a hole for the drum. Thankfully, I didn't damage it, and thankfully, I didn't have to adjust my drum very far from my original location. Keep this in mind when burying, especially when planning materials.
- Punchout ring in ET8 broke, so I had to go back to the store to buy a washer, so that the conduit could fit snug with the ET8 and avoid leaks.
- Getting the electrical wire through the conduit was a serious pain. I didn't think it would be hard to go through smooth bends in the conduit, but it was practically impossible (probably would have been easier with 1" conduit, but that was more expensive.
- I ended up removing the wall brackets and disconnecting the conduit from the ET8, stretching out the conduit so it was as straight as I could get it and fishing the wire through.
- To fish it through:
- I found a metal fishing tape/snake I had for plumbing clogs
- Fished the metal line through the conduit
- Once it was out the other side of the conduit, I wrapped one of the electrical wires and taped them off
- Pulled the fishing tape back through the conduit, with the electrical wire attached
- Wiring the outlet up to the ET8 wasn't as trivial as I thought. I didn't realize (stupid on my part), that I needed to connect to a 220v breaker, but I bought the 120v Stenner pump. So, I kept tripping the breaker every time I tried to turn the pump on, because I couldn't complete the 220v circuit.
- See the "The Story" > "Part 3" for more details on this
- Once I got it wired up, I wasn't sure how to get it connected to the main pump. Whenever the main pump was running, I didn't want to accidentally turn the power on to the chemical pump and be pumping chlorine into a stagnant line.
- See the "The Story" > "Part 3" for more details on this
- Plumbing connectors -> Don’t assume connections exist.
- I was trying to avoid using pipe and cement to make my connections. This caused me to waste quite a bit of time.
- Take the parts/connectors in with you when trying to find the plumbing connections.
- Be willing to cement pipe with connectors and this will be MUCH easier.
- If you seal off the drum, eventually, the pump won't be able to suck chlorine (conceptually). At a minimum, it will probably put more stress on the pump than desired. The "consider flooding" bullet below addresses this.
- Consider whether you might have flooding. If so…
- Leave your drum a few inches above the ground
- You'll want to be sure the connections to your drum are sealed as much as possible, to avoid water/debris getting in
- I used a rubber plug and drilled a hole in it and fed the tubing in it to "seal" it
- I tapped and cemented adapters to the drum where I would add chlorine, and I capped the top of the pipe so that (1) it doesn't entirely seal the drum off; and (2) so that I could easily remove it to add chlorine
- If rain can get to the drum, keep in mind that the dirt will eventually press against the drum, making it very difficult to remove.
- I added metal casing around the drum, with sand under the bottom of the drum, to try to avoid this. The dirt will press against the metal casing, but I can still turn/remove the drum. This will (hopefully) be helpful in the future if/when I need to replace the drum.
- Knowing how much chlorine to add isn't trivial. Even with calculations, it may not be exact, if you've run the chlorinator any additional time, or if the tubing in the drum has moved for some reason. I don't have a great solution to this so far.
- If have easy access to the top of the drum, this isn't a problem. However, with what I built, I can't see into the drum. So, I have to use a "measuring" stick through my PCV pipe to determine when to stop adding chlorine.
The Story
I can't write this much without giving some form of a narrative. The idea for this is to walk you through the order in which I did things, and to provide a little more context for some of the info listed above.
Like I said, I planned more for this project than any other home project I've done. I did a ton of research and asking questions ahead of time, because I wanted to get through this as quickly as possible. Thus, I started drawing the plan, doing the measurements, making the list, etc., all of which is noted above.
Part 1 - Burying the Drum
The first step to took was digging the hole for the drum, because I knew that would be the most labor intensive. I measured out where to put it, spray painted around it to mark it off, and started digging. As mentioned in the problems list, I ended up hitting a line when digging, but I was able to adjust with little effort. Thankfully, I didn't hit any big rocks like every other whole I've dug in the past in my yard, which was a huge blessing. (Austin, TX has a lot of limestone.) This took several hours, because I dug a 24" hole. I did this in the afternoon of day 1. It hadn't rained in about of month, so of course, it flash flooded that night. This turned out to be a blessing as well, because it pointed out two things: (1) when water gets around it like that with little liquid in it, it floats; and (2) the dirt adhered to the sides of the drum, making it very difficult to get out, even though it wasn't fully buried. This is when I decided I would put a casing around it to avoid problem #2, and put metal edging around it and build a wood cover for it to address #1. I had to re-dig some of the hole because of the rain, but it didn't take long. I then added the sheet metal and sand, and dropped the drum in. Part 1 complete!

Part 2 - Electrical
I then started to tackle the electrical portion. Honestly, I was hoping this would be relatively fast, because I've installed receptacles before, and running a conduit can't be that hard right? Mostly right, with the big caveat of fishing the wires through the conduit, and working out the breaker problems (see the problems section above). Rather than tell you what I did, I'm going to tell it as I would have done it to avoid the problems of fishing the line through. So, do NOT start with mounting the conduit. Start with fishing the wire through it. Be sure to leave extra wire on both ends for the outlet and for the ET8 connection. If you have trouble getting it through, use something stiff to fish it through. Once that's done, I then connected the line to the ET8. That way if I miss-measured, I'll have to adjust the placement of the outlet, but I won't have to unmount the outlet b/c it doesn't reach the ET8. Now, when I knocked out the punch-out to create the hole in the ET8, the ring which held the punch-out became loose. This made the connection unstable and showed potential for water getting through. This is when I had to go to the store to find something to cover that, but was thin enough to still screw down the connection. It's the top right connector in the pic below.

Next, I mounted the weatherproof outlet cover. Again, if you don't have a hammer drill, buy one, even if you never think you'll use it again. I've done 2 projects now trying to drill through brick without one, and it just didn't work. I finally decided to buy the cheapest I could find for this project ($22 from Harbor Freight), and it ate through the brick like butter! Didn't need to be fancy, just functional. Also, remember to keep your original measurements in mind. Once I got that mounted, I connected the conduit, cut the excess wire, and installed the receptacle. Finally, I put the plug in the top to keep rain water from standing. Probably not necessary, but I just didn't want to take any chances of a leak since that is a punchout type hole.
Now I mounted the chemical pump. Be sure to orient it the correct way, and if you have the rain mount, put that on. Once this was hooked up, and I finished the instructions from the pump, I tested the power and the pump. This brings me to the ET8 modifications.

Part 3 - EasyTouch 8 Configuration
As I stated previously, I didn't want the chemical pump to be able to run without power to the main pump. However, to test the outlet, I just plugged up the wires according to the diagrams I'd found. Note that what I'm about to describe DID NOT WORK, but I want to mentioned it in case anyone else were to try it this way, hopefully they'll find this in a search. I connected the neutral wire of my 120v chemical pump to the neutral bus bar, and one load line from the 220v breaker. This caused the breaker to immediately trip, because you can't steal power from leg of a 220v GFCI breaker. The fix was to plug the neutral wire into the neutral terminal of the GFCI breaker (which, with some reading online will complete a 120v circuit), and voila! We're up and running! However, I'm now hard-wired directly to the power, which is not really what I wanted, but I needed to ensure the outlet and pump worked appropriately. To make this change, I connected a new relay running the LINE side of the main filter pump relay to the LOAD side of the new relay. By using the LINE side of the filter pump, we ensure that no power will get to the new relay unless power was ON for the filter pump relay. I then ran the LINE side of the new relay to the chemical pump. Tested it out by turning the filter pump relay on, then the chemical pump relay, and it worked. Then, I left the chemical pump relay on and turned off the main filter pump. … And we're golden! For details on a full discussion on this troubleshooting and final setup, see this thread.

Part 4 - Chemical Pump, Drum, and Pool Line Injection
OK, outlet, pump, and ET8 are all installed and working properly. Now I'm ready to drop the line from the chemical pump to the drum. I needed to seal off where I was going to drop in the chemical line, so I used a threaded 3/4" to 1/2" reducer and a rubber stopper/plug. I drilled a hole in the rubber stopper (note that this took a while, because I didn't want it to be too big, but I needed to be able to pull the chemical hose through it). This was a bit of trial and error, slowly making the hole bigger until I could just barely pull the hose through it. Keep in mind the recommendation from the chemical pump instructions to not drop the line to the very bottom on the drum, so as to avoid debris. I then dropped this into the drum, fished the hose through the larger hole in the drum so I could add the filter to the end of it (my pump came with a filter to help avoid debris buildup), and then taped the reducer with plumbing tape, and screwed it into the drum. Chemical line set!

Next, I connected the hose to the other side of the pump for injection into my plumbing line. Again, this wasn't as simple as it should have been. I wasted tons of time trying to make pieces fit without using cement and PCV pipe, because I thought I could get the right number/type of connections/reducers to connect the chemical pump injection check valve. Turns out, I couldn't. YMMV. Once I confirmed all the connections would work, then filled the drum with chlorine and tested the pump before connecting to the pool line. Once chlorine output was confirmed (didn't have any problems here), I connected the injection check valve and was good to go!

For clean-up, I put the casing around the chemical hose and used the tie straps to keep the hose from moving around.
==> PROJECT "COMPLETE" !!!
Part 5 - Finishing Touches
At this point, the project was "done" from the perspective of an automated liquid chlorinator, but I wasn't done. First, I wanted to try to avoid rain/flood water from getting near the drum. Second, I didn't want to have to unscrew the larger cap to the drum every time I wanted to add chlorine, because (a) it was difficult to turn; and (b) every time I take it off, I run the risk of not sealing it well when screwing it back on; which leads to (c) I needed to seal it off well at the connection with the drum, but still allow it to breath, without having to worry about flood water getting in. So, I finished it out address these points.
First, I added the edging. I'd previously measured out how much I needed and bought the materials, so I shaped it as needed and formed a box around the drum. I then filled in around the drum with sand and rock to make it look nice. I now have a solution for general flooding, however, I this doesn't address rain water from the roof (don't have gutters in this area).
Next, I built a wood cover for the drum, so that rain water would run off before dropping into the area where the drum was, which would be a problem for build-up now that I have the edging in place. I created 4 legs with the 4"x4"x8', cut the right size from the plywood, and built a four-legged covering. It's not fancy, but it's good enough. This didn't go quite as planned, either, because I didn't realize my gas pipe for the heater was going right across where I'd planned one of the legs, so I got to redo that part. Wasn't too bad, though, and now I have my covering.

Finally, to solve the sealing / adding chlorine annoyance. I measured how much PVC pipe to cut so that, after the elbow, the top would stick out just past the underside of the wood "cover" I built. I made sure to make it as tall as possible to avoid water, because I didn't want to cement the elbow, to make it easier to seal off at the drum (so I didn't make it tight, and then the elbow be pointing in the wrong direction). I cut the pipe, cemented the threaded/slip adapter to the pipe, and let it dry. Then, I taped the threaded adapter and screwed it into the drum. I then cut the next PVC pipe and put it into the elbow and the elbow on the pipe that's connected to the drum. Last, I added the cap.

And now, I'm done!
Result
I'm super pleased with how this all turned out. After only 4 weeks of the setup, I took a 1 week trip, and it worked flawlessly while I was gone. The only problem I've had since installation was miscalculating when I add chlorine to the drum, and I went about 12 hours with little to no chlorine in the pool. I won't make that mistake again. You can consider that USER error!
As far as the pump, the ET8, the schedule, and the chlorine, everything has worked without a hitch. I check the water every 2-3 days, and I adjust the schedule, if needed, but it really only took about 2 weeks to get it adjusted just perfectly.
One more thing to keep in mind--if you run the chemical pump during a time when people may be swimming, be sure not to change anything in your automation that would turn off the pump; or, be sure to make a manual adjustment for that day.
Well, if you made it here to the end, bravo! Thanks for allowing me to share my story, I'm quite proud of my automated liquid chlorinator, but I NEVER could have done this without the wonderful folks here on Trouble Free Pools. Thank you to each of you who helped me along the way. I hope this post ends up helping someone else!
Last edited:


 Super details which I"m sure will help others. But did I miss a link to pics? I didn't see any. You know how much we like pics.