Intex 12 x 24 AGP build

talltree66

Member
Jul 27, 2021
7
Chicago area
Documenting my Intex 12' x 24' AGP build. I've learned so much from reading on this forum, and I hope to help others by showing my process.

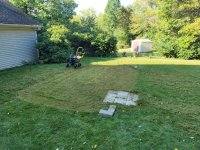
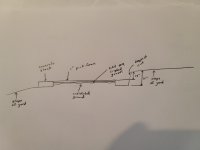
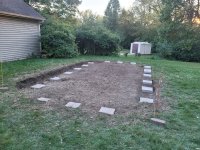
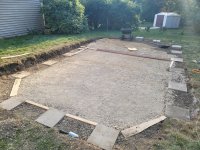
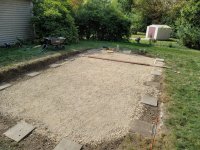
I looked for a level spot in my yard and thought I found something pretty close to level. I have a laser level, so at night (when it's easy to see the laser level across larger distances) I checked the 4 corners of where the pool is going to go, and to my dismay, there was a 13 inch height difference!

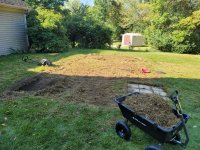
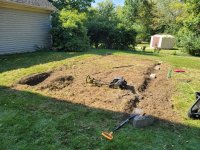
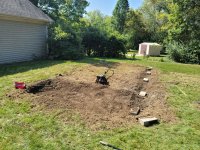
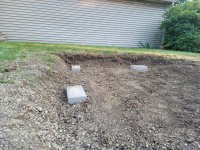
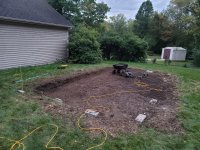
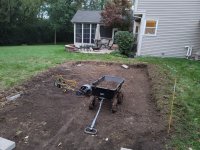
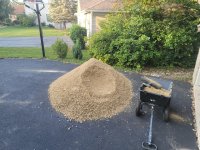
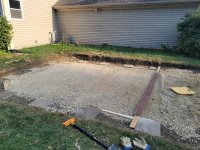
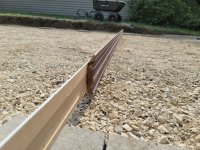
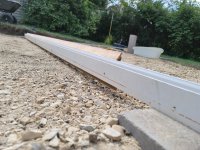
Undaunted, I decided to purchase a plug in rototiller, and start digging. Luckily my house backs up to woods, so all the dirt I'm going to remove can be wheeled to the woods and dumped. Photos are of the start of the dig. I started by mowing my grass as short as possible, so that it wouldn't wrap up in the tines of the rototiller, then I started digging and ripping up the roots of the remaining grass.
 

Attachments

  • 20210918_091139 (Large).jpg
    20210918_091139 (Large).jpg
    845.5 KB · Views: 17
  • 20210918_101431 (Large).jpg
    20210918_101431 (Large).jpg
    833.3 KB · Views: 14
  • 20210918_105137 (Large).jpg
    20210918_105137 (Large).jpg
    841.1 KB · Views: 15
  • 20210918_123158 (Large).jpg
    20210918_123158 (Large).jpg
    865.4 KB · Views: 17
Thanks for the tips. I've been using this forum so much for other people's feedback and ideas. What I decided was that I was going to make sure I do it right from the start, rather than hoping what I do is "good enough". So based on lengthy reading here, I came up with the following plan:
  • Level the entire pool as much as possible. I've seen that 1"-2" inches out of level aren't absolute dealbreakers, but I'm aiming for the entire area to be level within 0.5" across the entire area of the pool.
  • Use 4" thick pavers to minimize the chance of them breaking under the weight of the legs of the rectangular pool, which I understand are substantially greater than the weight on the legs of the round Intex pools. I found 16"x8"x4" solid concrete blocks at my local big box store. These are not in the 'pavers' section. They are sold with the other concrete blocks. And they only cost about $1.50 each, so for a 12'x24' Intex pool that has 18 total legs, I need 36. Total cost: $54.
  • Since I'm digging down, the pool will be mostly resting on undisturbed ground. I'll only be using fill to do the final leveling. So the spots that will have fill, will usually be not much more than an inch or two deep. I'm going to tamp it down manually a little bit, but I don't see a need to use a plate compactor, especially since I'm doing this work in the fall and will let the rain and snow over the next 6 months further settle the fill. I ordered a truck to drop off a few tons of CA6 #9 crushed gravel to do the fill. This is the stuff with small rocks and lots of fine particles/dust, which is what they use for road base.
  • I'll be putting a layer of the 1" pink foam panels on top of the crushed gravel, to be level with the top of the cement blocks. I think I'm going to have the pool sit directly on the pink foam, but I'm still trying to determine if it's best to place a tarp in between.
See attached diagram. My deepest cut was 17", so that I could place the block at the highest corner level with the block at the lowest corner, which will just be sitting on top of the original grade.
 

Attachments

  • 20211017_134926.jpg
    20211017_134926.jpg
    156.5 KB · Views: 9
Digging down with the rototiller was hard work, but really just took patience, time, and some determination. I spent a couple days at it. I placed a block at the low end of the yard, then using a 6' level, I placed additional blocks at a level height, to make sure that I was digging down far enough, but not too much. I probably could have built a water level that would have made a few things a little easier, but this method worked fine.
 

Attachments

  • 20210918_182600 (Large).jpg
    20210918_182600 (Large).jpg
    705.4 KB · Views: 7
  • 20210921_185551 (Large).jpg
    20210921_185551 (Large).jpg
    718.9 KB · Views: 7
  • 20210921_185621 (Large).jpg
    20210921_185621 (Large).jpg
    629.6 KB · Views: 7
I then got all 36 blocks placed exactly where I needed them. Since all the blocks are in groups of two, my process was to place one directly on the dirt where I wanted it, then added/removed dirt underneath until it was perfectly in the location I wanted it, perfectly level to the previous set of blocks, and perfectly level itself. But since blocks on dirt aren't fully supported, I thought it would be best to have the blocks each sit on a level bed of sand. So what I did was use the first block that I just set as a guide for a simple tool I made out of scraps of wood, which levels sand directly next to the block I just set. I then placed block #2 on the sand, then I removed block #1 and repeated the process. This led to both blocks being in the right place, and sitting on a leveled bed of sand. Rinse and repeat.
 

Attachments

  • 20210926_181423 (Large).jpg
    20210926_181423 (Large).jpg
    805 KB · Views: 9
  • 20211002_114338 (Large).jpg
    20211002_114338 (Large).jpg
    683.3 KB · Views: 9
Last step of ground prep was to fill in the gravel. Got a truckload of the CA6 #9 crushed gravel (amount shown was more than I needed. I'm using the extra for other projects). Then spread it out so that the top of the gravel is 1" lower than the top of the concrete blocks. I did this by making a leveler with a few long pieces of trim that I had in my garage (one was 16' long and the other was 11' long). I attached the 11' piece of trim 1" lower than the 16' piece, and used this as a grading tool. The 16" piece sits on the concrete blocks, then I scrape the gravel level. Worked pretty good!
 

Attachments

  • 20211001_080749 (Large).jpg
    20211001_080749 (Large).jpg
    717.5 KB · Views: 10
  • 20211001_165153 (Large).jpg
    20211001_165153 (Large).jpg
    707.9 KB · Views: 9
  • 20211001_165226 (Large).jpg
    20211001_165226 (Large).jpg
    732.5 KB · Views: 10
  • 20211002_114441 (Large).jpg
    20211002_114441 (Large).jpg
    523.8 KB · Views: 11
  • 20211002_114447 (Large).jpg
    20211002_114447 (Large).jpg
    431.2 KB · Views: 11
  • 20211002_114502 (Large).jpg
    20211002_114502 (Large).jpg
    801 KB · Views: 11
  • Like
Reactions: jseyfert3
Thread Status
Hello , This thread has been inactive for over 60 days. New postings here are unlikely to be seen or responded to by other members. For better visibility, consider Starting A New Thread.