Help me fix my plumbing

Jun 23, 2017
61
Sparta, NJ
Pool Size
30000
Surface
Plaster
Chlorine
Liquid Chlorine
We bought a house in 2016 with a pool. The first year we realised that one of the return valves for the spa at our equipment pad was leaking. We've tried to get pool companies to quote us on fixing it, but none of them seem to want to do it - it seems to be too much effort for a quick visit but not enough effort for them to dedicate time to doing it. One company tried a temporary fix (basically filling the crack in the valve with pvc cement) but that lasted about a week. So we've been using the spa with just one set of jets turned on for 2 years. We decided last fall that this spring we'd try and fix it ourselves.

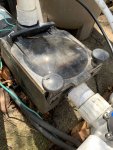
Part of the problem is probably that whoever put in the plumbing put it in very low to the ground and didn't leave much room for maneuvering. Here's a picture from a couple of years ago.

IMG_2974.jpeg

As you can see, the front row of valves (and it's the 3rd one from the left that would need replaced) is at or just above ground level. Then there's the way that the main return pipe from the heater cuts across the top of 3 of the valves. Why did they put in the standpipe that we use for our hose so it presses against the main return pipe? Finally, there's the way that everything is very close together, so while it's just one valve that has a problem (a close-up of that one is below), I don't see an easy way of cutting just that one out and replacing it because there wouldn't be enough pipe left to attach a new valve to.

Does anyone have any suggestions for the best way to fix this? I'd prefer at this point to just replace the return valves (I'm accepting that it'd be a whole row that needs replaced) given the cost of decent valves, and the slightly weakened financial straits that we (along with many others, though at least I'm still working full time while my wife isn't) find ourselves in. Should I try and raise that whole section back to the piping from the heater so that it's higher up? Is there any easy way of moving things further apart (I don't know if adding angles to any of this will negatively affect return flow)?

Adding to my stress over this is that my PVC plumbing experience is close to none :eek:

IMG_2181.jpeg
 
I would renovate that entire area and replace all 11 ball valves with diverter valves. Over time every one of the ball valves will fail. Adding angles is not going to make any visible difference in flow.

It looks like you have flex PVC connected that broken valve rather then rigid PVC.

Maybe with enough incentives @jimmythegreek would pay you a house call.
 
  • Like
Reactions: Arizonarob
Yeah ditto what Alan said. Those ball valves work fine for a while, but then they dry out and cause problems.
I have a feeling they only used flex pvc coming up to the pad. If you dig down you might be lucky and find ridged pipe. A nice manifold is in your future. :cheers:
 
Start digging it all out. Grab a tarp or wheel barrel and carefully remove soil from around all the plumbing and get it about a foot down and be careful that flex might be coming in straight and have a elbow up to the valves below what you see. Then post a pic on what your dealing with should be enough room to sneak a valve in there.
My office is 10 min from you I can send one of my guys over to do the pipe glue for you just throw him a bone
 
I need to slip out and drain about 6-12" of water from the pool early tomorrow (before the next round of snow/hail/rain) so I'll see if I can manage to dig down then, if not then definitely on Saturday
 
So I dug down 9-12" this morning by hand and it was flex all the way down to there. Will go out with a shovel on Saturday and have a better poke around the manifold as a whole

IMG_3582.jpeg
 
Gotta get down at least a foot all around it. The pipe needs to be free enough to be bent in a curve to then sneak a new valve in there. And the pipe needs to be scrubbed super clean to get a good glue joint on it. Gonna have to add a tiny section to come up the new valve is gonna sit higher closer to manifold. At some point your gonna wanna rip that all out and make it nice they will keep failing. Good valves are much cheaper online I dont even buy them local anymore
 
You could use a union to squeeze it in. Don't need as much play in the pipe that way, but now you have an o-ring in the mix.
I agree that you will continue to have issues with these valves. Vertical valves do not do so well in the winter. As a general rule I install them horizontal whenever possible.
 

Enjoying this content?

Support TFP with a donation.

Give Support
A valve installed vertically, when closed for winterization, will hold residual water, condensation, etc... on top of the ball. This water seeps into the space between the ball and housing and freezes. Since there is such a small tolerance in these parts and virtually no flexibility, they tend to crack from ice formation inside the valve.
Installed horizontally, the water drains away, or at least does not cover the entire ball leaving some room for expansion. Of course, if your pipe goes up from the equipment side of the valve it will hold water even if horizontal.
In the field, I have replaced many more vertical valves than horizontal for cracks. I rarely see a cracked horizontal valve, though it does happen from time to time. Realizing this, I always try to install them horizontally whenever possible.
 
  • Like
Reactions: jfreeman
I dug down and around quite a bit further today. I'm probably 18 inches down and it's flex PVC as far as can be seen. I also got down to the point where they obviously clustered all the plumbing together (with 2 more pipes visible behind the one with the leaking valve). And then a couple of inches in front of the PVC is a narrow black pipe which I'm assuming leads to our auto-fill (and with has the standpipe attached to it).

My question is, how flexible is flexible PVC? If I cut off the valves at the top, is there likely to be enough give to pull it forward a few or 6 inches and allow me to have a bit more room between everything at the top? I've no way of knowing if this is the original plumbing and, if it is that would make it 28-29 years old, so even if it was super flexible when put in I'm not sure if I'm risking disaster by wiggling it around. My plan would be to possibly add some hard PVC at the top, then the new valves, so that they're higher off the ground.

IMG_3586.jpeg
 
Flex can harden and grow somewhat brittle over time. I see it mostly in portable spas (most pools I see are plumbed in rigid pvc) so buried may be different. You could cut it lower and couple in a short piece of flex to get the play you need. Just remember, the key to any glue job is a clean surface, so make sure you get that pipe spotless.
 
Here's the latest update in this saga. I've (at least partly) uncovered all the pipes, since I discovered that while I thought everything had escaped damage over the winter, the return valve and some of the pipework for the waterfall had huge cracks in it. My plan is to bite the bullet and replace all the valves and replace the pipework from where-ever it makes sense below ground. This means quite a bigger job than I originally intended.

IMG_3590.jpg

Obviously I need to dig more so that all the pipes aren't encased in dirt, but at least I have an idea of where they're all going. Would the best idea be to get to the point where they're all horizontal (or as horizontal as they get - I'm not convinced there's any straight lines anywhere in this plumbing set up) and use that as the point where I switch to rigid PVC? Ideally I'd move the front row of valves forward to be in front of the standpipe, and also put them higher up.

Another thing we will probably do, since I'm doing all this work, is go ahead and get a robot to replace Polaris. That would mean I could cap off one of the underground pipes (fourth one in from the right). The booster pump for Polaris takes water from the hard PVC after the filter and uses the fitting below.

IMG_3593.jpg

What sort of fitting is that? Am I likely to be able to unscrew it at the hex part on the T fitting - and if so, what fitting would I get to screw into there? And lastly, since I am a complete amateur at this, I'm hoping I can just unscrew the existing plumbing from the pump. In this picture, which bit unscrews - is it the hex fitting immediately next to the pump basket, or is it the round bit below it?

IMG_3594.jpg

Thanks so much for all the advice so far!
 

Attachments

  • IMG_3594.jpg
    IMG_3594.jpg
    455.9 KB · Views: 2
Convert the Polaris booster line to another return.
 
Last edited:
The fittings at the pump will screw out. I would put unions on it for future service.
If those flex pipes aren't leaking I wouldn't cut them back underground. That is just making potential leaks, then burying them. Make your connections accessible, and use threaded fittings at the connection so it can be taken apart without cutting or digging if it ever needs it again.
The polaris barb just screws into the threaded reducer that is glued into the tee. I think it is a 1", but it might be 3/4".
 
I was out this morning with a tape measure so I can start to buy supplies for this (will probably do it in a week or two, since we're not opening the pool until right before Memorial Day). I discovered that the flex PVC and all of the plumbing up to the pump are 2" PVC (have a 2.5" outer diameter), but all of the plumbing on the pad (up to a right angle where the grey pipe from the heater meets the white pipe to the returns) is 1.5" (2" outer diameter). Given that the plumbing is changing size, does it matter where this happens? I'm going to follow RDspaguy's suggestion to make all the connections accessible, so I'll only cut the pipes right underneath the current valves. So if I put reducers on the end of the flex PVC so that everything above ground is the same size will that have any major impact versus the current situation where all the valves and plumbing around them have a larger diameter?
 

Enjoying this content?

Support TFP with a donation.

Give Support
Thread Status
Hello , This thread has been inactive for over 60 days. New postings here are unlikely to be seen or responded to by other members. For better visibility, consider Starting A New Thread.