finding water leak near skimmer basket

dleclair

Member
Jun 24, 2019
17
Ottawa, ON
Hi folks,

I'm trying to isolate the source of a leak in my above-ground pool. When I assembled my system and turned it on earlier this spring I was noticing the water levels dropping rapidly (noticeable within a day).

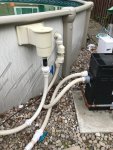
At first I was suspicious of the hose assembly coming down from the skimmer basket because it had a small o-ring that kept bulging and buckling whenever I tried to attach that joint. So I rebuilt and replaced that valve and hose assembly with one that I felt would be more robust.

Hoping that was my only problem, I went ahead and turned the system back on. Still, the level was noticeably dropping to the point where it would reach the bottom of the intake within a couple of days.

I'm not seeing any visual signs of water loss near the system - certainly not nearly enough to match how quickly the water level is dropping.

At this point I figured I would have to be more careful and precise in my method to isolate the source of the problem. I again shut the system off and the first thing I wanted to do was determine if it is a suction-side or pressure-side leak. So I am leaving the system turned off for now and I am taking measurements of water loss. Yesterday I re-added water to bring the level up about 3/4 of the height of the intake opening. I marked the level with some tape and I setup a plastic bucket of pool water next to the pool also marked with tape to measure loss from evaporation.

After 26 hours I took my first measurement and I see a drop of 14 mm in the pool and 3.3 mm in the bucket. Netting off the evaporation that's a drop of about 11 mm due to the leak. For my 21' diameter round pool, that works out to a loss of 344 litres (~91 gal) in 26 hours. That's like 14 litres (3.8 gal) per hour. At those volumes I should definitely be seeing something somewhere.

I've only taken one measurement so far and it was this evening. Earlier this morning when I was up for breakfast I visually looked out my window at the water level relative to the tape edge and I feel like it hasn't moved much between then and about 12 hours later when I actually took the measurement. I'm wondering if it hit a level and is staying there. I'll know more when I take another measurement tomorrow.

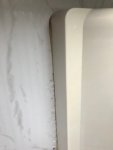
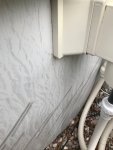
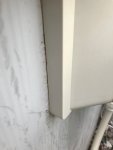
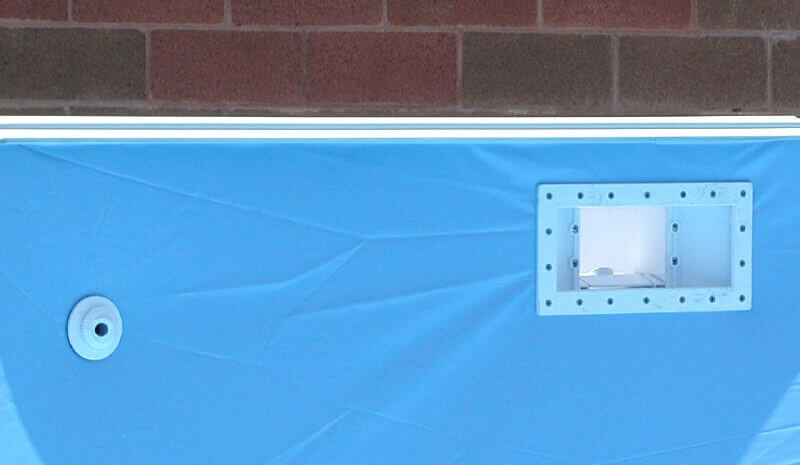
In the meantime, I went back and did another visual around the skimmer area. I am seeing some signs of salty sediment near the edge of the intake housing. I'm posting some close-up pictures here of what I'm talking about. Are these symptoms anything any of you have seen before? Might this be the evidence that I'm looking for that water is seeping out the side of the intake? Could it be getting in between the liner and pool wall hence making it so difficult for me to see the leaking water?

Anyway, this is clearly going to take some time to find and fix. I appreciate any and all tips I can get from your experiences. In the meantime as I work on this, my pool water is getting nice and green with the summer temperatures really starting to kick in now. :confused:

Thanks in advance for your help.
Denis
 

Attachments

  • IMG_2078.jpg
    IMG_2078.jpg
    139.3 KB · Views: 37
  • IMG_2079.jpg
    IMG_2079.jpg
    279.3 KB · Views: 38
  • IMG_2080.jpg
    IMG_2080.jpg
    171.3 KB · Views: 40
  • IMG_2081.jpg
    IMG_2081.jpg
    505.8 KB · Views: 42
Hello and Welcome to TFP!!

That's one heck of a first post! I think the water is getting in between the liner and pool wall. The water is running down the inside of the wall and absorbing into the sand. I don't see any salty sediments, only some bubbling paint that may be from some minor rusting around the edges. These two things may be making each other worse. As more water leaks, more rust forms. As more rust forms, it makes the seal less waterproof and more water leaks.

You may have to pull the skimmer out altogether, sand down the rust, apply rust stop primer and paint, then reassembling it with a new butterfly gasket. Do it sooner than later and you could prevent a major rust issue. Not to scare you but the inside may be worse than the outside.

Why is your water getting greener? water loss shouldn't prevent you from adding chlorine or running the SWG.


Thanks a lot! This site looks like it can be very helpful for new and experienced pool owners alike. I especially like that it's not yet another sales tool for an equipment vendor and/or retailer. It is good that it is being kept independent.

As for your working theory of what might be causing my leak problem, is there any additional observations or measurements that I can take to give us higher confidence that that is indeed what is happening? I'm assuming that pulling apart the skimmer and so forth does not make for a trivial job and I would prefer having higher confidence that it is the right path to be taking before diving too deep (pardon the pun).

Also, can you recommend any visual how-to guides / walk-thrus / videos on how to disassemble and reassemble the skimmer? I didn't do the initial installation of this pool so I'll need some pointers to get me started.

Lastly, as for the algae, with the amount of water that I've been losing, I haven't been able to keep the system running for more than a couple of days at a time before the water level drops below the intake line and I decided to not even both trying to maintain the minimum salt concentration in the pool for the SWG to work since I'm regularly having to add more water anyway. As such, other than a couple of shock treatments that I have applied, the water hasn't been getting any regular applications of chlorine. If I need to reinstall the skimmer that will take more time still so maybe I'll mix in some liquid pool algaecide to keep the water clear in the meantime.

In summary, I like your idea but I'll need a couple more pointers to further confirm it and then implement a fix.

Thanks,
 
That is definitely rust in the skimmer area. You have a leak behind the liner, and if you were to poke at that bubbly rust with a screw driver it would probably crumble and ooze water. If that were sediment or salt it would scrape off and leave the smooth pool surface intact. If you allow the leak to continue until it stops, it will probably stop just at the bottom of the skimmer opening. To fix this you will need to drain down the pool, enough to drop the liner out of the way so you can get to the rust, patch the wall, and reinstall the skimmer. You may also need to patch the liner and re-cut the skimmer opening. It can be difficult to get the holes to line up correctly.

Algaecide will not prevent algae or kill an algae bloom. At best it will slow it down a little. Don't bother topping off the pool until it is repaired. To keep the water clear, pour in a jug of liquid chlorine and mix it in by brushing the walls of the pool.

Just so you know how I know this is a rust problem, click the link in my signature, RIP rusty Vogue Pool. We won't know how bad your rust issue is until we see what is behind the liner, but I believe your pool can be repaired. Skimmer replacement is pretty straight forward.
You can check youtube for other videos.
 
  • Like
Reactions: Teald024
Thanks a lot! This site looks like it can be very helpful for new and experienced pool owners alike. I especially like that it's not yet another sales tool for an equipment vendor and/or retailer. It is good that it is being kept independent.

Lol, it really is helpful. There always seems to be someone who can help and has real world experiences to share. We have never and will never use advertising to generate revenue. Because of this, the advice can be trusted as the best for the member and not for the benefit of the adviser. We have no skin in the game, just the enjoyment of helping fellow pool owners with their questions and issues. The site is supported by regular members who have decided they like what they see and want to help out. Volunteers with their time and some with charitable donations. Much of the advice is tailored to the specific member's issue.
Stick around and read through pool school. There is an app to help with chemical additions and tracking and an Ebook to use as a handy reference.
 
Thanks all. I've put in a jug of bleach to try and keep the algae under control. We had a lot of sun again today and the water was noticeably more green by the time I got back from work.

As soon as I get a couple of hours to work out there I'm going to start pulling off the skimmer and seeing what the state of the wall is back there. I'll take some pictures and let you know what I'm seeing.

Hopefully it's not as bad as what I think it might be.
 
I would agree with everything zea3 said. I also add: get butterfly gaskets. The two separate gaskets do not protect the wall from water and salt.
Our skimmer and return openings rusted so badly, we had to cut a piece of galvanized sheet metal to replace over the areas, cut new openings and then bolt them to the pool wall. We could see the gasket in the openings, but also an edge of the pool wall too. Which caused it to rust after 10 years. The butterfly gaskets go over the wall openings and the liner and protect the wall from water and rust.
 
Ok, here's another update since it's been a few days since I last reported anything. Due to a hectic week with end-of-school and all that, I haven't done any work on the pool other than to try keeping the algae at bay. I've kept the system turned off the whole time and I've been watching the water levels visually but not diligently taking measurements every day.

Surprisingly, from my casual observation of the water levels over the week, it felt to me that the leak had significantly slowed down if not stopped altogether. We did have a couple of bouts of rain during the week and lots of sunshine in between so there was probably some to and fro between rainfall and evaporation. I've kept my reference bucket of pool water all along so in theory the rainfall and evaporation would still be accounted for in my measurements. I got out there this morning and took another measurement of the pool drop and the bucket reference. By my calculation the net loss from leakage has increased to 720 litres (compared to 340 litres measured on Monday). So that tells me the pool is still losing water but at a much slower pace than it was in the first 24 hours.

I can imagine that if the source of the leak is around the skimmer opening then the rate of water loss will vary depending on what level the waterline is. As the water level drops, the rate of leakage may slow down or possibly even stop altogether as it crosses below a threshold of where the structural damage is.

Another conclusion I can draw from my observations this week is that most definitely the water loss is much much faster when the pump system is running. When I was running the pump, the water level would drop down to near the bottom of the skimmer opening where I would have no choice but to stop the pump to avoid taking in air. That doesn't seem to be happening this week with the system turned off.

Our working theory is that there is corrosion around the skimmer opening due to a bad seal and water is being lost between the liner and the wall. If that's the case, does it make sense that the water loss will accelerate with the pump system turned on as opposed to being turned off? Should we expect that the water flow from the pump action will accelerate the water loss?

Next Steps:

I think I've learned about as much as I'm going to learn with the pool in its current state and my family is getting frustrated with the lack of a pool just as summer weather is finally arriving so I need to take some action now. I think my next step will be to turn the pump system back on again and get some chlorine shock mixing in the pool to clarify the water again. If history repeats, I expect the water loss will accelerate again and will likely drop to a point where it's too low to keep the pump going. If and when that happens, I'll continue draining to bring the water level below the return jet and I'll take the faceplate off of the skimmer to get a closer look at what's going on around the seal and get a look at the state of the wall behind it. Assuming our working theory is correct and I see damage and corrosion there, I'll get it fixed up and re-sealed then all should be good (hopefully).

If by some fluke, the water does not drop substantially when I turn the system back on then I'm less sure of what I will do. I will be tempted to push my luck with it through this swimming season and then do the skimmer inspection and repair in the fall when I drop the water again.

Any other suggestions?

Denis
 
Another brief update:

After about 4-5 days of surprisingly stable water levels I started bringing the salt concentration back up, vacuumed, shocked, and rebalanced the chlorine and also rebalanced the pH. Things were looking reasonably good and my wife and daughter even took a dip. But sure enough, over the past 1-2 days we've seen the level drop again to near the bottom of the skimmer opening. <sigh>

I guess I know what I'm doing this weekend. :cautious:
 

Enjoying this content?

Support TFP with a donation.

Give Support
I've never taken the skimmer cover off before. Are there any special considerations that I need to know about before starting?
Do I need to take top rail right off to be able to get a good enough view behind the liner? I don't know where to start for that.
 
You first take the cap off of each end. If you look up underneath the cap on the uprights there should be an opening for a screw. Remove the screw and the cap should pop off. From there you should be able to see how the rails are attached and remove those screws. Don't be alarmed if the liner clip comes loose with the rail. You will need to pull that off to pull the liner out of the way if needed. Do you know the brand and model of your pool? May be able to look up instructions online.
 
Thanks for the video link. I've watched that one a couple of times already - it's a good one.

As for the pool model, I'm sure I still have a copy of my invoice back home so I'll look up specs and documents online if it's not obvious enough visually.

I'll keep you all posted on my progress. Thanks for the support.
 
  • Like
Reactions: mariane
Saturday morning update.
The skimmer is off. When I took the cover plate off, I noticed two things. First, along the vertical edges, the front fascia of the skimmer support was resting over top the liner and the edge of the gasket creating a bulge whereas on the bottom horizontal edge, the fascia was inset in the wall hole creating a flush line. I suspect having the bulge there is not design-intent. Secondly, the lips of the butterfly gasket were wrapped around the pool wall but did not wrap around to include the pool liner. It would seem to me that the seal between the liner and the wall would be better if the butterfly gasket wrapped around both the liner and the wall together but I need to do some research on what the correct installation is for it before I put it back together

First, here are a few pictures of the condition before removing the skimmer. You can hopefully see the bulge that I'm referring to along the vertical edge of the frame. As I loosened those screws, a bunch of retained water came spilling out

109846

109850

109851

109852

Then, when I got the skimmer off, I pulled the liner back slightly to take a look at what was inside. To my untrained eye, the condition is not as bad as I was expecting. There's certainly a fair amount of rust around the screw holes and the edge of the hole cut into the pool wall. But outside of that, I'm seeing some minor paint bubbling which is obviously the sign corrosion starting but I'm thinking that it's not enough to justify the risk of pulling the liner back along the whole panel.

Here are a couple of pics that try to show the condition of the metal.
This one shows the vertical left edge of the skimmer hole from the outside the pool.

109853

This one is the lower right corner of the skimmer look peering in between the liner and the wall:
109854

This is along the lower horizontal edge of the hole against looking between the liner and the wall:
109855

Lastly, this one is at the lower left corner of the hole looking between the liner and wall
109856


Based on what I'm seeing, I think my plan is going to be as follows. I'm going use my Dremel tool and very carefully polish up the metal work along the edge of skimmer hole holding back the liner by hand to avoid damaging it but not pulling the liner down off the wall in any way. Then, I will apply some rust paint over the polished areas and let that dry thoroughly. I will buy a new butterfly gasket and some new bolts to replace the rusty ones and I will research to ensure that I am applying the butterfly gasket correctly (as I said above, I have some doubt on how it was done in the initial install) and then I will reinstall the skimmer and cross my fingers.

Let me know if you see any risks or issues with my plan. If you think that even the smallest about bubbling will become a big problem down the road even if I remove the leakage and there's no choice but to sand it all off then please let me know that as well. Lastly, if you have any guidance or expertise on the right way to install the butterfly gasket with respect to the wall and liner, please pass that along to me as well.

Thanks all!
 
The rust was not too bad. It looks like the sanding and painting will work. If the bolt holes had gotten bigger from the corrosion it would compromise the tightness of the skimmer plate against the wall. Then it would still leak.
There are all kinds of ways people install the butterfly gasket. You must install it over the liner and wall no matter what else you see on the internet. So here is the order of the layers using the gasket - from the outside going in: gasket - wall - liner - gasket. Think of it like a taco shell, the shell is the gasket, the lettuce, meat and cheese are the wall and liner. If you do not install it this way, the wall will still be exposed to water and salt and will continue to corrode.

We did a MAJOR overhaul on our pool last summer. The wall had severe corrosion around the skimmer and return openings. We had not used butterfly gaskets when we installed the pool 12 years ago. The metal edge of the wall was visible thru the openings. We could see it had rust on it but had no idea how bad it was. In #12 post, the video - that was how bad our wall looked and that was how we had to fix it. We had to cut out the rust and bolt a piece of galvanized sheet metal to the wall. I had several conversations with a Doughboy installation expert (he trains installers) re: proper liner installation. He gave me the above instructions and I see how well it worked. I wish I had taken pictures of the process to show you.

Go slow when reattaching the skimmer plates. Make sure you line up all the holes well and you can see the gasket edges.

Looks like it's going well so far. :goodjob:

The manufacturers of the butterfly gaskets specifically say to install them only over the wall and not over the liner.

How exactly are you supposed to install it over the liner in a new installation where you have to install the skimmer before cutting the liner?


110042
 
Last edited:
To answer your question: "How exactly are you supposed to install it over the liner in a new installation where you have to install the skimmer before cutting the liner?"
You are partially installing the skimmer assembly to line up the holes, cut the liner, then remove the assembly, install the butterfly gasket, and then screw the skimmer assembly back in place.

I know I've included a lot to read here. Hopefully it helps why I said the layers of the gasket go over the liner and wall. I cut the opening in the liner, used paper tape to hold it in place in order to install the gasket while lining up the holes in the liner, gasket and skimmer assembly. It really was not hard to keep it lined up while installing the skimmer. I did it by myself. My husband was out of town.

Here is a post re: butterfly gasket installation: Read #5 - Best way to install skimmer butterfly gasket

Excerpts from the article:
"Most skimmers these days come with serpentine, or butterfly, gaskets. This should be installed at this time. It goes over the sidewall only, taking your time to line up all of the screw holes. Doughboy installer says to put butterfly gasket over the liner on the inside and over the wall on the outside of the pool.

Take the skimmer faceplate and insert two skimmer screws in the top holes, corresponding with the holes in the liner. Place the faceplate inside the pool and poke the screws through the liner. This should hold the skimmer faceplate in position allowing you to grab the skimmer and get it in position.

You will need a screwdriver in one hand and the skimmer in the other. Hold the skimmer up to the screws with one hand and start the screws, using the screwdriver, with the other hand. These screws should be started enough to hold the skimmer in place but not tight at this point. You can now do the same thing with a couple of bottom corner screws.

You now have four skimmer screws in place, loosely. Check the gasket and make sure it is still aligned correctly. It is now OK to insert the rest of the screw and tighten as you go.

The reason for the serpentine (butterfly) gasket is to protect the exposed surface of the sidewall from rust. If you are using a two piece gasket set you can do the same thing by coating this exposed surface with clear fingernail polish. If you closely examine the skimmer opening you will find it is not coated the same as the inner or outer walls. This does create a potential for rust, be aware of it and take the simple precautions to prevent it. That is what caused our wall to rust and possibly yours too.

When you finish filling the pool check the skimmer for leaks. If it leaks, start by tightening all of the screw just a little bit more. If that does not work you need to loosen up all the screws and readjust the gasket. Sometimes the gasket, or gaskets, is, or are, not set just right. They can usually be adjusted and when the screws are once again tight the leak is gone."

I hope this helps. I did a lot of research before I tackled ours last year.
 

Enjoying this content?

Support TFP with a donation.

Give Support
Thread Status
Hello , This thread has been inactive for over 60 days. New postings here are unlikely to be seen or responded to by other members. For better visibility, consider Starting A New Thread.