DIY Pool Rehab

MinerJason

0
Bronze Supporter
Jan 29, 2018
287
Tucson, AZ
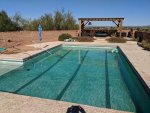
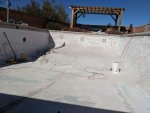
Newbie here, have been lurking for a few weeks. Bought a house with an older pool in need of re-plastering 2 years ago, and have recently decided to attempt doing it myself. The top layer of plaster was delaminating and flaking off at an alarming rate. After draining the pool I found that a lot of the base layer of plaster sounded hollow because it wasn't properly bonded to the gunite shell. It appears that maybe someone went overboard with an acid wash on the gunite, weakening the surface drastically, as in many sections it's like a sandy soil for the 1/8" under the plaster.

Right now I'm in the process of doing the chip out, assessing the plumbing, and trying to decide what my options are. I'm thinking of trying a polished aggregate finish.

Most people likely think I'm crazy for attempting this, and I probably am, but I have a fair amount of experience with concrete and stucco. Hopefully I'll learn a lot, save some money, and end up with a pool that's no longer falling apart.

I know this is a bit of a long shot with the forum being mostly pool owners rather than builders, but does anyone know what the typical solution is for sections of gunite with a deteriorated surface? I was thinking I'd try using a commercial grade pressure washer to try and get the majority of the weak/ loose material off. I also considered grinding the top layer off, but worry about making it too smooth and not leaving enough texture for the new plaster to key in on.

Pics of the pool at the start of draining and mid chip out included, because everyone likes pictures. I was surprised at how much worse the pool looked once it was empty. :eek:
 

Attachments

  • IMG_20180113_123139.jpg
    IMG_20180113_123139.jpg
    99 KB · Views: 497
  • IMG_20180128_144233.jpg
    IMG_20180128_144233.jpg
    91.5 KB · Views: 497
:shock: Well you have gone and done it now! That is a good bit of work you have already done there! Well done!

I have a call in to my go to guy for building and re-doing pools. It will be interesting to see what he has to say.

I love the pool area! That view!! WOWER!

Kim:kim:
 
1/8” is no biggy, clean, it and keep torturing yourself.
that looks more like an old school monolithic pour than a shotcrete pool, the 1/8” is more than likely trowled cream from the shell pour, hydration cure before initial plaster was applied, or was “pulled” from shell when wet plaster hit it or brown coat...

Lots of “or factors” but not an emergency.
 
Jason,

Welcome to TFP... a great place to find the answers to all your "crazy" pool redo questions.... :shark:

First.... Yes, you are a little crazy... :p

Second... Good job so far...

Third... Plastering is half skill and half art... I believe that it is highly unlikely that when you are done you will be happy with the outcome. :(

Fourth... I've had a couple of pools re-plastered and watched my pool being plastered and it took about an army of people, specialized equipment, and a "pumper" truck.. I can't imagine getting it done by yourself and getting a uniform and professional looking coating.

But... it will sure be interesting to follow your thread...

On the two pools that I had re-plastered, the crew used a hammer and just went around the pool knocking... They then chipped out all the hollow spots... I was surprised at how many hollow spots they found.. Then they applied some type of bonding agent and applied the new plaster.

Good luck with your project...

Jim R.
 
Thanks all!

Based on the locations of the weakened layer, I think it has to be either way too much water used while troweling, or too much/poorly rinsed acid wash. In the worst areas it's got some strong orange-brown oxide alteration, just like when a rock mass gets altered by strong acid. This is what led me think maybe poor rinse of an acid wash is the culprit. I guess the cause is much less important than the fix though.

I'm sure it would take at minimum 5 skilled plasterers to plaster a pool of this size without creating cold joints. My plan is to divide the pool up into manageable size sections with granite tile to avoid this issue to some extent. There will still be something like cold joints at the tile edges, but the cold joints at the tile lane dividers in bottom of this pool were some of the strongest and hardest to remove sections. This will allow me to plaster one or two sections a week over an extended period. The problem this poses is that the various sections will be at different stages of curing when the pool is finally ready to be filled. Hopefully allowing everything to cure for a couple weeks after the last section is finished will help prevent issues, but I'm not really sure.

My main concern about the finishing portion of it is getting the mix and mixing process right. My experiences with all manor of concretes, mortars, and plasters has imparted on me how critical the mix and mix procedures are, and how the seemingly smallest changes can have a massive impact on the workability, durability, finish, etc. Having never worked with pool plaster before has me a bit worried. I'm guessing I may end up scraping at least a batch or two off the pool floor and into the garbage before I figure out a mix and process that works well.

The plan is to pressure wash everything, install the granite tile, put down a bonding slurry, then a brown/scratch coat, then the final coat with the aggregate. I'll do a very light acid wash to expose just a little of the aggregate, and then grind/polish it to expose more of it and get a smooth finish. The uniform finish issue should be partly mitigated by the plan to expose the aggregate and then grind/polish it smooth, but I've several years of experience working with a trowel too, which will hopefully help some.

I'm also a bit concerned about the plumbing. Before draining it, the only operational suction port was one of the two 1 1/2" pipes under the skimmer basket, and there were only 2 operational return ports in the walls (both 1 1/2"). There are another 7 smaller ports in the walls (1/2"), but I don't know what they're connected to. There's also a 1 1/2" pipe in the center drain, not sure where it connects either. There's a capped 2 1/2" PVC pipe coming out of the ground by the pump and I'm not sure what it was originally connected to, or why it was abandoned. I'm not sure what exactly I need to have operational as far as suction and return ports, or how to fix the drain port for example if the PVC is cracked under the pool somewhere.

The current pool filling system is a 1/2" PVC pipe running through the deck slab connected to a manual irrigation valve. Keeping it dripping at just the right rate to keep the pool at a good level was a bit frustrating the last 2 years. I'm considering cutting a hole in the deck slab and putting in an autofill valve, but am worried that might be a can of worms.

There's also a large aluminum light niche (sans light) in one wall. I'm still on the fence about whether to just fill the niche and plaster over it, or try to repair it, or replace it with a smaller more modern niche. The circuit the light was on has been abandoned, but it appears to have wire run from the niche to a junction box on the wall near the pool entrance. I need to run new conduit for the pool equipment anyway, so it wouldn't be a huge deal to bring power to that junction box at the same time.

Thanks again for the warm welcome and encouraging words. Whether I fail miserably, end up with the pool I'm imagining, or something in between, it should at least be an interesting and educational adventure.

And another pic, just because. Pool after draining, showing how bad the plaster had gotten.
 
Jason,

You may already know this, but just in case...

In most old pools, when there are two open pipes in the bottom of the skimmer, one of the pipes goes to the equipment pad and the other open pipe goes down to the main drain. To make the Main Drain work, a floating diverter was originally used. In most cases this spaceship-like valve is missing.

It is not much of an issue not having a Main Drain, and there are thousands of pools that operate just fine without one..

Thanks again for posting a very interesting thread..

Jim R.

I did not know that, but suspected something along those lines. Thanks!

Would it be worthwhile to replace the missing diverter valve? In what cases would someone want to use the main drain, brushing the debris to the drain rather than using a vacuum?

I'm pretty much as clueless as one can be when it comes to pool equipment and pool plumbing, and look forward to learning a lot from the great people here. Hopefully in time to apply that new knowledge to the pool renovation!
 
A main drain can help you mix the water in the summer to help keep the water cooler. It is not much good for brushing stuff to really I have come find out :( I was SO excited to get a main drain but it has not worked like I had hoped. Oh well, live and learn.

Kim:kim:
 
Several out of state/country work trips recently have slowed down progress on the pool considerably. I did get all the plaster chipped out and cut out some sections of the concrete deck though. I also got rid of the old tiny and broken equipment pad, and built a form for a new one. Tree roots destroyed the old skimmer, and pressure tests indicate they may have caused a slight crack in the skimmer plumbing too, which is why I decided to cut a slot in the deck and replace the whole line with 2". I decided to abandon the main drain, and have capped and patched over it. I'm also adding an autofill, and have cut the hole for it. Yesterday I started installing rebar to extend the baja shelf and add a step.

Found out that the small returns in the wall were part of an old whip hose cleaning system, fed by an 1 1/2" loop. Plan is to use that loop to feed a 36" wide sheer descent in the water feature wall, as well as a pair of bubblers in the baja shelf.
IMG_20180228_183337.jpg
IMG_20180304_145020.jpg
IMG_20180307_180128.jpg
IMG_20180311_093742.jpg
IMG_20180311_143500.jpg
IMG_20180401_145949.jpg
 

Enjoying this content?

Support TFP with a donation.

Give Support
A little update. Progress is slow but sure. Digging the trench for the new skimmer plumbing proved to be the most difficult task yet. Had to be careful not to damage the return line plumbing, the pipes all ended up being over 3 ft deep to get under the footer for the wall around the pool, and there was a massive system of tree roots in the way. Got it dug out, plumbed, wrapped with a couple loops of rebar, poured some concrete around it, and backfilled the trench. Also poked a hole in the bond beam for the auto fill and got that plumbed. Chipped out the back of a section of bond beam to expose the old whip hose line on the far side of the pool, then tapped into it and installed a valve and a stub out for the planned sheer descent. And I poured the new equipment pad, and added some additional 6 ga bond wire since the existing one was only 10 ga.
_skimmer.jpg
_skimmer2.jpg
_autofill.jpg
_pipes.jpg
_wall.jpg
_equip_pad.jpg
_pool.jpg
 
Next time, you don’t have to go as deep as the old pipes- just leave them for dead..

Did you replace the skimmer?

If so the deck says you did NOT pin the new skimmer to the wall. But then again you are a miner & may have done it below?
 
Next time, you don’t have to go as deep as the old pipes- just leave them for dead..

Did you replace the skimmer?

If so the deck says you did NOT pin the new skimmer to the wall. But then again you are a miner & may have done it below?

The grade at the equipment pad is about 22" lower than the pool decking on the other side of the wall. I wanted to avoid drilling through the wall, so decided to take the same route under the footer. Had I known there were so many roots, and the footer was so deep, I may have opted for something different. But by the time I realized those things I was so close to being deep enough that I figured I might as well keep going.

Skimmer replaced with a new Hayward 1071, pinned with 2 rebar loops below the deck (and a bit of wire to hold it in place during the pour). Was trying to minimize the amount of decking to cut/chip out, and, as you implied, miners tend to do things a bit differently. ;)
 
Cool. If you haven’t backfilled yet, I suggest drop a couple dummy pipes in the trenches, so if you do have a failure- you can dig in just 1 spot and tie them in.

I put in a single 2" pipe before backfilling. More pipes might have been a good idea.

Speak of the devil, this just showed up in my email.

Skimmer Replacement, Part 2: In With the New - AQUA Magazine

Having struggled with the rebar loops and pouring concrete through the small gaps in the deck, and then reading that, were I to do it over I'd cut more of the deck out and put an expansion joint between the deck and the concrete around the skimmer.

What was that about experience being the thing you don't get until right after you need it?

For our replaster we had the pool sandblasted down to the gunite. Wasn't very expensive and it at least reassured us that the gunite was still in great shape (after 40 years).

Having done the plaster chip out myself with a smallish demo hammer, I'm now intimately familiar with exactly how competent every square inch of my gunite shell is (or in some spots, isn't). :D
 

Enjoying this content?

Support TFP with a donation.

Give Support
Thread Status
Hello , This thread has been inactive for over 60 days. New postings here are unlikely to be seen or responded to by other members. For better visibility, consider Starting A New Thread.