Replumbing and SWCG Log (was Cracked Chlorine Feeder)
- Thread starter rumcglot
- Start date
You are using an out of date browser. It may not display this or other websites correctly.
You should upgrade or use an alternative browser.
You should upgrade or use an alternative browser.
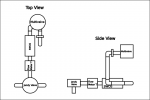
I would not raise the pump with wood. I use large pavers under the pump when it had to raised. Another way to pipe in a SWCG when space doesn't allow is vertically such as in THIS diagram.
Following sktn77a's advice about the PVC glue, I got some of Oakey's "Heavy Duty" clear glue. From the further reading I've been doing, it looks like the blue stuff is mostly for the case where you can't get the joint dry. I used primer and the other glue and have had a much better experience. Here is the same setup as early, but redone.
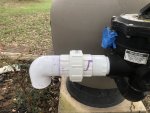
I got the SWCG cell completely plumbed in this afternoon. There were a couple of mistakes, but nothing show stopping this time. I was pretty careful with all the joints, but there's no way to test until I get the new pump plumbed in also. Here's how it looks now.
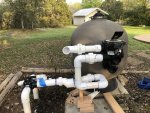
I have the union connected to the multivalve ready to plumb to the new pump. I've ordered the replacement pump connector from Inyopools.com and a new Jandy 3-way diverter.
I chatted with the customer service person there this morning. They told me that the inline skimmer I was also planning to replace was part of a Hayward vacuum. Since I don't have the vacuum, they suggested I pipe the pressure return directly. In other words, I won't be replacing that filter on the return line afterall.

I got the SWCG cell completely plumbed in this afternoon. There were a couple of mistakes, but nothing show stopping this time. I was pretty careful with all the joints, but there's no way to test until I get the new pump plumbed in also. Here's how it looks now.

I have the union connected to the multivalve ready to plumb to the new pump. I've ordered the replacement pump connector from Inyopools.com and a new Jandy 3-way diverter.
I chatted with the customer service person there this morning. They told me that the inline skimmer I was also planning to replace was part of a Hayward vacuum. Since I don't have the vacuum, they suggested I pipe the pressure return directly. In other words, I won't be replacing that filter on the return line afterall.
Just looking at the picture with the cell mounted I'm not sure if the cell is designed to be inverted with the wire coming out the bottom. It possibly needs to be rotated up 180 degrees so that the wire exits the cell at the top and not the bottom. Circupool RJ models are only mounted inverted if the low rpm from a VS pump causes issues.
Last edited:
If you don't have the recommended space of 12"before the cell then it can be placed after the cell using the length of the cell for straight pipe.The flow switch should be before the salt cell. Not judging, just saying.
I installed both the cell and the flow switch as recommended in the manual. Oddly, it seems like older (on the Hayward website) versions of the manual show the cell in the other orientation... with the plug on top.

Hi Everyone,
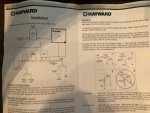
I checked with the Hayward support about the orientation of the SWCG. Here's what they said:
If it stops raining, I'm going to try to get the new pump plumbed it today. The replacement connector piece I ordered came in so I should be ready to go with it.
This is my schematic plan for the pump plumbing. Let me know if you see any issues or have a better idea.

I checked with the Hayward support about the orientation of the SWCG. Here's what they said:
The cell can be installed either way. If you have a
variable speed pump we recommend the cell (I think they meant wire since that is what I asked about) be coming out from the
underneath side of the cell.
If it stops raining, I'm going to try to get the new pump plumbed it today. The replacement connector piece I ordered came in so I should be ready to go with it.
This is my schematic plan for the pump plumbing. Let me know if you see any issues or have a better idea.

I think they mean when you have a vs pump and the rpms are low they want to be sure the plates in the cell are fully submerged (horizontall install) they want the hump of the cell upside down with hump facing the pad.
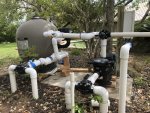
I got my new pump plumbed in today. After looking and thinking and looking and thinking, I couldn't see any way to get it to come together the way I had drawn. It would have taken skills beyond what I have. As it is, I feel like this just barely came together.
I ended up mounting the diverter valve vertically. Because I added the recommended straight-pipe length at the front of the pump, it ended up further back than the original. If I had mounted the valve horizontially, as I had planned, the control box would have been in the way. So I went vertical with the valve and brought it higher. I intended to make it the same height as the input to the multivalve. I missed by a little bit, though. Having the union at the input to the valve help because it means this pipe can rotate to match the one from the diverter valve.
I also added the hose bib to this pipe there at the front.
I'm a bit worred about the elbow towards the middle. That's sorta the capstone piece that I added last. I'm not confident that either pipe got fully seated in the elbow though so it might be the weak connection.
I've got an electrician scheduled for Tuesday morning to connect up the pump. I can't test out my plumbing until then.
I still have the pressure return for the cleaner to connect there on the right. The new pipe coming from the diverter valve is a bit higher than the existing pipe towards the front. I think I'm going to attempt to raise the exiting pipe (cut, add a coupler, and more vertical pipe) and try to match the new one from the valve.
I don't think I've gotten any two pipes to come together the way I intended.
Does anyone have a resource for how to get pipes to align better? How do you align a new run to a pipe that is already fixed in place? I keep measuring, but always seem to be slightly off. Sometimes I can make it work, but several times I had to redo it.

DeanP66
0
For alignment purposes, it's best to do a dry fit to get everything lined up the way you want them. You have to remember to account for the extra pipe that will be seated inside both sides of all the fittings as well. You really should have used primer before the glue. It cleans and softens the pipe so the glue will adhere better and generally makes it easier to join the pipe to the fitting. With bigger pipe (2" or bigger), when you glue them together, you have to push hard and hold them there for at least 10 to 30 seconds, otherwise the pipes will tend to push apart on their own somewhat. That may have been why you weren't able to seat the pipe all the way into the fitting.
Last edited:
Thanks Dean. I did scrap the parts that I had not used primer on and re-did them using primer and heavy-duty glue. The dry fitting is just really difficult when the pipes don't seat all the way. I'm getting better at it, though. This last section I installed came together pretty well.
So, to close out this thread... This weekend, I finally installed the last section. This is a pressure side return for a cleaner.
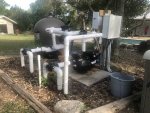
The whole system is together and seems to be leak free. I've been running the new pump and the SWCG for a couple of weeks now. The valve above the pump at the unplumbed return shut out. The whole system is operating well. There are still some things I'm getting used to with the variable speed pump, but I like the scheduling flexibility and the energy savings.
Now that the return line is plumbed, I have my Polaris working on getting the leaves and oak pollen pods out. I'm a couple of days into a SLAM. The water has gone from green to blue but not clear yet. I'm looking forward to getting in sometime this week.
So, to close out this thread... This weekend, I finally installed the last section. This is a pressure side return for a cleaner.

The whole system is together and seems to be leak free. I've been running the new pump and the SWCG for a couple of weeks now. The valve above the pump at the unplumbed return shut out. The whole system is operating well. There are still some things I'm getting used to with the variable speed pump, but I like the scheduling flexibility and the energy savings.
Now that the return line is plumbed, I have my Polaris working on getting the leaves and oak pollen pods out. I'm a couple of days into a SLAM. The water has gone from green to blue but not clear yet. I'm looking forward to getting in sometime this week.
- Jan 2, 2018
- 563
- Pool Size
- 24500
- Surface
- Fiberglass
- Chlorine
- Salt Water Generator
- SWG Type
- Pentair Intellichlor IC-60
Like the earlier advice, I'd still replace those 2x4s with something that won't rot.
mguzzy
Gold Supporter
I had a contractor friend say that all construction was just a bunch of errors nailed together and covered with flashing... Yeah. there are always adjustments you have to make when actually building it out. I wondered if it was possible to turn your filter 90 degrees and scoot it up to take out some of the extra 90's.. but this will work. I think you can build a little strut out of your extra PVC to support the run with the SWG cell instead of the 2x4s and I would use pavers under the pump to raise it or at least pressure treated 2x4s.I don't think I've gotten any two pipes to come together the way I intended.
I'd still replace those 2x4s with something that won't rot.
Thanks for the advice. I get what you mean. I will have to replace those 2x4's someday, but I expect to get a couple of seasons out of them.
Here's why I'm not too concerned. They aren't touching the ground directly so they shouldn't get wood eating insects. I've watched the concrete, and I know that water doesn't puddle there. And these are both southern yellow pine which is more resilient than the typical white pine 2x4.
The benefit I see is that– I have the tools to make it whatever thickness I need it to be. I can bolt the pump directly to it; I don't have a setup for bolting into a concrete paver. And I can attach the pump to a wider board. Both of these help to reduce the vibration and noise.
I wondered if it was possible to turn your filter 90 degrees and scoot it up to take out some of the extra 90's
Yeah, I think it would have been. I thought about it, but wasn't sure I could figure out a way to move the filter by myself. Short of trying to remove the sand first, of course. When I started I felt like there was a benefit to knowing that the previous plumbing had lined up with it in this orientation. Probably, though, I should have considered moving the filter more... next time.
Thread Status
Hello , This thread has been inactive for over 60 days. New postings here are unlikely to be seen or responded to by other members. For better visibility, consider Starting A New Thread.


