Another The Woodlands, TX Build - Finishing touches

Robtown

Bronze Supporter
Jul 16, 2020
135
The Woodlands, TX
Pool Size
18500
Surface
Plaster
Chlorine
Salt Water Generator
SWG Type
Pentair Intellichlor IC-60
****Adding a finished pool pic to the first post so the thread doesn’t start with the issues, lol***

E4FA5E56-7887-47FF-BFD5-092AF52EAF53.jpeg


Like many others, I’m very glad I’ve found this site and have been meaning to start my build thread weeks ago. While I didn’t find TFP until after I picked a PB and signed a contract (I probably would have gone with a different builder after learning more here and while my PB had good ratings, references, and pricing they lack knowledge in some specifics of my build), I’ve been able to change our project significantly by adding SWCG, chiller, IntelliCenter, IntelliPH, Intelliflo XF pump, correctly sized plumbing for the most part, etc...

Hopefully I’ll have time to update this thread with more of the past details for others to learn about and maybe save someone else from my struggles however I have a more pressing concern.

I’m at odds with our tile/coping sub about the cuts on the spa travertine coping. I’m pretty sure everyone here is going to agree it needs to be redone but would like opinions regardless. I’m not getting much support from our PB (which will result in another conversation about he being our advocate rather than siding with his subs).

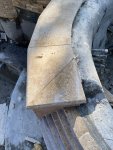
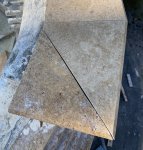
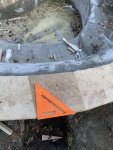
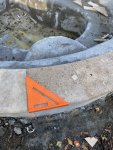
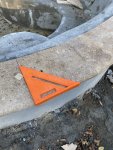
It seems the tile sub is cutting corners. On a round spa with 12x12 bullnose coping and a curved beam/neck roll, they are making cuts on only one side of the coping tiles. For over half of the tiles one side will have a 90 degree angle and the other about 80 degrees instead of each side at about 85 degrees. There are a couple of tiles even beyond a 90 degree angle. Here are a few pictures...
 

Attachments

  • F4298D30-DFA7-478E-A8D8-AE37097B3434.jpeg
    F4298D30-DFA7-478E-A8D8-AE37097B3434.jpeg
    731.4 KB · Views: 246
  • 44090070-F76B-406C-99A7-B9FEB57B9A73.jpeg
    44090070-F76B-406C-99A7-B9FEB57B9A73.jpeg
    694.7 KB · Views: 242
  • C5025F49-3BB7-4D50-A2E8-EA90A0D4DD73.jpeg
    C5025F49-3BB7-4D50-A2E8-EA90A0D4DD73.jpeg
    720.3 KB · Views: 235
Last edited:
  • Like
Reactions: KBR
Of course, the joint at the spillway doesn’t match either, I think they should make 2 triangles, then start the trapezoid shaped coping. Instead one continues for about an inch and the other side continues for about 3 inches...
 

Attachments

  • D0E0FEC7-B037-4372-8F16-6FAE73EDF7DF.jpeg
    D0E0FEC7-B037-4372-8F16-6FAE73EDF7DF.jpeg
    675.3 KB · Views: 141
  • 559F5EE3-8337-43E5-842E-AFF333441CD3.jpeg
    559F5EE3-8337-43E5-842E-AFF333441CD3.jpeg
    894.9 KB · Views: 138
Am I being too particular? Would you accept this work?
Overall we would never really be walking around the spa looking at these cuts. The angles we’d be looking at the spa would hide this issues. We wouldn’t see them from the pool, existing patio, or the pergola we are adding to the left of the spa. When entering the spa from the left side, the cuts angle away to the left so as noticeable.
Here’s the current progress and renders for the pool...
 
If you have read on here at all you know I am the first one to say NOPE to poor work.............I don't see any problem with the spa coping on the first set of pics.

BUT those end corners are bad and need to be redone! The "inside" parts no one will ever notice as it really does not show without the angle tool. Those end corners everyone will see and notice as they are so off. I agree they would be to equal triangles.

Good luck getting him to fix them!

Thanks Kim. The are fixing the corners. After they put grout in the rest of the coping it doesn’t stand out so I can live with the cuts. They are doing the rolled beam now, I think when it’s all done it will look even better.

Now I just need to make sure they get the spa tile level as I think this will be a challenge.

Thanks,
 
They are fixing the corners.
What are they doing to fix the corners? I would ask them to SHOW you the pieces before they put them on. It will save them time and effort and you the headache of having them redo it AGAIN!

Now I just need to make sure they get the spa tile level as I think this will be a challenge.
Any way you can be there to watch over their shoulder? Even if it is 6' back if you are watching serving them some snacks and drinks they will be on their A game (hopefully).
 
I’m watching over them and we have pretty open communication. Of course the PB is MIA. This is the 4th day they’ve been here. They brought there own drinks but I got them lunch 2 of the days, Pizza one day and Raising Caines chicken another day. Probably going to order some more pizza again here soon as they are trying to finish up today (Saturday night is movie and pizza with the family).
 

Enjoying this content?

Support TFP with a donation.

Give Support
Sounds like you already know this but get out there with a level and make sure the spillway is level. That's the lesson I learned from my build. I have an awesome stone spillway where only half of it works when it is at the flow I want it running.

Love the spa design!

--Jeff
 
I was checking your previous posts. . . Looking for your tile data.
Which waterline tile did you use? What about your wall and pillar?
I've been stuck on the tile selection stage for awhile. Would love your input!
 
Sounds like you already know this but get out there with a level and make sure the spillway is level. That's the lesson I learned from my build. I have an awesome stone spillway where only half of it works when it is at the flow I want it running.

Love the spa design!

--Jeff

Yes, I’ve checked the spillway multiple times and all of the other walls, columns, etc... I’m sure they are getting frustrated with me pointing out and checking their work but I’ve had to have them fix multiple imperfections. We’re having a little rain so they are coming back out tomorrow to finish up some of the split face tile as well as if
Fix a couple of items.

My biggest concern now is the spa rolled beam with 1x1 tiles and it looking a little wavy (see pics).

I told them from the beginning they should have started at the bottom and worked up to make the “rings” level, then do the coping last. But they did the coping then worked down as you also need the coping in the spa to align the the raised wall in the pool. I guess it would be hard to match either way. They did spend a lot of time trying to get the mortar rolled edge symmetrical around the sp

What I really want to see now is what it looks like with water inside as it’s difficult to measure if the rings are level and how pronounced the waves are compared to the waterline.

Has anyone ever tried to fill up their spa before plaster to check the waterline and spillway? It would be quite a bit of water to waste, but better to know now if there are going to be any issues. ...


9646EA9F-5ABF-4225-8652-7F2B69A28EE7.jpeg
2FE149CE-6327-4D00-AC31-DA2D090E15D8.jpeg15B98509-FC06-42E8-BA37-65B5864BEDF8.jpeg
 
I was checking your previous posts. . . Looking for your tile data.
Which waterline tile did you use? What about your wall and pillar?
I've been stuck on the tile selection stage for awhile. Would love your input!

Hi Sollace,
I never got around to starting my build thread at the beginning so hadn’t posted much previous information. Hopefully soon I can find some time and am about to post my equipment, plumbing, and wiring plans to get feedback. This is where I applied most of the knowledge I’ve learned so far from TFP.

As for our tile and stone selections, we’re getting them from QDI stone here in Houston. We picked out choices from the Spring/Woodlands showroom off of I45. Not too far from you. They mainly focused on Travertine and have limited tile selections. We happened to find one we liked from them so went with it. We had seen lots of other options at other PB showrooms so we don’t feel like we missed other options. If you’re going with glass tile, NPT is very popular on this site and have a Houston showroom I believe.

We selected...
Coping - Noce filled and honed bullnose coping
Spillway - Noce filled and honed paver
Columns and spa neck roll- Noce tumbled 1x1 tiles
Pencil tile (separates waterline tile and raised wall) - Noce 12” travertine pencil tile
Raised wall - Alpine 3-size split face travertine.
Waterline tile - Canvas Deam 6x6 ceramic tiles
Waterline grout - grey
Travertine grout - Sandstone #30
Plaster will be - PebbleSheen Blue Surf
Decking will be Cool Deck, color TBD
 
We have quite an elaborate set up planned to be able to power our spa, automate our water features and control our temperature. Attached is the equipment list and plumbing/electrical we’re planning for our pool.

please let me know your thoughts...

My main question is should we switch the water feature pump to a IntelliFlo VS instead of the WhisperFlo? We want to control our water bowls and wall scuppers separately which is requiring an elaborate plumbing and automation setup (I wish they would make the IntelliValves able to be Programmed to multiple positions). However this does allow us to drain the features back into the pool so they don’t have too much standing water.


And while we considered a robot, we decided on a pressure side vacuum for now as we don’t have a great place to connect and store a robot. But we’re still thinking about it. We have the vacuum port already in the Gunite shell but could remove or plumb for suction, another return, etc...

I was hoping to get away with only a Pool/Spa and water feature pump, but the “JetArrays”. We are using in the spa require quite a bit of flow so will need a dedicated XF pump as well.
 

Attachments

  • Collison - Pool Pump-Automation Diagram v2.pdf
    168.5 KB · Views: 50
It could be the colors that throw the line off. From here it looks okay then from there it looks wavy. Is it smooth when you run your hands over it? no point or corners that will hurt if you rub against them?

That’s a good question. I didn’t take really feel across it too much. There are definitely spots where the tile bulge out slightly or sink in. They are not perfectly smooth and symmetrical but I should probably pay more attention to the function rather than the form.

I’ll check it out and report back.
 
I have a three way valve with an actuator that does the same job as these formy bubbler/fountains. There is no need for the return to pool from the water feature pump that I can think of. I did upgrade the water feature pump to a VS because I feel like I will not need full flow most of the time. I am wondering why an added pump for the spa, when I use spa mode on our pool it will use the full flow of the pool pump and I can run it at full speed for more water if needed.
1603136990102.png
 
I have a three way valve with an actuator that does the same job as these formy bubbler/fountains. There is no need for the return to pool from the water feature pump that I can think of. I did upgrade the water feature pump to a VS because I feel like I will not need full flow most of the time. I am wondering why an added pump for the spa, when I use spa mode on our pool it will use the full flow of the pool pump and I can run it at full speed for more water if needed.
View attachment 166308
With the automation, you can have only 2 positions available so if full one way and the full the other way, we’d only run one set of water features at a time and not both, water bowls or wall scuppers. That is why I wish we could have 3 stops with one Intellivalve in the automation control. I believe that is the intent (I think I read to have 5 programmed stops) but is not yet available or maybe ever available. I believe there are some folks trying to get around this with Raspberry Pi’s and some coding.

Ideal would be a VS pump and one 3-way valve with at least 3 stops controlled by automation.

My thought process is...

pump off - water bowls open, wall scuppers open, pool bypass open - this would allow the bowls and scuppers to drain to the pool but pump would keep prime due to the check valve

both water features on - both valves open, pool bypass valve closed. All flow split to both features, say 100 GPM total, 50 GPM to each.

One water feature on - that feature valve open, other feature valve closed, pool bypass open to allow extra flow to be sent back to the pool so all 100GPM doesn’t go to one water feature as that would be too much, 50 GPM to one water feature, 50 GPM back to pool.

I really want the water bowls to be able to drain and not turn into a bird bath.


Does that make sense? Is there a better way?
 

Enjoying this content?

Support TFP with a donation.

Give Support
Thread Status
Hello , This thread has been inactive for over 60 days. New postings here are unlikely to be seen or responded to by other members. For better visibility, consider Starting A New Thread.