My above ground pool flex hose conversion to hard PVC pipe. Warning, long post...
Aqua Leader Elegance AGP 15'x30'x 54", 12k gallons, vinyl liner ... Hayward/SwimPro Voyager pump SW159412STL, 2hp, 2spd, Hayward/Voyager 175sf element filter SW175MDDVPAKS, Installed August 2016 ... Liquid Chlorine, Stenner, Woods 50015 timer ... TF-100
I have wanted to move the pump/filter and run hard pipe on my AGP. It was run with the typical AGP corrugated flex hose. The kids & dog could and would run around and over it. I was always worried it would spring a leak, get stepped on, be a chew toy or break all together. I decided that since I had the trencher to finish the electrical run that I would use it to cut a path for the plumbing as well. The plumbing trench sat empty for at least a week due to life stuff getting in the way…
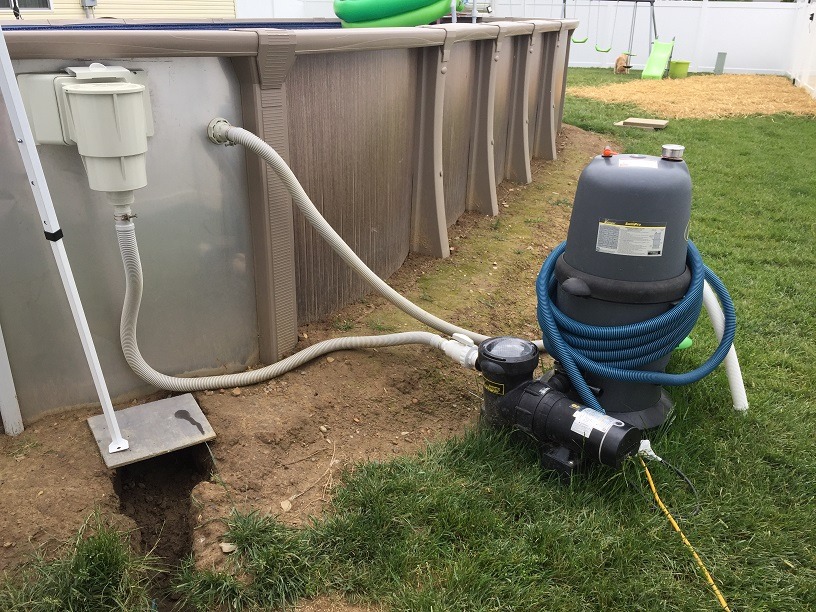
I don’t have an original pic, but the pump/filter was right in front of the skimmer & return where the trench is now. I had to move the pump over to get it out of the way of the trencher and it’s giant saw blade. It's basically a big chainsaw on tracks! I left it all hooked up since this project was going to take more than a day to finish. Power is still fed from the yellow heavy duty extension cord coming from the house GFI outlet. Not the recommended setup, but like I said, I was making it a permanent install.

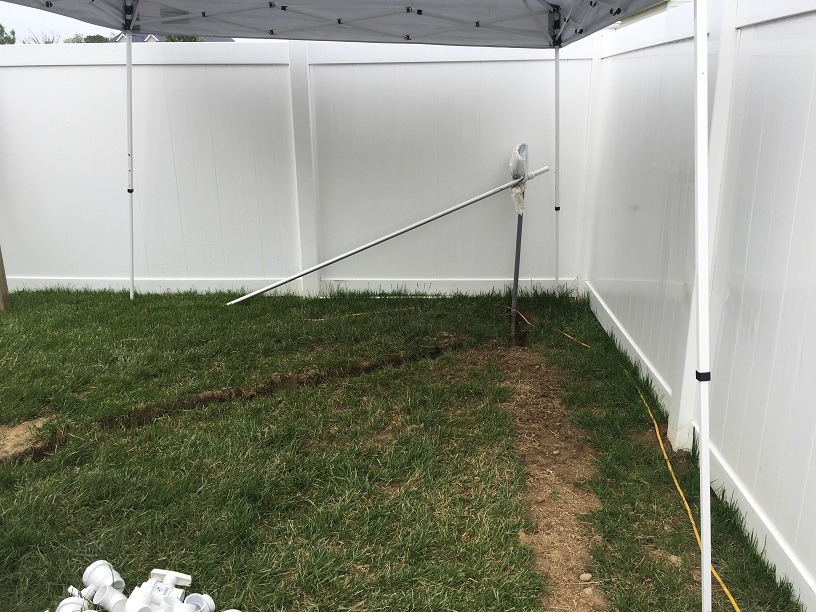
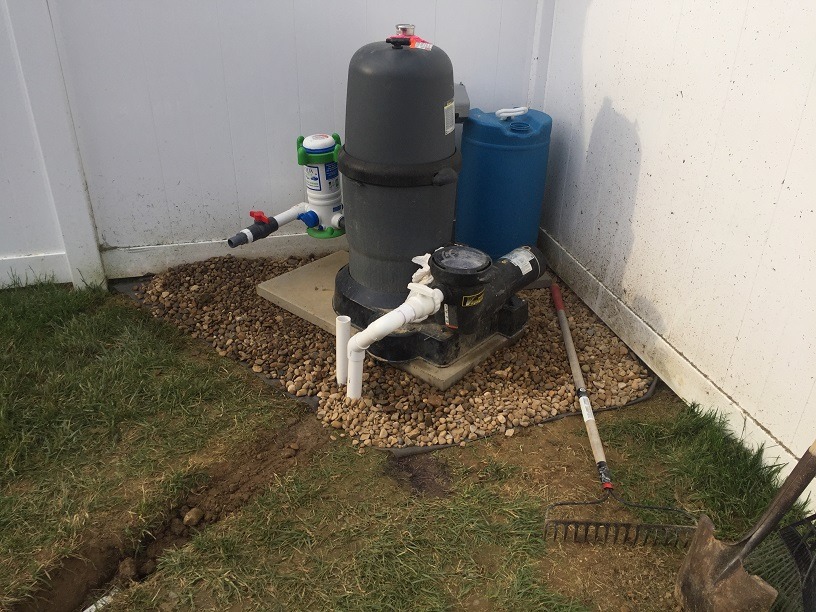
This is where I want to put the pump/filter pad. The weather couldn’t make up its mind and was swapping between sunny without a cloud to downpour. So I set up an ez-up tent to get out of the sun and keep things dry. It worked great until the wind caught it and flopped it upside down while I was eating a late lunch.
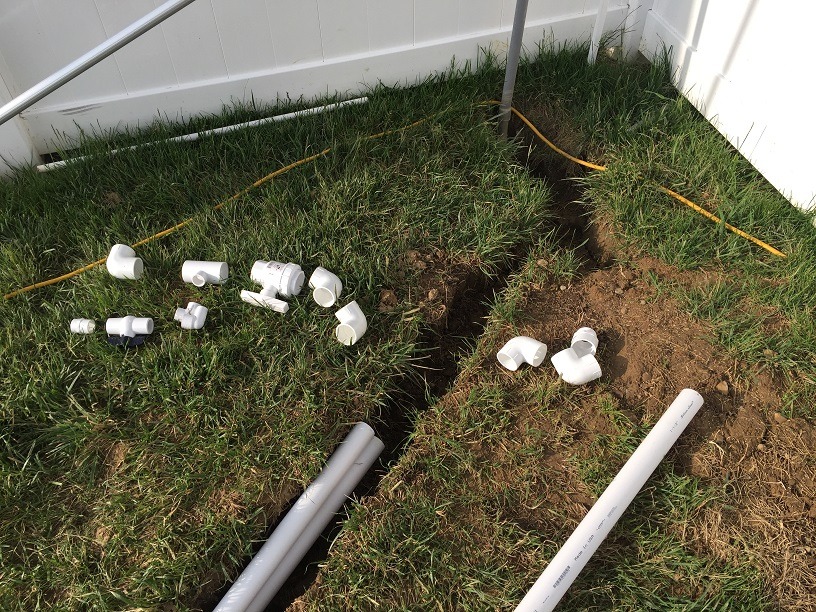
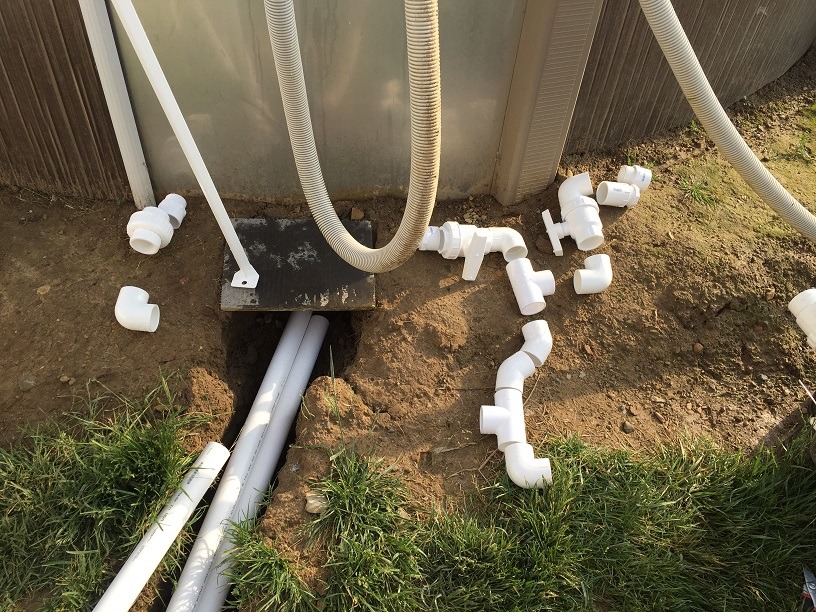
I started by laying out the fittings where they needed to go. I had done this in the big box store in the cart.. twice, but since it was go time, I wanted to be sure I had the parts I needed. I did have to tweak it some as I went along once I started putting pipe between the fittings.
I did buy some extra fittings just in case and I’m glad I did. Couple extra elbows (90 & 45), extra tee, straight couplers. But one thing I didn’t account for… the correct amount of pipe. I took a pic so I could “remember” how I had it planned.
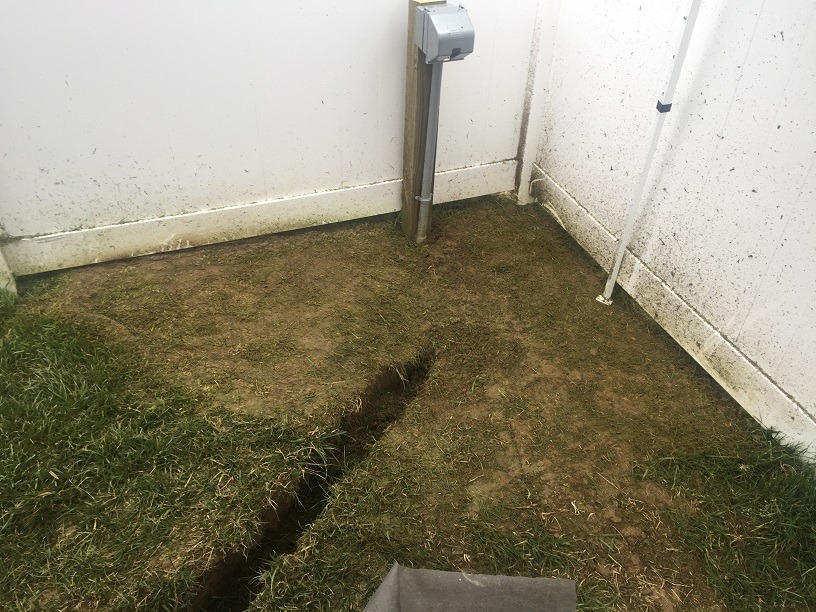
I moved it all out of the way. I mowed the grass short, then took the string trimmer and scalped it down to dirt where I wanted it to be. I liberally sprayed weed & grass killer all over the place to try to stop regrowth. I'll see how that works out...
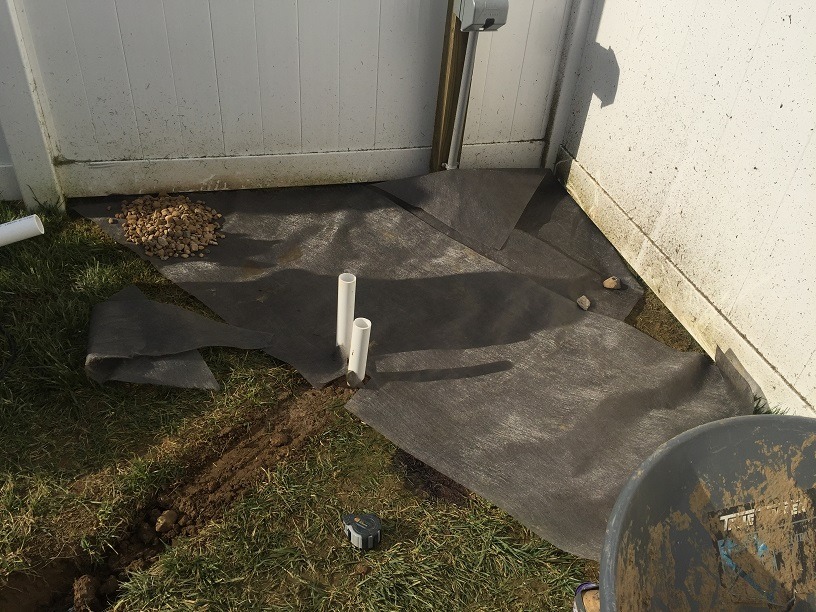
Dropped in some landscaping fabric. I’m not a gardener and don’t even try to pretend I’m one. I’ve read some mixed reviews on the effectiveness of this, but decided it was easier to add it now instead of wish I did. I laid it out and cut to fit. Then shoveled some donated stone onto the fabric to keep it in place while I cut & fit the fabric. I’m going to use a simple 4x4 PT post for the border to keep the stone in. In hind sight, I probably should have put it down before but I didn’t have it on hand. On that note, our dog has decided he likes digging through the stone… spreading it everywhere… digging for who knows what?? So I need to get that border on soon. Shoveled more stone to get it to the desired depth of ~3”. I didn't measure the depth, it just was what it was.
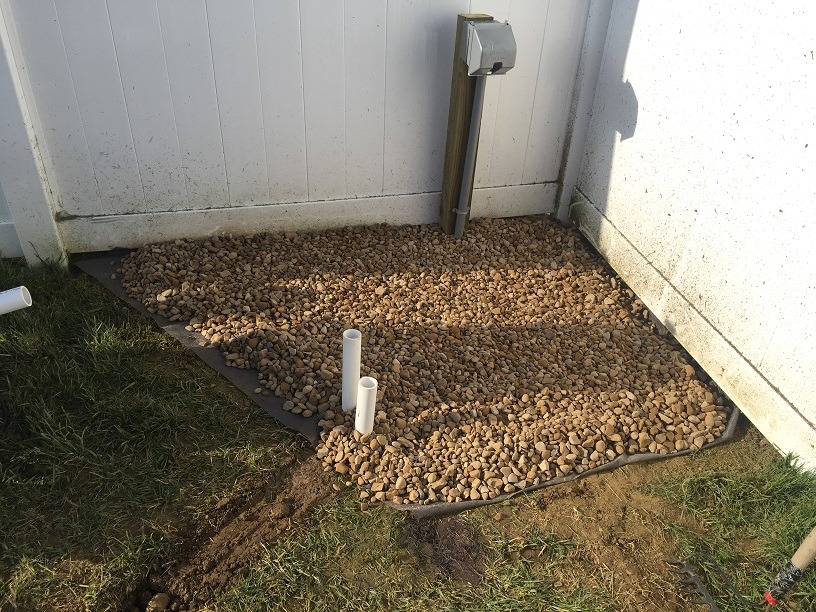
I laid down some 20”x20” stone pavers to put under the equipment. The one in the back is a 16”x16” to put the chlorine barrel on. I leveled all the pavers just by rocking them around on the stone, it actually wasn’t as hard as I was expecting. I unhooked the equipment and dragged it up on the pavers. I did have to tweak the location of the pavers a bit to line up the pump intake to the pipe but I just used a shovel handle to push them around. I didn't have to remove the equipment, it was light enough with the water out of it. One thing I noticed when I powered up the pump, the hard plastic base vibrated on the pavers, even when it was full of water. I wedged a plastic bag under it for now, but will have to add something under it to absorb the vibration. Was thinking taking some clear vinyl tube and splitting it or some rubber/foam weather stripping.
From there, I started the hard plumb on the pad side of the run. This is probably opposite of how it usually goes but I wanted to make sure things lined up here before I went too far in case I needed to move the trench location.
I started by dry fitting a lot of the fittings. Using a sharpie marker to show how far the pipe would slide into the fitting and then measure from dot to dot to give me the pipe length. There was a lot of eyeballing and using a level to get things to line up properly. In the end, I think it ended up how I wanted.
I worked the pump inlet first since it was the easiest. Discharge side was next. I went with 2x 45deg elbows instead of a single 90deg elbow. It seemed like it fit better and let overhang distance.
The 3/4" branch line is for a future Stenner pump that I have in a box, waiting to be installed. The filter has a plug near the base for draining if needed. The valves have integral unions so that I can pull the pump/filter assembly out in the fall for closing.
** please ignore the tab feeder. It was part of a package deal the installers had installed. It sits empty with no purpose in life (no tabs nor minerals). But I wanted to keep it just in case.
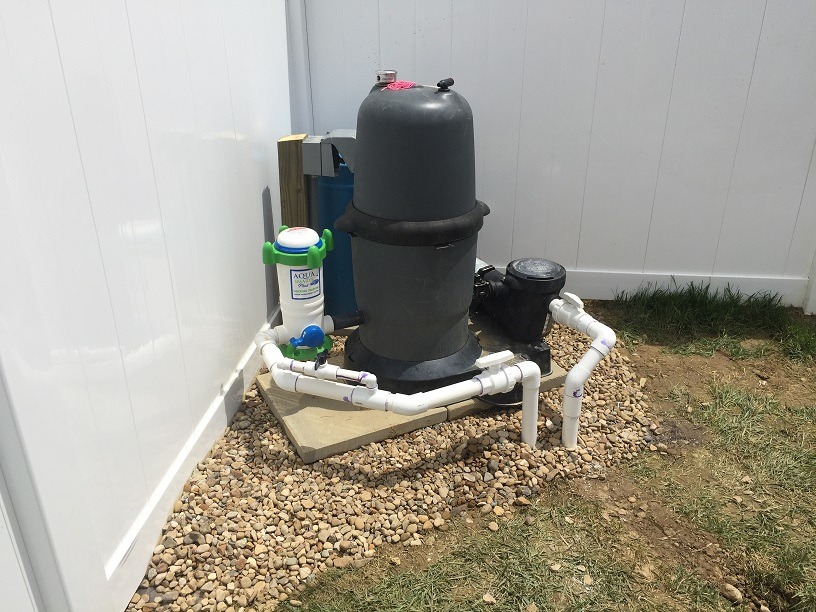
The straight pipe was an easy straight shot about 11’ to the poolside skimmer & return.
The sun was setting and I wanted to finish for the day. I didn’t want to leave the pool “un-plumbed” to the pump as I wasn’t sure if I was going to be able to work on it the next day.
So, I plumbed up to the skimmer next as it was a straight shot up to the skimmer. I didn’t want to drain the pool and I didn’t have a stopper big enough to plug it up. I ended up using my vacuum hose. I pulled the basket and stuffed the hose end down in the skimmer drain. It needed a couple of turns of black tape to seal it off to stop the water from leaking past it, but it got the job done. The Hayward skimmer has a standard MPT-to-barb fitting to attach to the flex hose. I unscrewed that and screwed a MPT-to-Slip fitting in its place using some Teflon tape. Short pipe to a valve/union**. Short pipe to a union so that I can take this spool piece out for winter closing.
**I couldn’t decide if I should have the union attached to the skimmer OR the valve to skimmer. I decided on the union since without it, the valve wouldn’t seal anyway. And I could turn the valve so the handle faced out regardless of how much I had to turn the threaded coupling. I could also pull the spool piece and the valve parts would be safe indoors through winter.

Then I had to work on the return side. I decided it was going to take too long to finish it the way I wanted it. So I had to get creative. I knew I was going to put a drain on the return side, so I used the barb fitting to attach to the flex hose that was still attached to the return eye. I capped off the riser pipe above where it needed to be cut. I had to sacrifice the cap for the greater good.
The drain valve and barb fitting were part of the original pump/filter install and I just cut it off long enough to reuse it. You can see this is a different valve, a cheaper one. There are a few people here that have warned against using them because they stick and the handle breaks. I’m now part of that chorus. When I finally finished the return side, I tried to open the valve to flush the system. It was stuck and now harder to access than before, so… I broke one side of the red handle.
Now it’s fate is to be turned with pliers until it totally fails. Then replace it with a better valve. I wish I could afford the Jandy valves, but that wasn’t in the budget.
The pic is from the next morning since it was too dark out to see when I finished for the night.
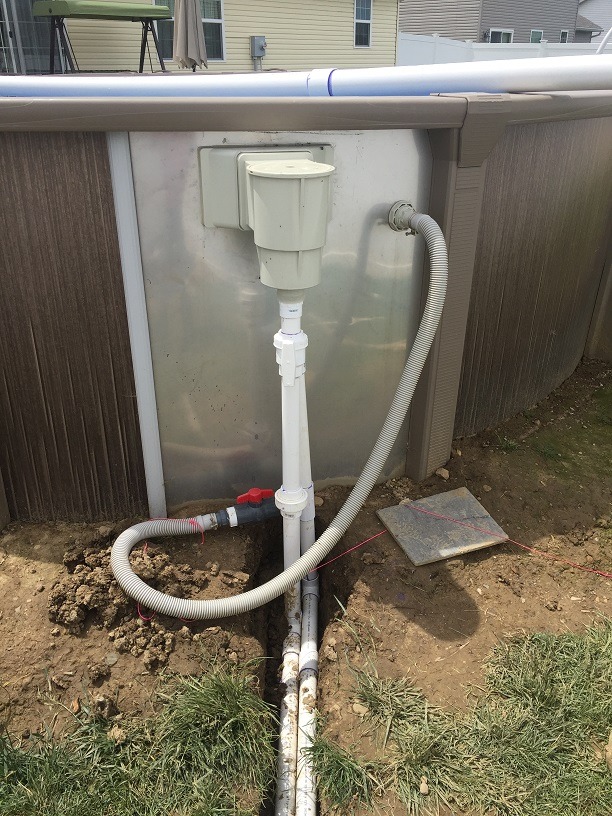
Two days later I was able to finish up the return side. I started and worked from the eyeball return working toward the ground. The diagonal pipe was a bit interesting to line up. It was obviously a height delta, but also had to move closer to the pool to meet the feed pipe. I had to eyeball it after using a level to get the correct angle down. I cut down the capped pipe to the proper height and glued it all together a piece at a time. If you look close, it doesn't have a union at the ground. I need to add one so that I can remove some piping at closing.
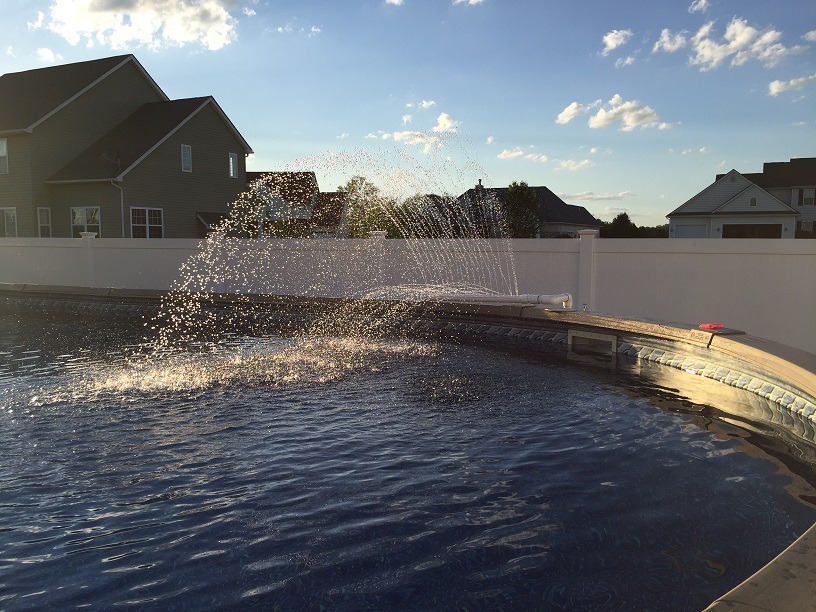
The sidestream coming out vertical to the pool edge is for a homemade fountain that isn’t finished yet***. Right now it is terminated at a FPT fitting with a plug. The fountain will attach directly with a MPT fitting. I did this so that I can have various fountain attachments to fit my (kids) mood. I could have used a union, but I didn’t want to have to buy full unions to just get the half I needed. The valve/union can control the flow (on, some, off) and can let me rotate the assembly if I want to make it directional.

***And a teaser of the fountain I made.
Some notes & comments:
I used all “for pressure”, not DWV fittings. Well, if you have a good eye you will find one, but it’s on the drain. That the installers used. And I recycled. For the pipe, the store shelf said it was “not for pressure”, but the pipe stamp (1-1/2”) had a rating of 330psi. Go figure…
While plumbing this, I tried to leave each pipe piece long enough so that if I ever had to cut out a fitting, I would get one more chance to make it right before the two fittings were back to back. This wasn’t an issue anywhere except for the final valve before the return eye, The extra 1-1/2” of pipe on each side of the valve made it stick out a bit further than I would have liked. I suppose I could have put the valve vertical, but then I couldn’t independently control the return from the alternate sidestream, without making the sidesteam pipe cantilever way out.
My OCD is a bit annoyed at the purple runs and spots in some places. I tried to be careful, but that’s how it turned out.
I made the pump pad very small and compact on purpose. Hopefully that won’t come back to bite me. I can get to all the valves and switches, fill the barrel and remove the filter lid fairly easily. I've flipped the pump switch and pulled the filter lid and I am happy with the access.
I think it cost me a tick over $100 for the hard pipe and fittings, plus my time. I already had the trencher for the electric so that saved me on digging by hand (which would have been a royal P.I.T.A. in the rock hard clay).
Doing the conversion didn’t reduce the head losses any, the pressure gauge reads nearly the same value on LS. If anything running on HS may have a higher head loss than before, but that wasn’t my goal. I wanted a more reliable system, less prone to damage, to move the pump away from the pool and to just make it look nicer & more “finished”.
Next is to install the 4x4 to hold the stone.
I still have to tie up some loose ends on the electrical, but that’s not what I wanted this thread to be about.
My solar panel install thread
.
Aqua Leader Elegance AGP 15'x30'x 54", 12k gallons, vinyl liner ... Hayward/SwimPro Voyager pump SW159412STL, 2hp, 2spd, Hayward/Voyager 175sf element filter SW175MDDVPAKS, Installed August 2016 ... Liquid Chlorine, Stenner, Woods 50015 timer ... TF-100
I have wanted to move the pump/filter and run hard pipe on my AGP. It was run with the typical AGP corrugated flex hose. The kids & dog could and would run around and over it. I was always worried it would spring a leak, get stepped on, be a chew toy or break all together. I decided that since I had the trencher to finish the electrical run that I would use it to cut a path for the plumbing as well. The plumbing trench sat empty for at least a week due to life stuff getting in the way…
I don’t have an original pic, but the pump/filter was right in front of the skimmer & return where the trench is now. I had to move the pump over to get it out of the way of the trencher and it’s giant saw blade. It's basically a big chainsaw on tracks! I left it all hooked up since this project was going to take more than a day to finish. Power is still fed from the yellow heavy duty extension cord coming from the house GFI outlet. Not the recommended setup, but like I said, I was making it a permanent install.
This is where I want to put the pump/filter pad. The weather couldn’t make up its mind and was swapping between sunny without a cloud to downpour.
So I set up an ez-up tent to get out of the sun and keep things dry. It worked great until the wind caught it and flopped it upside down while I was eating a late lunch.
I started by laying out the fittings where they needed to go. I had done this in the big box store in the cart.. twice, but since it was go time, I wanted to be sure I had the parts I needed. I did have to tweak it some as I went along once I started putting pipe between the fittings.
I did buy some extra fittings just in case and I’m glad I did. Couple extra elbows (90 & 45), extra tee, straight couplers. But one thing I didn’t account for… the correct amount of pipe.
I took a pic so I could “remember” how I had it planned.
I moved it all out of the way. I mowed the grass short, then took the string trimmer and scalped it down to dirt where I wanted it to be. I liberally sprayed weed & grass killer all over the place to try to stop regrowth. I'll see how that works out...
Dropped in some landscaping fabric. I’m not a gardener and don’t even try to pretend I’m one. I’ve read some mixed reviews on the effectiveness of this, but decided it was easier to add it now instead of wish I did. I laid it out and cut to fit. Then shoveled some donated stone onto the fabric to keep it in place while I cut & fit the fabric. I’m going to use a simple 4x4 PT post for the border to keep the stone in. In hind sight, I probably should have put it down before but I didn’t have it on hand. On that note, our dog has decided he likes digging through the stone… spreading it everywhere… digging for who knows what?? So I need to get that border on soon. Shoveled more stone to get it to the desired depth of ~3”. I didn't measure the depth, it just was what it was.
I laid down some 20”x20” stone pavers to put under the equipment. The one in the back is a 16”x16” to put the chlorine barrel on. I leveled all the pavers just by rocking them around on the stone, it actually wasn’t as hard as I was expecting. I unhooked the equipment and dragged it up on the pavers. I did have to tweak the location of the pavers a bit to line up the pump intake to the pipe but I just used a shovel handle to push them around. I didn't have to remove the equipment, it was light enough with the water out of it. One thing I noticed when I powered up the pump, the hard plastic base vibrated on the pavers, even when it was full of water. I wedged a plastic bag under it for now, but will have to add something under it to absorb the vibration. Was thinking taking some clear vinyl tube and splitting it or some rubber/foam weather stripping.
From there, I started the hard plumb on the pad side of the run. This is probably opposite of how it usually goes but I wanted to make sure things lined up here before I went too far in case I needed to move the trench location.
I started by dry fitting a lot of the fittings. Using a sharpie marker to show how far the pipe would slide into the fitting and then measure from dot to dot to give me the pipe length. There was a lot of eyeballing and using a level to get things to line up properly. In the end, I think it ended up how I wanted.
I worked the pump inlet first since it was the easiest. Discharge side was next. I went with 2x 45deg elbows instead of a single 90deg elbow. It seemed like it fit better and let overhang distance.
The 3/4" branch line is for a future Stenner pump that I have in a box, waiting to be installed. The filter has a plug near the base for draining if needed. The valves have integral unions so that I can pull the pump/filter assembly out in the fall for closing.
** please ignore the tab feeder. It was part of a package deal the installers had installed. It sits empty with no purpose in life (no tabs nor minerals). But I wanted to keep it just in case.
The straight pipe was an easy straight shot about 11’ to the poolside skimmer & return.
The sun was setting and I wanted to finish for the day. I didn’t want to leave the pool “un-plumbed” to the pump as I wasn’t sure if I was going to be able to work on it the next day.
So, I plumbed up to the skimmer next as it was a straight shot up to the skimmer. I didn’t want to drain the pool and I didn’t have a stopper big enough to plug it up. I ended up using my vacuum hose. I pulled the basket and stuffed the hose end down in the skimmer drain. It needed a couple of turns of black tape to seal it off to stop the water from leaking past it, but it got the job done. The Hayward skimmer has a standard MPT-to-barb fitting to attach to the flex hose. I unscrewed that and screwed a MPT-to-Slip fitting in its place using some Teflon tape. Short pipe to a valve/union**. Short pipe to a union so that I can take this spool piece out for winter closing.
**I couldn’t decide if I should have the union attached to the skimmer OR the valve to skimmer. I decided on the union since without it, the valve wouldn’t seal anyway. And I could turn the valve so the handle faced out regardless of how much I had to turn the threaded coupling. I could also pull the spool piece and the valve parts would be safe indoors through winter.
Then I had to work on the return side. I decided it was going to take too long to finish it the way I wanted it. So I had to get creative. I knew I was going to put a drain on the return side, so I used the barb fitting to attach to the flex hose that was still attached to the return eye. I capped off the riser pipe above where it needed to be cut. I had to sacrifice the cap for the greater good.
The drain valve and barb fitting were part of the original pump/filter install and I just cut it off long enough to reuse it. You can see this is a different valve, a cheaper one. There are a few people here that have warned against using them because they stick and the handle breaks. I’m now part of that chorus. When I finally finished the return side, I tried to open the valve to flush the system. It was stuck and now harder to access than before, so… I broke one side of the red handle.
Now it’s fate is to be turned with pliers until it totally fails. Then replace it with a better valve. I wish I could afford the Jandy valves, but that wasn’t in the budget.
The pic is from the next morning since it was too dark out to see when I finished for the night.
Two days later I was able to finish up the return side. I started and worked from the eyeball return working toward the ground. The diagonal pipe was a bit interesting to line up. It was obviously a height delta, but also had to move closer to the pool to meet the feed pipe. I had to eyeball it after using a level to get the correct angle down. I cut down the capped pipe to the proper height and glued it all together a piece at a time. If you look close, it doesn't have a union at the ground. I need to add one so that I can remove some piping at closing.
The sidestream coming out vertical to the pool edge is for a homemade fountain that isn’t finished yet***. Right now it is terminated at a FPT fitting with a plug. The fountain will attach directly with a MPT fitting. I did this so that I can have various fountain attachments to fit my (kids) mood. I could have used a union, but I didn’t want to have to buy full unions to just get the half I needed. The valve/union can control the flow (on, some, off) and can let me rotate the assembly if I want to make it directional.
***And a teaser of the fountain I made.
Some notes & comments:
I used all “for pressure”, not DWV fittings. Well, if you have a good eye you will find one, but it’s on the drain. That the installers used. And I recycled. For the pipe, the store shelf said it was “not for pressure”, but the pipe stamp (1-1/2”) had a rating of 330psi. Go figure…
While plumbing this, I tried to leave each pipe piece long enough so that if I ever had to cut out a fitting, I would get one more chance to make it right before the two fittings were back to back. This wasn’t an issue anywhere except for the final valve before the return eye, The extra 1-1/2” of pipe on each side of the valve made it stick out a bit further than I would have liked. I suppose I could have put the valve vertical, but then I couldn’t independently control the return from the alternate sidestream, without making the sidesteam pipe cantilever way out.
My OCD is a bit annoyed at the purple runs and spots in some places. I tried to be careful, but that’s how it turned out.
I made the pump pad very small and compact on purpose. Hopefully that won’t come back to bite me. I can get to all the valves and switches, fill the barrel and remove the filter lid fairly easily. I've flipped the pump switch and pulled the filter lid and I am happy with the access.
I think it cost me a tick over $100 for the hard pipe and fittings, plus my time. I already had the trencher for the electric so that saved me on digging by hand (which would have been a royal P.I.T.A. in the rock hard clay).
Doing the conversion didn’t reduce the head losses any, the pressure gauge reads nearly the same value on LS. If anything running on HS may have a higher head loss than before, but that wasn’t my goal. I wanted a more reliable system, less prone to damage, to move the pump away from the pool and to just make it look nicer & more “finished”.
Next is to install the 4x4 to hold the stone.
I still have to tie up some loose ends on the electrical, but that’s not what I wanted this thread to be about.
My solar panel install thread
.
Last edited: