New build, 27ft round above-ground in Canada

StephL

0
Jun 15, 2015
73
Dewinton, Alberta
Ok, I can finally share some pool build pictures! It's really a work in progress still, but I'll update as we keep at it. We're doing everything ourselves (my husband and I), from the levelling to the electric and gas work.

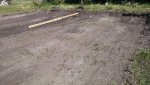
So far, we've started levelling the ground with our tractor. We had about a 6 inch grade sloping away from the house, so we had to take down quite a bit. After getting a very rough level, we are using 2x4s on end, with a level duct-taped to the top, which is nailed into a post sunk in flush with the ground in the centre. We took a quick look and right away discovered we were still off by a few inches. The ground is hard as rock, so my husband used a landscaping rake on the back of the tractor to dig into the ground at the high spots, and I've used the back flat-end of a rake to remove all of that now-loosened soil. We're a LOT closer now (like, it is actually looking like this might be possible :) ) We still need to go around with the 2x4s a few more times for finishing touches, but it is pouring rain so we're inside now.

attachment.php


attachment.php
 

Attachments

  • Tractor Level.jpg
    Tractor Level.jpg
    98.1 KB · Views: 615
  • Two by four leveling.jpg
    Two by four leveling.jpg
    98.2 KB · Views: 614
Welcome to TFP! Congrats on the new pool!

Nothing easy about this part of it, but the hard work and time to get it right will pay for a long time to come!
 
Levelling this ground may actually be the end of me. We did what we could with the tractor bucket, and now we are hand-levelling the rest. Husband cut the sides and end point off an old shovel to make a scraper, and he's inch by inch taking this down. We were using a 2x4 with a level duct taped on top to level off the ground, and then a string-level and some stakes to try to gauge the overall slope of the entire circle...it was woefully slow and my guess is, quite inaccurate. We purchased a laser level/tripod contraption yesterday and were able to go around making really accurate measurements in all directions, which is invaluable. The only issue is, the laser isn't visible during the day so we're out at 10pm STARTING to work! Sigh. Making matters worse (so much worse!) is that the pool was finally delivered yesterday, and it's just sitting here, sad and empty. And it is 100 degrees out. Would be nice to jump into an icy cold body of water right about now....:mad:
 
I feel your pain. But I slayed a hillside upwards of 6ft! :mrgreen:
 

Enjoying this content?

Support TFP with a donation.

Give Support
Finally got the pool level, using our laser level in the evening hours only...sigh ;)

My husband cut a 24inch piece of 2x4, pounded a nail into each end on the underside, then measured out a 26 foot string, attached it to our centre point, and is walking around the outer edge of the pool to mark where we need to dig our trench. We decided to do a trench around the entire track, instead of pavers, as we live in an area with harsh winters and are worried about frost heave.

wrCv1EZ.jpg


- - - Updated - - -

We dug the trench out 2 inches deep, and 24 inches wide, and are filling it with 3/4 inch crush

uIfZVMM.jpg
 
We calculated that we would need 1 ton of crush, so we went to our local landscaping company (they sell piles of all kinds of rock, mulch etc in bulk). Our little tow behind trailer can support about 800 lbs, so we wanted to take 1/3 of a ton at a time. Pull in to the initial scale, weigh ourselves, and then head over to the heaping pile of crush. A HUGE tractor comes over and we ask for about 1/3. He fills us up, and it is really quite underwhelming to see...this gravel barely covered the base of our small trailer! I made my husband pose for the pic for better perspective of how small the pile was. Anyway, we head to the weigh-out scale....it's not 1/3....it is an entire ton! How does that small amount of rock weight 1 ton!!? We took the back roads home, very....very slowly.


9CRzA1s.jpg


- - - Updated - - -

Turns out, 1 ton of crush was, in fact, not quite enough... sigh. We finished what we could, and drove BACK to the landscaping centre for more.

V1SoGXL.jpg
 
We rented a vibratory plate compactor, and compacted the trench of crush. At first, it was a huge mess (I even posted a panicked thread!), it just looked like a slurry of mud all of a sudden. Hubby got the hang of it, and the rest of the compacting was smooth sailing. Then we went around with a measuring tape, every three inches front to back and allll the way around, checking for level using our rotary laser level in the centre of the pool. Any spots that were low by more than 1/4 inch, my husband filled with a shovel full of crush. Then we compacted it all again, then measure for level again, and repeated this process two more times. Now she's level within 1/4 inch all the way around. This was all last night - it's since dried up, and the rim feels as solid as concrete! Very cool.

GSloruI.jpg
 
Equipment pad pics! We decided to put the pad closer to the house, and about 50 feet away from the pool (there's a large deck in between so there was no real middle ground). The pad is right by the gas lines to the house, so the gas line and electrical install were fairly straightforward. We did the work ourselves, after pulling permits. First pic is my hubby smoothing out the cement. 18 bags of cement to make this tiny pad!! We framed out the sides with old wood from the garage, then mixed the cement in our wheelbarrow and painstakingly smoothed it out.

jXCBVIt.jpg


And then it started POURING, literally just as we finished!! Little tiny divots everywhere on top of his clean work! We rushed to tarp it off.

i3iGJQR.jpg


It's all dry now, and the equipment is set up with dry fittings for the water in between. We're waiting until the pool is up to do the actual glued runs, in case we have to make any changes.

YizWiHa.jpg
 
He reached his arms under that tarp in the rain and desperately tried to smooth them! I'll let him know you can't see them, he'll be pleased. I told him the equipment will cover most of the surface anyway, and hopefully everyone is over at the pool and not staring at his cement pad ;)-
 
He did a great job! I do not see a thing out of place! Good idea with the dry fit. I like that I see unions!

Make sure to put valves right where the pipes come out of your pool so you can turn the water flow off there if needed.

Y'all do good work!

Of course it started raining RIGHT when you were done!

Kim
 

Enjoying this content?

Support TFP with a donation.

Give Support
Thread Status
Hello , This thread has been inactive for over 60 days. New postings here are unlikely to be seen or responded to by other members. For better visibility, consider Starting A New Thread.