Information Overload... To cut the skimmer gasket or to not cut the skimmer gasket?!

May 11, 2015
33
Roanoke
I've been reading (for weeks) on the best way to install the skimmer. It's a brand new intex 20'x52" pool that is about 12" from being full. I stopped the filling process once I decided to go all in on the skimmer and place my order. Needless to say, I've gotten cold feet for the installation. I don't want to drain the pool, because it'll be another week at least before we can get in, versus this weekend. But I also want a long standing pool. I've read COUNTLESS people cut the liner without issues, but I tend to agree with the folks suggesting it's a better seal if you don't. The question is: do I cut/split the gasket or do I not? UGH! Any help would be greatly appreciated.

Here I stand with my laptop and swimming trunks on. My tool bag locked and loaded for the operation, but standing on "cold feet".
 
Will I stretch the liner if I mount the plate, cut the hole, and then put the gasket on? I'm worried about the length of time I'll be standing there with a gaping hole in the pool and it stretching in the time it takes me to put the liner gasket on and tighten the screws.
 
I think the only reason to cut the gasket is to enable adding the skimmer with a full pool. Put the frame and half the gasket on the inside then the skimmer and half the gasket on the outside, screw the screws through the liner, then cut the liner.

IMO, if your water line is below the skimmer, leave the butterfly gasket whole and install as instructed... half inside and half outside, but still whole (not cut). That's the way I did it both times. Works like a charm for me (and that's what the manufacturer intended).

Good luck! It's a breeze, and don't panic about cutting into the liner.
 
I have the same pool and my skimmer gets delivered today. I'm as nervous as you are. Please give a play by play so I don't mess up! On my way to the hardware store now to get all the materials to hard plumb. The things I get myself into....

Good luck. Post pics for all to see!
 
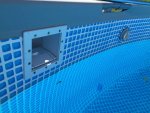
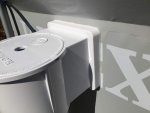
Woooo... Well... I got it installed. Followed the instructions by using a screwdriver (narrow enough to slide through the holes of the face. It all came together in a matter of 15-20 minutes. I was very meticulous with the cutting. I haven't filled up the pool yet, as I had these stupid flex hoses for the two intake ports that came with the pool and need to do something with them. I'll post pics of all of it in after I finish tomorrow. I ended up cutting a the tubes off to put in the old style intex ports. Once I cut the first hole for the skimmer, I went a little crazy. The only thing I'm a little wary of is the bulge of the butterfly gasket inside the skimmer and the gap it seems to leave on the inside of the pool between the wall and faceplate.

IMG_3206.jpg
IMG_3204.jpg


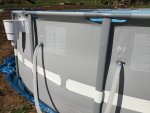
Here's the stupid dual ports that make no sense and have been removed for the sake of of an awesome pool.
IMG_3203.jpg
 
Update: Everything has been a FAIL since around noon. I've made 3 trips to Home Depot and had followed directions for hard plumbing. I'm falling back to the soft tubing that came with the pool..> The problem is now I have cut holes in the pool to allow me to block the off those stupid small intake hoses. I am not using either one of those intakes and needed to block them off. The problem now is that they are both leaking. I've punted for the day and will forfeit memorial day pool floating. I am honestly at a loss for what to do get this flipping skimmer installed. :grrrr:
 
Oh **** now I'm really scared. This was going to be my project today but am now having second thoughts. So am I hearing you say that you cut new return holes for hard plumbing? I also plan to hard plumb. :study:

Somebody please tell me should I add an additional return or use the original inlet and return? I have read so much about this stuff that I think I've confused myself. Arghhhh!!
 

Enjoying this content?

Support TFP with a donation.

Give Support
Ok. So far so good. I'm waiting for my photos to sync to show you how it's working now. Until then... Check out the way that they did it in THIS THREAD. I did the exact same thing and just "plugged/capped" the two smaller holes in the pics above. I consider myself pretty dang handy considering I've knocked down walls, re-plumbed my bathrooms, gutted and refinished my basement and have built many different gadgets, which is why I got so dag on frustrated. I'm sure I did something wrong, because I've seen others do it in the forums. Whether it be the all weather glue/cement i used, the lack of curing time (<1hr) or something else stupid. I am just not in the right mindset to re-assess the situation and MUST get this pool up and running to give me some peace over the next two days.


In case you didn't click the link. :)

http://www.troublefreepool.com/thre...-install-Hayward-Wide-Mouth-Skimmer-WITH-PICS
 
Thread Status
Hello , This thread has been inactive for over 60 days. New postings here are unlikely to be seen or responded to by other members. For better visibility, consider Starting A New Thread.