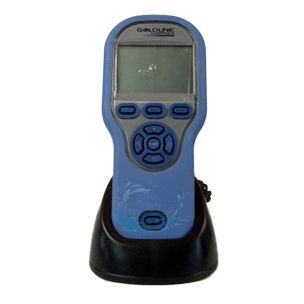
Hello everyone: I, like many others it seems, have a Goldline remote where the battery has worn out over the years. And if you are reading this, you already know about Hayward making these remotes waterproof and therefore they didn't make the battery replaceable. After searching the internet, I found a few instances where these remotes were taken apart including a you tube video. The video was good in that it showed where the battery was located but it pretty much destroyed the case and covering. I also see where there is a person on Ebay that is replacing the batteries for $77 which is not a bad deal in comparison to having to buy a new unit. But I am the DIY type and in order to avoid tearing up the remote, I went after this in a more strategic manner and was successful at replacing the battery without damaging the unit. I was able to repair mine for around $20 dollars after finding the right battery and the Lithium Ion over-voltage protection circuit.
I will do my best to explain the steps and I took some pictures that should show how it was done. Unfortunately, I can't figure out how to upload the pictures. If you have some basic soldering skills, a dremel tool with a couple of cutoff wheels, a box knife and some clear silicone, you can fix your remote and save a lot of money. Basically, the repair I made was to cut a window on the back of the remote where the battery is located. I removed the battery and reinstalled a replacement.
Steps:
1. The blue cover that surrounds the remote is bonded to a hard plastic shell. On the back of the remote just above the charging terminals, I used a box knife or equivalent to make a slice across the covering. Then make a slice up the sides so that you can peel back the covering that exposes the plastic shell. Then you can begin peeling back the blue cover to expose the opaque plastic body. (You can use a wide tipped screwdriver or equivalent to help peel the backing from the plastic housing)
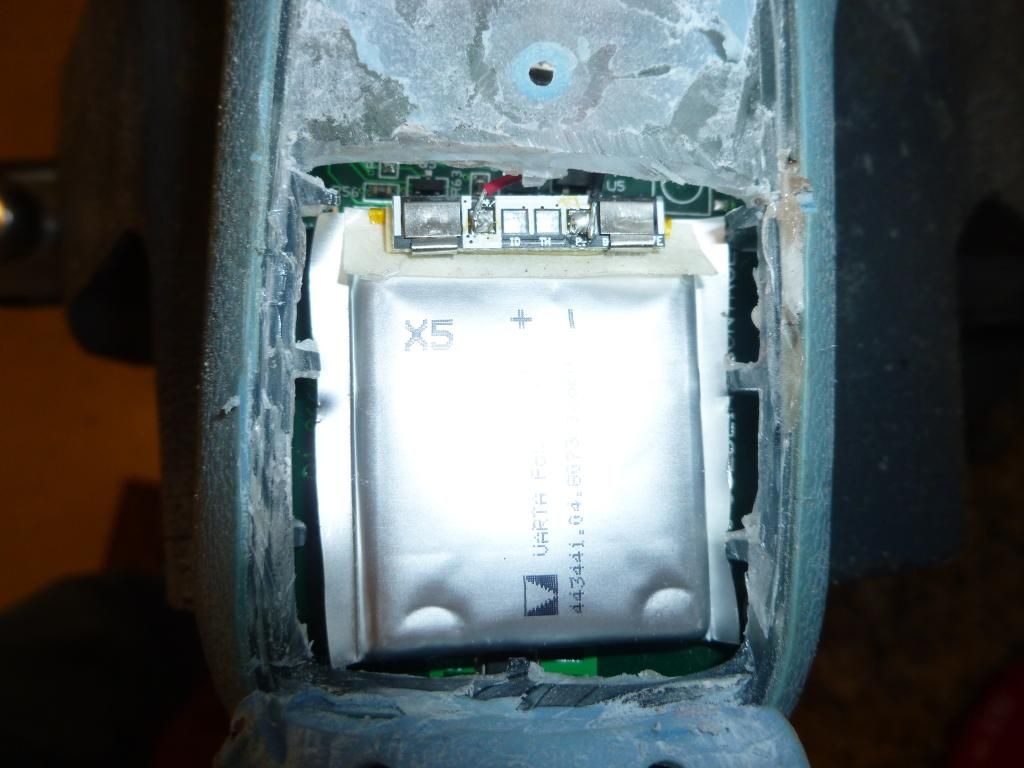
2. Once you have the plastic cover pulled back, if you look closely through the plastic, you will something that looks like a silver square. This is the battery.
3. Using a dremel tool with a cutoff wheel, slice into the plastic housing cutting out about a two inch square window of plastic. Please note that the cutoff wheel will sort of melt the plastic a little as it cuts through but all you have to do is clean up the melted edges a bit in order to refit the square window of plastic that you remove.
4. After you remove the window, you can gently pull up on the battery and it will come loose from the double sided stickum tape holding it in place.
5. Note that there are two wires that are soldered onto the overvoltage protection circuit board that is attached to the battery. Lightly touch the wires with a soldering gun and they will come off. Once that is done, you can remove the battery.
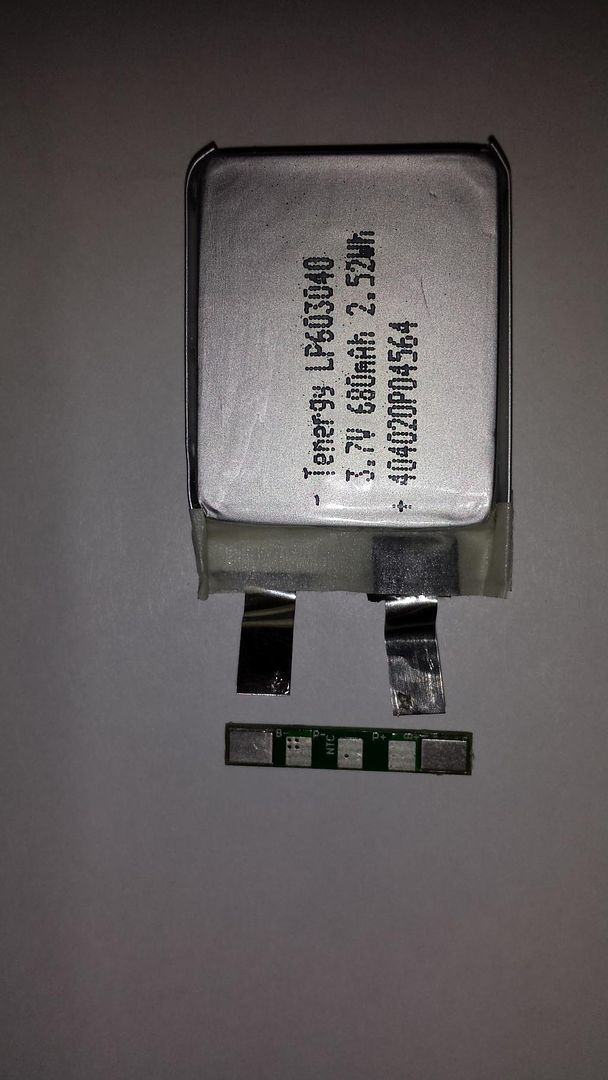
6. After some research, I found the battery and the overvoltage protection parts at All-Battery.com. If you are careful, you may be able to transfer the old one to the new battery but All-Battery has a minimum order price so you might as well get an extra one in case you mess up. The battery part number is 603040 $7.89 and the overvoltage circuit board is 32135 $1.99.
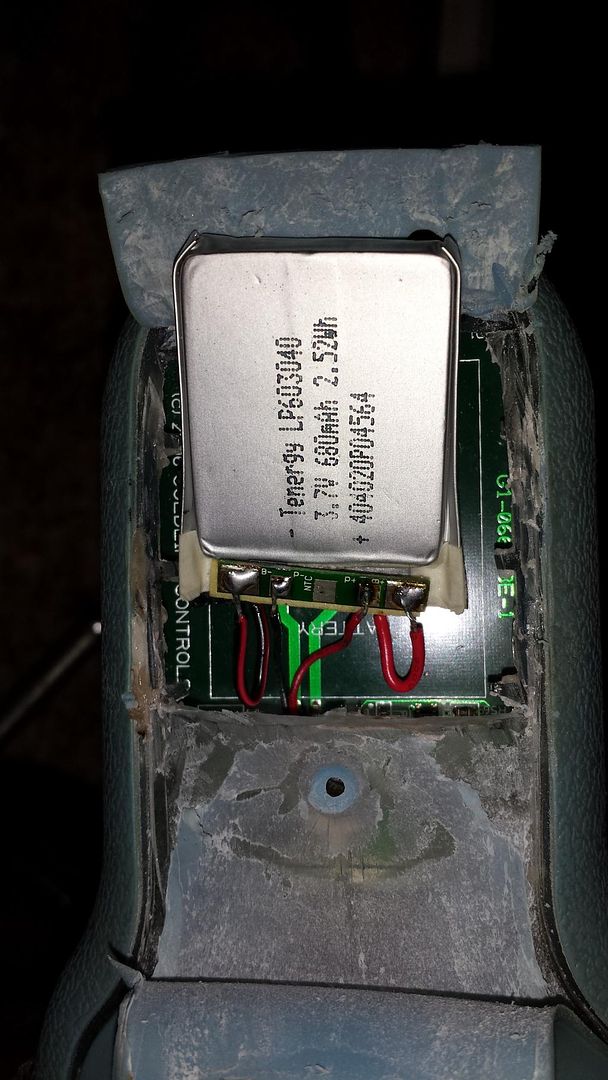
7. When you get the new battery and overvoltage board, you will need to solder the battery to the board and then solder the wires from the remote to the overvoltage circuit board. Please note that the width of the battery terminals do not line up exactly correct with the overvoltage circuit board so I use two short pieces of wire and soldered the wires to the battery and then looped them around to the circuit board. I think you can see this in the pictures.
8. After you get everything soldered, the remote should come to life. Fit the battery into position.
9. If everything checks out, now you can refit the plastic window back into place. Make sure it fits flush with the rest of the plastic housing and you can trim it with the dremel tool as necessary to get a good fit.
10. Once you put the window back in place, I used some clear silicone around it and then I put clear silicon on the exposed plastic housing and laid the blue plastic cover back into position. I used a few strips of electrical tape to hold everything in place until the silicone dried (about 18-24 hours).
It works perfectly and though I won't be tossing the remote into the pool any longer, it is actually water tight again. I hope this information helps those adventurous soles who want to fix their remote for about $20. If you want me to send some pictures, send me an email at [email protected].
I will do my best to explain the steps and I took some pictures that should show how it was done. Unfortunately, I can't figure out how to upload the pictures. If you have some basic soldering skills, a dremel tool with a couple of cutoff wheels, a box knife and some clear silicone, you can fix your remote and save a lot of money. Basically, the repair I made was to cut a window on the back of the remote where the battery is located. I removed the battery and reinstalled a replacement.
Steps:
1. The blue cover that surrounds the remote is bonded to a hard plastic shell. On the back of the remote just above the charging terminals, I used a box knife or equivalent to make a slice across the covering. Then make a slice up the sides so that you can peel back the covering that exposes the plastic shell. Then you can begin peeling back the blue cover to expose the opaque plastic body. (You can use a wide tipped screwdriver or equivalent to help peel the backing from the plastic housing)
2. Once you have the plastic cover pulled back, if you look closely through the plastic, you will something that looks like a silver square. This is the battery.
3. Using a dremel tool with a cutoff wheel, slice into the plastic housing cutting out about a two inch square window of plastic. Please note that the cutoff wheel will sort of melt the plastic a little as it cuts through but all you have to do is clean up the melted edges a bit in order to refit the square window of plastic that you remove.
4. After you remove the window, you can gently pull up on the battery and it will come loose from the double sided stickum tape holding it in place.
5. Note that there are two wires that are soldered onto the overvoltage protection circuit board that is attached to the battery. Lightly touch the wires with a soldering gun and they will come off. Once that is done, you can remove the battery.
6. After some research, I found the battery and the overvoltage protection parts at All-Battery.com. If you are careful, you may be able to transfer the old one to the new battery but All-Battery has a minimum order price so you might as well get an extra one in case you mess up. The battery part number is 603040 $7.89 and the overvoltage circuit board is 32135 $1.99.
7. When you get the new battery and overvoltage board, you will need to solder the battery to the board and then solder the wires from the remote to the overvoltage circuit board. Please note that the width of the battery terminals do not line up exactly correct with the overvoltage circuit board so I use two short pieces of wire and soldered the wires to the battery and then looped them around to the circuit board. I think you can see this in the pictures.
8. After you get everything soldered, the remote should come to life. Fit the battery into position.
9. If everything checks out, now you can refit the plastic window back into place. Make sure it fits flush with the rest of the plastic housing and you can trim it with the dremel tool as necessary to get a good fit.
10. Once you put the window back in place, I used some clear silicone around it and then I put clear silicon on the exposed plastic housing and laid the blue plastic cover back into position. I used a few strips of electrical tape to hold everything in place until the silicone dried (about 18-24 hours).
It works perfectly and though I won't be tossing the remote into the pool any longer, it is actually water tight again. I hope this information helps those adventurous soles who want to fix their remote for about $20. If you want me to send some pictures, send me an email at [email protected].
Last edited: