BBQ island build in Phoenix

chris fox

0
LifeTime Supporter
Oct 3, 2013
91
Phoenix area
So been lurking on this bbq island forum about a month asking questions etc.
Thanks Jabooh and others for the great feedback to get me started.

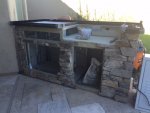
The island is small and basic but adding TV stone and concrete countertop to create a rich appearance.
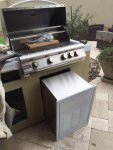
The grill I purchased was the Blaze 32 with searing. I decided not to use a fridge because I figured I would be replacing it every couple of years and didn't have the funds to drop in a high end commercial version.
For storage I will be using a 30" shallow drawer, lower double door storage access and a roll out tank drawer. So splurged a little on these add ins.

My progress...
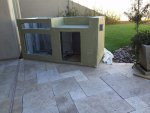
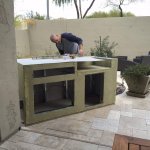
Just added the top surface substrate with durock. The side corners and edges have been wrapped and all the surfaces been coated with laticrete hydroban to create a water barrier.
Next steps are to test fit the grill, apply the TV stone and finish the electrical hookup.
Still need to understand the grill drop in and notches Blaze highlights on the PDF download.
The studs are typical H.D. 3.5" and used a tree like lumber between travertine deck and stud plate.

The counter top is the last bit of research and to buy for. As of now I'm planning to use z counterform edges and use quickerete counter top mix. Any other suggestions??
If anyone here has left over edge forming and willing to sell let me know I didn't need a lot of linear ft and they sell a min. of 65ft.

A few pics below of my progress...
 

Attachments

  • image.jpg
    image.jpg
    96.1 KB · Views: 530
  • image.jpg
    image.jpg
    93 KB · Views: 524
I just realized I may have really screwed up on where I placed my roll out tank storage. I have it directly under the grill and not off to the side for instance under my drawer. Even through I have a floor on the grill cutout and the rollout has a box I am concerned this is not adequate and void warranty. Anyone else has the rollout under the grill? Should I be concerned?
Thanks
 
This is the pic of the rollout and grill. I have a couple of inquires to see if this is an issue or not. I would think with proper side to side venting for the grill which hasvents on the left and right side of grill I should be ok. But I don't want to be part of dinner if there is a BAM! :p
 

Attachments

  • IMG_6469.jpg
    IMG_6469.jpg
    34.4 KB · Views: 494
Great progress! Looks nice!

For your countertop, have you seen Cheng concrete? I built my ODK last year and spent quite a bit of time going over his site (http://www.concreteexchange.com/). He has lots of tutorials and I even found his book in the local library. They sell concrete mixes that you add in to any 5000 PSI mix. They have a specific mix for outdoor use that includes colorant as well as additives to help the concrete survive temperature changes and the elements. It worked out great - I also added glass chips and ground it all down to a pretty nice finish.

My build is here: http://www.troublefreepool.com/threads/63645-Outdoor-Kitchen-Build-Kansas, and it has some pictures of the concrete work.

Good luck
 

Enjoying this content?

Support TFP with a donation.

Give Support
Thanks for chiming in...
I spent time reviewing both Z countertop and Cheng's site also some Buddy Rhodes too. Really impressed with Cheng's product and site, more my style of projects, etc.
I ended up buying z countertop forms - really easy and mounted them this past weekend. After reviewing additives from both I ended up buying quikcrete countertop mix $16/bag at Lowes. Only 2 stores in Phoenix had these in stock. Others have used this with good results. Will be pouring this weekend.
Will post pics and progress.
 
Awesome... I'll be using the Quikrete counter top mix as well this weekend. Pouring in place one huge counter top that measures 101" x 40". It will be 1-1/2" thick with 2" front face. Estimate it will take 7 bags which I ordered from Home Depot. Might actually have to order one more bag just in case. Good luck with your pour!
 
Chris Fox, how did you countertop come out? I poured this one today and boy am I tired. I had a neighbor who promised that he would get me a cement mixer from his father inlaw but never came through, so I started this morning off by putting together a new Harbor Freight small mixer. This little mixer did one 80# bag a time and worked out good over renting one from Home Depot. I'll probably just throw it on CL to recoup most of the money once all my projects are done.

This massive countertop is for a storage island that will have a fridge and few other things. It will sit against the house mainly as a serving counter and margarita station. The actual BBQ island will be about 10 feet away in an "L" configuration. I think I'll probably not do the pour in place method for the smaller sections of countertop needed.

2m6mhwj.jpg


Forgot to mention. I originally figured that I needed close to 7 bags to fill this countertop mold, but it actually was 6 bags plus about 2 cup fulls concrete mix. I pretty much wasted about 3/4 of a bag that is now a solid chunk of concrete in a 5 gallon bucket. I'm sure my math was correct, so maybe they exaggerate a little on the .6 cu ft per bag number.
 
It turned out pretty good. I have been traveling and haven't had a chance to post. My pictures are not very good just got busy. My dad helped me and it was a lot for him as the concrete started to setup faster than I had planned. Ended up with alittle more water than the bag indicated but in Phoenix it was too much of a big deal.
I ended up using #4 rebar at the inside corners and still managed to get tiny cracks at the inside corners for the drop in, very minor and cant really be seen.
I also used a palm sander to vibrate the molds and think it worked. I have small pits on the half bull nose but expected to get those but have NO pits on the top. I think I got lucky floating this out.
20 minutes after screeding I used a wood float, 20 minutes after wood float I steel floated it, 20 minutes after steel floating I floated it again. Cured the concrete by tenting with plastic, I was surprised by the condensation but it was even.
I am currently sanding 60, 150 and 300 diamond grit. Unfortunately the wrong block was sent so haven't used 300.
All in all I am happy with it without testing beforehand. There is only one section of the bullnose that really pitted and it was an area I don't think was vibrated very long luckily it on the back side toward the house away from being seen.

After the 300 grit I will stain with Cola(from Z counter top solutions) and seal with some stone sealer I have from another stone project.
 

Attachments

  • IMG_6536.jpg
    IMG_6536.jpg
    40 KB · Views: 306
  • IMG_1560.JPG
    IMG_1560.JPG
    88.7 KB · Views: 303
Your top looks real good!

This goes to everyone.... Are you using a slurry to fill the voids? I have a couple pits and voids where two separate batches of concrete met. I was so busy mixing the concrete , I forgot to stress to my dad how important the vibration of the sides was. Overall I'm pretty happy with first attempt at a countertop.
 
I was concerned about this too. A mason friend of mine suggested to keep a little mix left, remove any gravel and mix up a mini batch of slurry and fill it in. But I didn't do this and forgot in the rush of things during the pour. The mix I used costs $16/bag but thinking to get a bag of 5000 and try it out on the area on the back side of the island. Its not a high visible area but might be worth doing while I am waiting for my diamond pad to arrive.
If the pits are on a high visible area ie. top I think Countertop Solutions has a skimming product for this very reason if you didn't want to mix and patch from 5000. Could you sand it and blend it out? My 60 grit cut through the concrete pretty easily using a orbital pattern it took out any blemish I had from troweling within a couple of minutes. Are you staining?
 

Enjoying this content?

Support TFP with a donation.

Give Support
Thread Status
Hello , This thread has been inactive for over 60 days. New postings here are unlikely to be seen or responded to by other members. For better visibility, consider Starting A New Thread.