911medic's MN AGP Build

Aug 19, 2013
79
Otsego, MN
Hello all. I've been a long-time lurker here and have been using BBB/TFPC for my Intex AGPs for several years now, with great success. The pool calculator/poolmath have been invaluable tools and the advice here that I've scavenged has been great. Thank you all!

We started years ago with an Intex Easyset, then graduated to our current Intex metal frame (specs in my sig), and are in the process of moving to the Intex UltraFrame (again, specs in my sig). This journal will document the construction of the UltraFrame.

We have always taken down the pool and stored it each fall, and raised it again in the late spring, but this year with this larger pool we are going to try leaving it up over the winter and see how it goes.

At any rate, on to some pictures!

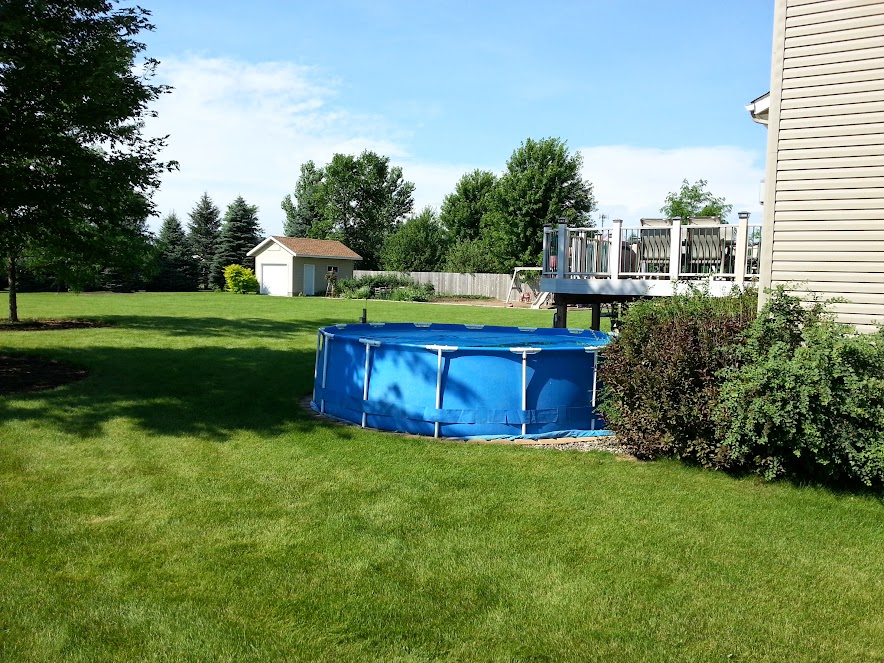
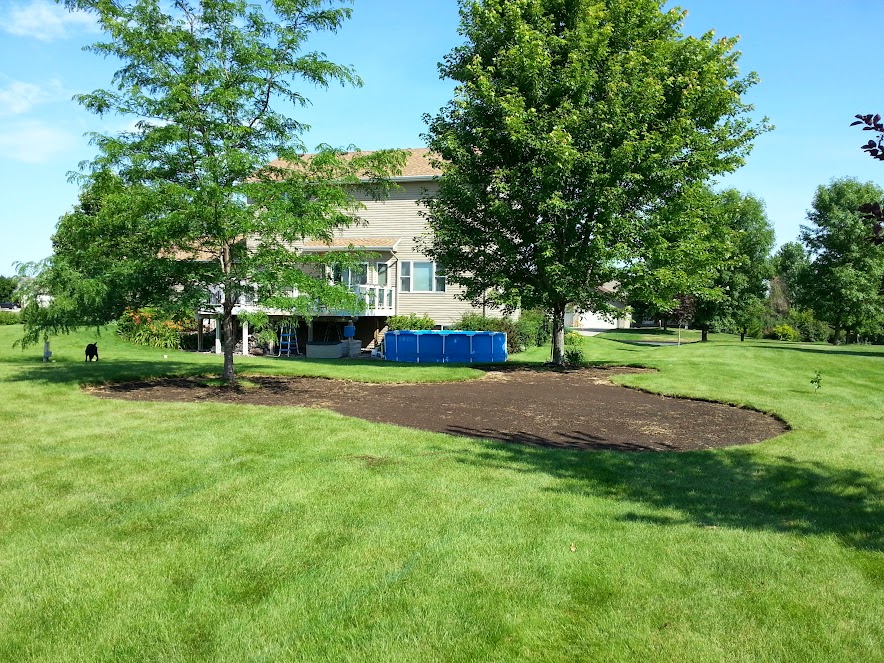
First, our existing metal frame pool. It was set near the house for convenient access to power and easy viewing from our deck, but I never liked having 4,000 gallons of water so close to the house and a basement window. The new pool site is farther away.

IMG_20140726_100417.jpg


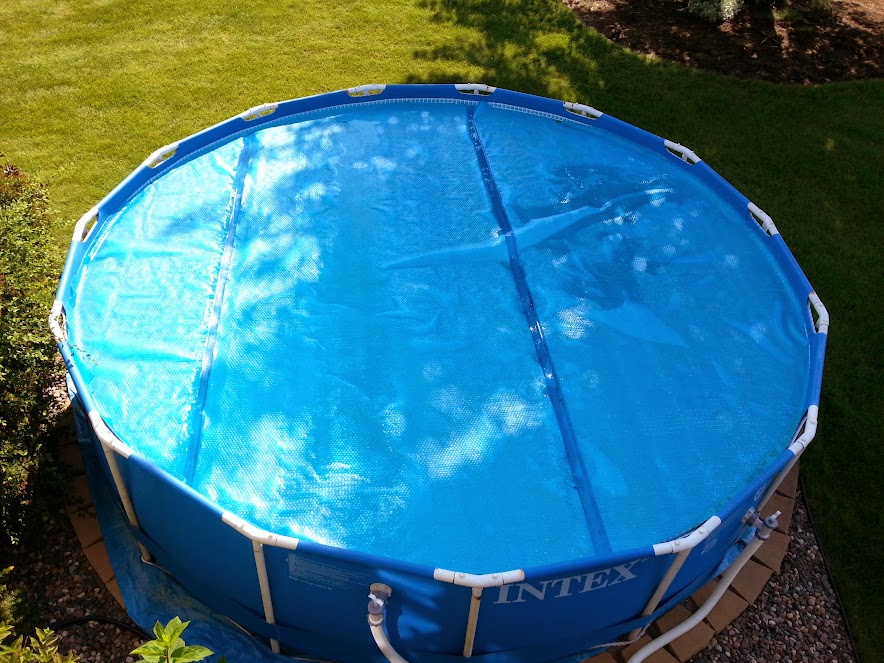
The view from the deck:

IMG_20140726_100245.jpg


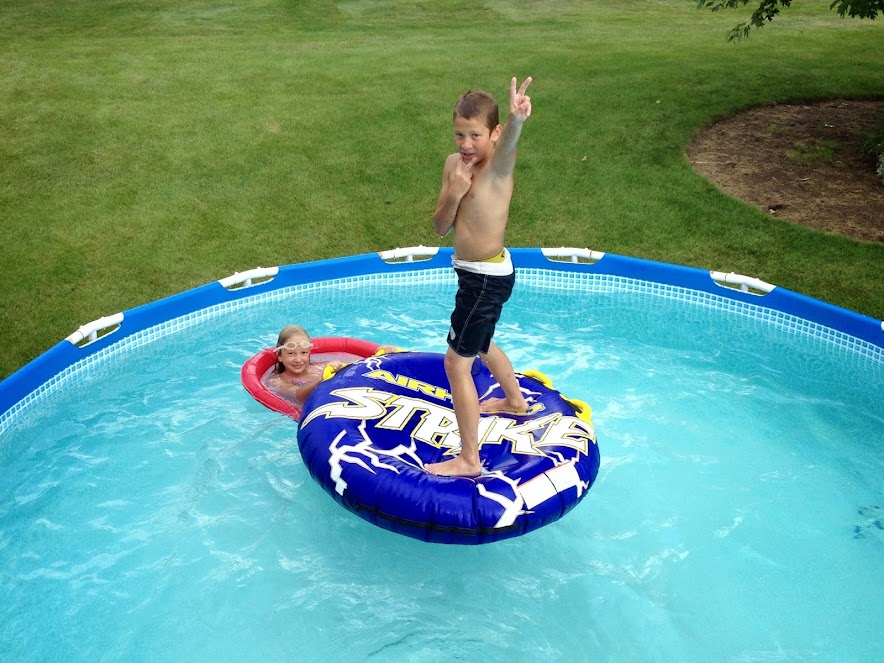
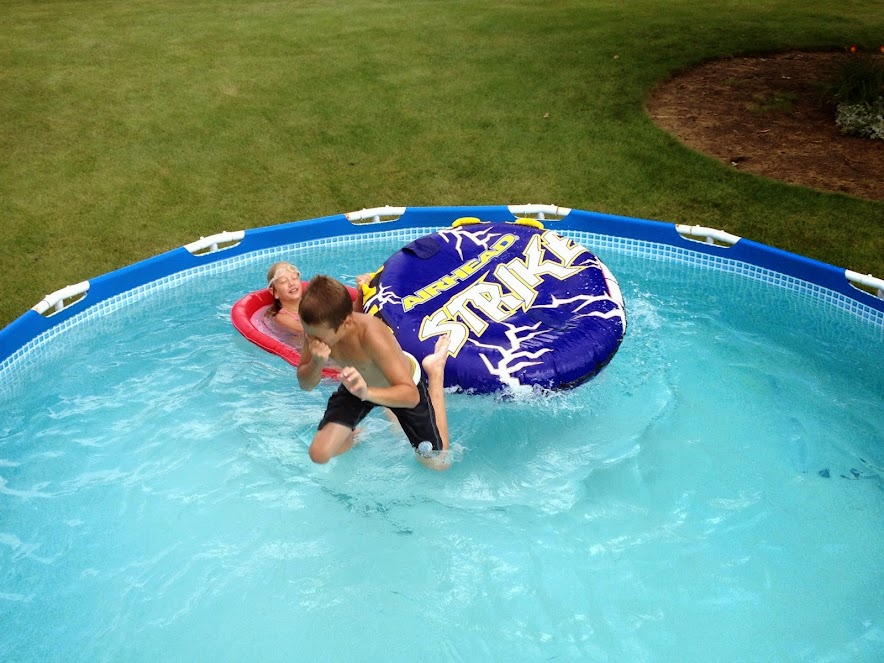
My youngest son and my niece enjoying the pool (as you can see, the water looks great!):

IMG_1681.JPG


IMG_1682.JPG


This existing pool was placed on a site that was prepped by leveling a ring of retaining wall stones in a circle, and filling the center area with sand. While this works pretty well, I have issues with pool legs slipping off the stones and sinking into the sand, and the sand requires leveling each spring (and filling in holes the dog has dug when there's no pool in his way). The new site will be prepared differently.

We originally intended to move the pool about 20 feet further away from the house, still having it near the deck, with the idea that we could extend our existing deck down to a pool deck area, and connect the two. However, the grade there was just too much (easily a foot; it's graded for drainage around the house), and there was a potential problem with a sprinkler line that might have been in the way during excavation that I didn't want to deal with.

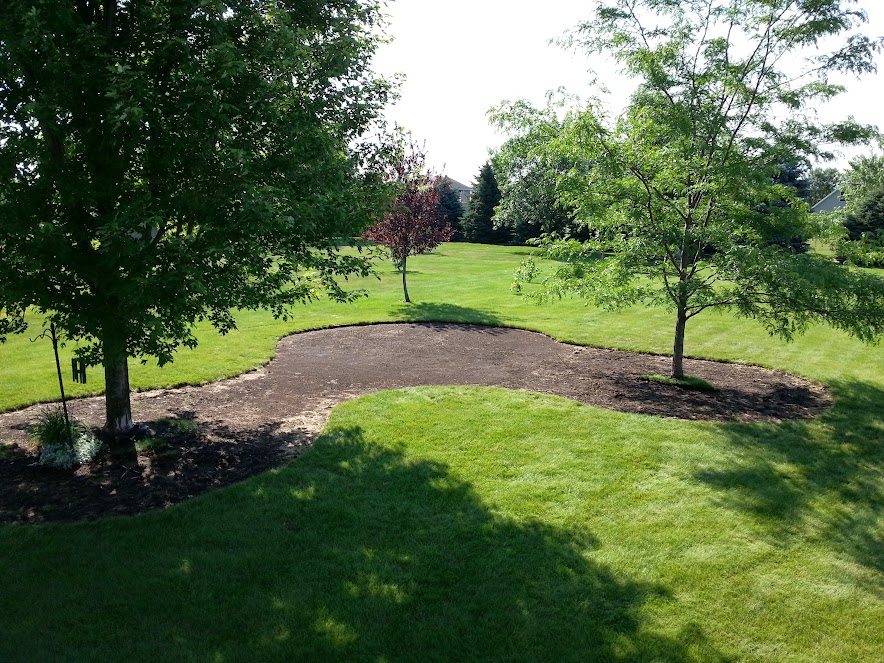
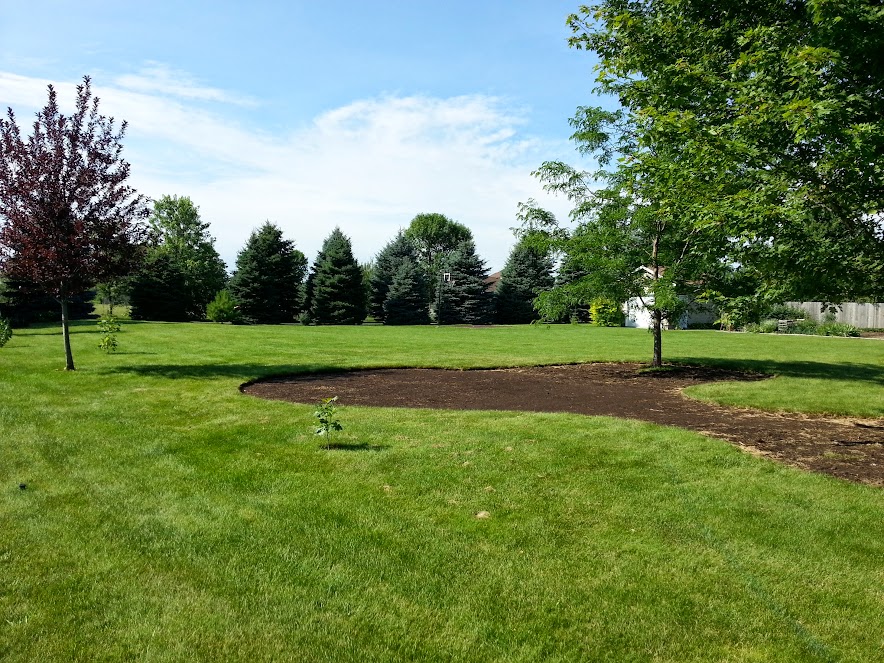
So, a new site was chosen, a bit further away. We have some restrictions in our yard with a septic system and drain field, as well as the aforementioned buried sprinkler lines and heads, and in some areas, utilities to avoid. The site we chose is relatively level, with maybe 4 inches of grade that will require excavating. It is near some trees, which I know is far from ideal. However, it only gets late afternoon shade from a honeylocust (dappled shade, not full shade), and is not directly under any branches (at this time). I know that leaves and other tree debris will be something to deal with, but it's about the same distance from a maple tree as our current pool location, so I don't anticipate it being more of a problem than I already deal with. I plan to move a couple of saplings in the area to locations farther from the pool, but there will be three more mature trees in the area that will remain.

OK, more pics! Sod cut from around the two closest trees and the new pool location (this will all be landscaped together):

IMG_1644.JPG


Moving sod sucks, but we got it cleared eventually:

IMG_20140726_100212.jpg


Different angle:

IMG_20140726_100436.jpg


And another:

IMG_20140726_100543.jpg


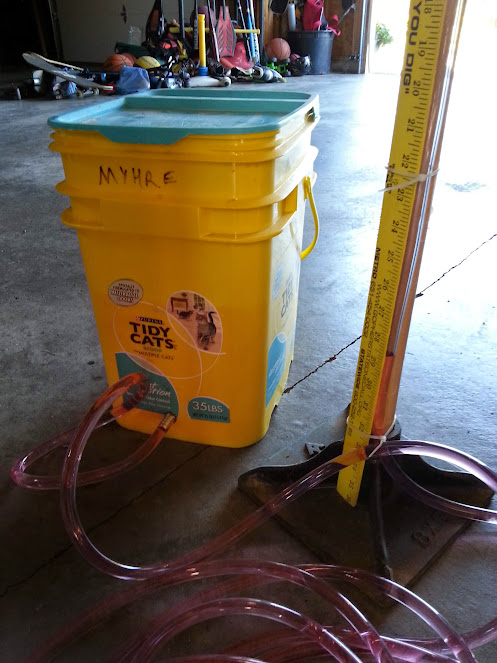
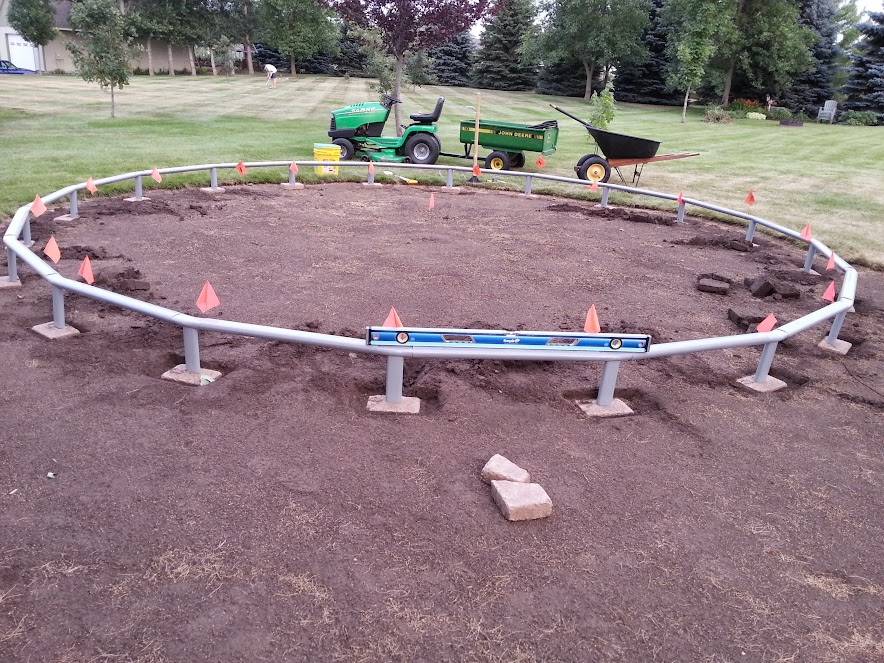
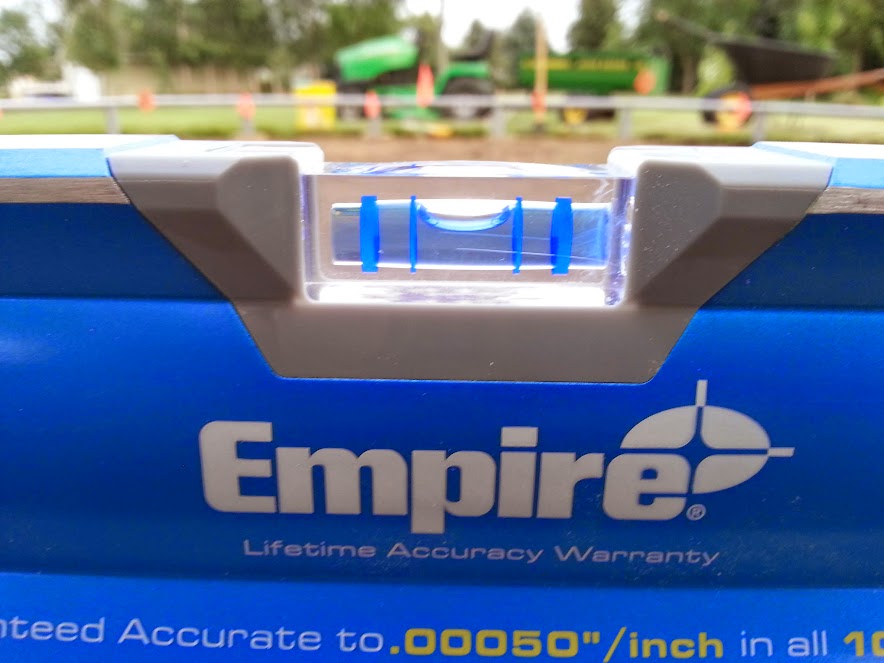
And onto the leveling. Yay! First, I made my own water level:

IMG_20140726_141352.jpg


Next I bought a couple dozen pavers. The first ones I bought were 9 x 16 x 1.5 inches, and I started to level them and decided they were too thin. I returned them and bought 6 x 9 x 2 3/8 inches pavers instead. I know many here go with larger and thicker (4") pavers, and these still may be too thin, but I hope not. If I have issues with them cracking, I'll have to replace them with thicker ones in the off-season.

First I assembled the top ring of the pool, and marked each leg location and the center with landscaping flags (these two pics show the thinner pavers that I returned):

IMG_20140726_173427.jpg


IMG_20140726_173357.jpg


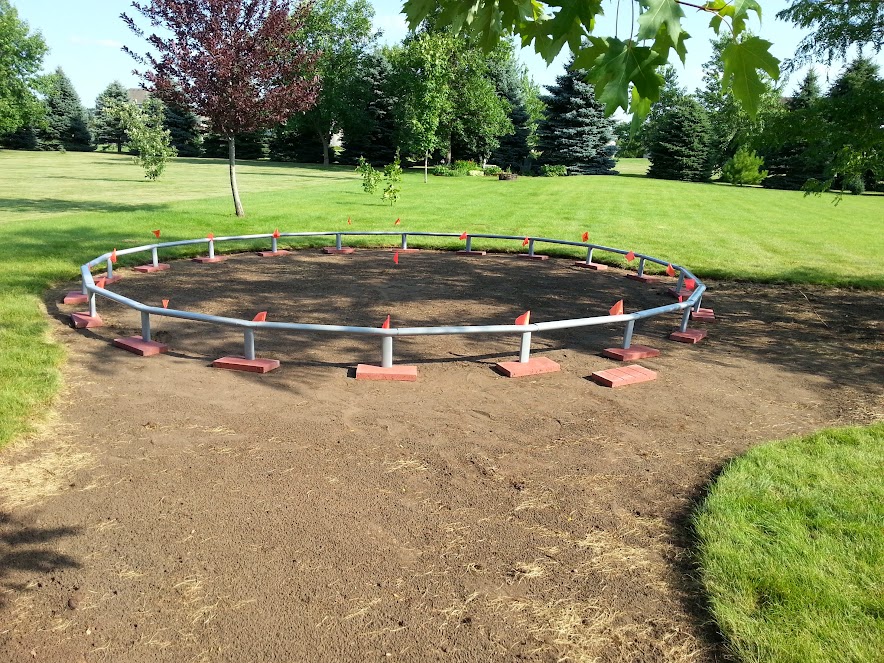
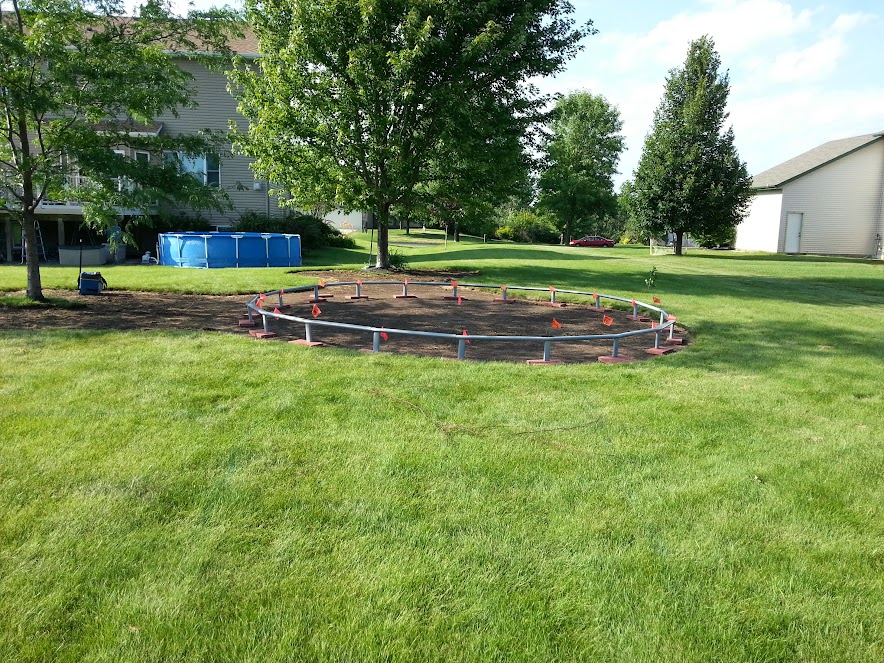
And here are the thicker pavers all in and leveled:

IMG_20140805_195637.jpg


IMG_20140805_195717.jpg


Next will be the excavation of the pad area to level, then foam board, tarp(s), and finally pool.

More to come...
 
Well, it's been forever, but hey, that's life. Waaaay overdue for an update, so here...we...go!

When last we saw our intrepid pool builder, he was leveling the pavers for the legs of the pool. Once that was done, the area in the middle of the pool (where the foam insulation board would be placed) was carefully excavated. As you can see in the picture above (with my lawn tractor in it), one side of the pool--nearest the camera-- was higher than the other side, near the tractor. All of that earth between the pavers had to be removed to create a level surface.

Using a flat-blade shovel, I carefully scraped off layers of dirt. I placed a spare paver in the center of the pool area, and leveled it with the rest of the pavers. I used this as a rough guide for depth of dirt to be removed. After rain or irrigation, I could see any high/low areas my shoveling left, and tried to level them out:

lA52lao-NWD-M82fqOpDqt9doZllRwKE8hrR41U8ekw8tggsnX-BhQFkjZA_aaHqBfewDgQojNJFKmdu2er1vvjQX94AtvR8ZCZWlLGKDcFas_6sfcegunkVWrrBz03YOOCrvZY7JA72yKQ3mXSfGSVwpEnOYOu0VEw2CfVcVk7sEDO9X53hKonKwLhh9cgzyuMbDe1PLMigJ81rVeWxZ2g7w68FRgH6iLOmUBCI4AczTUgnbeYRfsWdR9K_fPBJK-k-ifO9Lj-snOGHX6zE3utVjYrhyLFX_FfoFrpe9HUWOHfZD1MVEbh0FmAdzyPc0u-kwDFXE8VoO-MpimRggOOmY-u9k2VUMavokTarduvllF6JyKfCtMee0H6LmE6o_Sayl6rOis9cBsX0AY9uDMtpzGKTnrt0OMullgli-47Gtbm3oUfaVx3NjIHjBCmH8OWMUP5K3jrOTwfRTnFebLXpB-NQwHMeBrPBB66BqET3-wd0WqDA9qMuDNAIYkTSkn6B5eVkn2wCIJ3ca66vgaXwUqo6Zf_81l8YfxplJgvlkA2o3PUmH665DeImWb2BQ9CcGQ=w1645-h926-no


I then pounded a stake into the center of the pool area, and made sure it was level with the pavers around the perimeter. I then took a 12' 2x4 and notched the ends to fit over the stake on one end, and the pavers on the other. I then put a screw through a hole in the stake end of the 2X4, into the top of the stake, allowing the board to pivot. I bungied a level to the top of it, and pivoted the board around the pool pad, first just on top of the dirt, to check for high spots:

zO782-HgB7jc_cpZpLgdOrFlRSWwm5ZS-Mc66tGXSMhr0lSk4m3_yVjdESeW6G33ZOrvKYAzm5QGVOpqBMfTz7GWfvelvrh7Iet94EsIddN-DFkqsed5Bi57haZ3XNdqBf5p5AaIUBQaoURGfFg_K6I_Ol5wjpZvNemLXgcOXldsGLLz7gRpzKHtjMAV_kmHX2QWuBUy2nC0-tqCZJ8WcIMys-jyNlFz8aiegtfQaWWyQYmD8p5fId_g-dp0c16cOcpN2e6hkZc6q1n7cdBhsyQJagd0VVb-fYofHFkb9vfquwD3rVScCRh7UbpAvT61br9wOa-FdZhTRlIGc15kdkE9g5EB0LjI5LFz9QCdKp5KPVvgk9wp6rrta4RXEZowZs07AilAxQ36ZbAfwar0eGuNfrGZ_EiiSOrfDPaMFakRBh4nJAGVIJGDP3dZvqI6vqCI-0xi9SfS8V-dzgEEBNGw3eUpZ6cLjt2c7GJVjPmy6f0_MiSJv5WrzOT5XJchdB3hs48_seyG5CZvEm_U06M0lotQOr2L7iO7y0nlEwXTu-vHFvyIUovW26GJEAT3_fMxVw=w1645-h926-no


gHWb1bEafb1XEpNwcvtGDEFlPtKabMv7AQT3aOupcbozC90yGq33EUjdPT_h9O_a_XpR74SVS-u3W3lVSLedy5qtTAcVcTp_vYjqbVu8cqqGGV81MV52IocgNbLaFv_hxI1BkT22Dp06lx5JUDFZRnHxz-ms2_82QdjI2G4d0YjYY2Y0ybP2ZMNN8sfn2KyZ8BOfq6_5U3rEKb40vZ1qtVn1Ni0a_lZtr7LU0Ekk86AiWezJF4n7JNxkATdMR5uvnmO9Z_gFLLfNvaEt5AuRXDKIpfMvW6b7gTtPaq7sonkTZRWBovX_Mx6k7aVn9tE895LdnZPzccwyuPs04lxi3in1DKX-QS7CeUN2JReIFR_7dF2-qdk765PZFpo6nJFtK5iJJUpimfkfFd3OfcqrFbFy56u2dvS30RcHNgPMeizJpnoxbzX1DpX5lbwrrG6X6P_wzOKdodsngldynALgPq39-NOK29yTTi_2kfgF-IVAr4VX5IGL_uIFvO2jA6TBAHLQxgXaA5vmwiuF-hVGjuftM_-pfqqQo_PZ1ik6pD6H7AcKL2sLqAesNv66vomdC3_AXg=w1645-h926-no


After getting the dirt pretty level, I then took a small amount of sand and went over the entire area again and again...and again:

FaEs9vFkwU6k13KSrWNcfpLtW5Qb9_gZsaDutA3dZOVMl8zXONuwpJL7WO4DIKSeH7-PWkhJZeGGQY6teg_f7D21-9guE7m571ap5ICOJqZkxfK-y-zrqln09jo6TbrGjhGWhzlkNdpci0zsNGOZ71QWlhgWkFCjpL1CjaJCaFwXFOvkASDFgq5abd7cNLI7gBYHAKUQlLInG8TUfmXKmZucu1RlDtHH9GlcSx_7z8vG8Sk402mwpa9XgF39mdpbp_uq9zPmqgP0TwebQPsO3lKowmi1YZ7P6ttRQfervU8VTXMl5KMEnfXfK_zuTeTBQnCk4vrTlpTeMy6-5QxlFDpyoE0LWBP2pIZZCI2UPjjgSx5LIb2y3MmG8f_rwYYsYlO7myL1vsM5HaAHU9wVnhNeQvKFLdGwP2ZhUldY5b2IB0NDP6poExd-x_uENls1t5eGGnyYxObqsT3z2aKz0x2DgYsOQLSNm9aaNdgrpa28rVRAXTQQurZhC6a3Ukq_0UhZyIHPFi4maAvG3RaudVvpQoYKSHOkB3FRB8IgDbMjHLZTIqtQAAG6V6MvHS65Hehw7g=w1645-h926-no


Then, after I thought I had it pretty level, it rained, revealing a bunch more low spots.

qy4e5gp9pJ0g4d5Z0qBXDmU2qqavt8Dz1zZAvqly9WS9j6B3nXBwGXVOcqBPhbMZkROk9652DYT5DMH56GRWGn6RMp4Mu6Lc0JdMl1etJOWZQMIGRwMWG7xY37CV-3QS76EZ1c4daXsh9lNl2RBpEykz6iGiOO7eLxUKbK2JPjFtTLycaK08n_0FP727G3emcqu3TZXkJuraAqaXQdDdG54ZkoqcsFTKxW2Pa_CttyxqTtVbHfn3oMkZQFD7DrnNvPIax-H3cJEzrltQvtS_nleCEvRo6QGOwPZKOTn0Eq2usu4zfPwdoa3Gdz72pqTWX48UX1fM2CfzNdrNdZSOQbChA_g0DbhrJvoce0OxBmOfbYdbBYIQFbVjb87u6su1KFFWHgL8NYeg-g_Q-OEEFr1DQAgfT-XKeiBpPg0hVmBCk1JcY7Lrhxqyum6p7VQ13RtPyQWMNOzNVLj-WWL0timc5zjHdhLHnlMGyAFzHGFYrIppm4FSir9YCUj4q_oou7WGJC7JLgw6C4fwZ1VcwyHzaXh_4z4j4Gxm-w9jbFFjdj__MetLHbDVGglLFd5VXDyaWA=w1645-h926-no


So, I was back to leveling some more.

OnbRldgChfPbUD1sPrCDLs4kCes2X0YLXjO-6x5hB1NTXCly5FyN7pgRnNnL9_0M7pYvSvCUmCr6Ql1VUXgtOliKJ9fQe4Ah96BS0b-yWa3hKU36YG05daF650kiNbxGGLbOjnXpxPChwlXgupPgUYkeYY5WFJnRF9zU-fXN_-zlPVGCpwvEHMp9IT8q78JcgBIol6Fw0ziQ0WqN7Sfj8XgxRZwaZrZ6NM5lerMz9hLbhZm9Xh8o7WljyGJhFscvr3UB7ytBcf6Y2J9JjoL8ADa8rxlMY3WXrsjQq86SZdmdhHVSZBIupk0tDiacK_3zqVQrBC2XeeVc6v57gj5TxehZp5G4lrQAf5zfX5UpLMNZVg0YItMtgWJkjsVDiNovbIQ7YuCDKwcWDDbUN6gAKIb95UnsnlwU7SVPYwBlKxmqzEGIAyxi_cOhImmiN8jrp8u5cwjXdDMH7rkvQnzkwV1_YLCxiNI39cK5kEoqmHqXCsKBVIAV7MH9pquI3-w4gOZ9Um6pyhmHMXulwtoAJBCXKS7poc8ed-45OCPlxYN1K9FMvowbJpJsOT_Ox0DNVFhA7Q=w1645-h926-no


I finally decided it was good enough.

Next, I pulled the center stake and leveled that area. I then added 2" extruded foam board to the pool pad, triple-taping the seams with Gorilla duct tape (sorry, no pics of this step :oops:). I then put a heavy-duty tarp over the foam board, and the pool was assembled on top of that. Finally, the pool was ready for swimming!

quUBWS7VmoHDYpyk-cSKB4B19YI3AFUlpLEAfVV-bhtgdXIzA5Zv1v25wn1RX6p1Y9Iq33mVQC79CCqupefdpC7P8N-46JwyWz75m82lx2aq1yliEgGRKscVZtE2dhDmHCybTQfsypTjZz2Nxl6ciFhcsFOdLobGErGtYXBIiFZ_MJsJaoFOQJeOMj4T6VdmYdJFf9rPUI8ar_7G3NMpcP0K8xFmCFIG9Gb5eF3VdgfAPkcsBucw-tQ2tknGNjBvQc9sb5JOXLIDWwJC6lhJCWUXgWiSaEF-sVLDk1k6LXZqhP5k6aWwOVJKEuPs6edrg79guxnVQCVBIAbB2pH1r8UPVNfL9N6g6wA0r0Rc-souvvKNfjOAPlDxwCLklQoX_6OM5YCmtgrweRF2afHtPTHPKh25mLkCQ47RjGbgxj-pmNwPeLYZnvGDuFD29tXv5xPJcLxAU7JpUUdwy3T8UnYQEaFwEGK-JjYQF6yLBbRg7vKLNhaHHab_hcwkzMKcRr_zejKo2Bk1xqVltNyTmN1Cf-aygPflZ4cNPC1W7s6fdyen5xL5mvru9YxbJGurSnq6XA=w1645-h926-no


Got a lot of good use out of it over last summer. When fall came, I drained the pool below the lowest hose port and drained and stored the pump/filter and hoses. I raised the chlorine to shock level, and covered the pool with a mesh cover, waiting until all the leaves had dropped and the water temp was below 50F. Then I removed the mesh cover and covered the pool with my winter cover. This cover is designed to lay on top of the surface of the water, and then up and over the sides. This way, snow can collect on the cover and I don't have to worry about snow/water weight on the surface of a suspended cover. I secured the cover with the included ratcheting wire, as well as a bunch of bleach bottles half full of water and bungied to the cover grommets:

bvDHOl6OZdQYAkp7AnNwrl9_EQNsGZeeiy18HSDKPA8GO6Rw0N3ugYH-iJQCyRSbceF3mAFs_4dJEAhdHmzH6wHKkDuLmHfj6dBEiIN4pa-kVymnDELReG-BWV5Zwc9f94NoSvwRb0TwCNwZaSHeS6dm-a1GwM8c7P3SwFyqUamOIn2PIwAiSegjlT0MBoB0y_U5uNsR-SA3vpgNZItP9sdpjOmxEm7t724N0gXwcN3lJ5S8iiHrd8LFNWFOONrEnNxXonpk3V9q10SuPnF4PvYS1ZFV0ZNqF5HbHq89In8HGtN5K1WOr_NAWlOsI-dCnYd554DxJD4mgigbdTKq9eFR8_-MosBSiSZmTjnSRS35-IfLRbx6XRoBorLPAq3fVaoIwoc6MZsYve7O71t_6RUS6pwg7_IAg_ziXyvifKD2CPPS_07HUJoEstt-xzmqpKoK5UcOlPC6rNaqzPlSNBwwakIK7d9zmCFemeJV5V6x7ivlWQ67Wf55HkfrAdf1mDWIehy9gpeyTn2C09wPxJuZ2z0cnjoJrdFP79eaZKKGDr35wwgFvBEX-dV9oTT8EUsmpg=w1645-h926-no


The pool wintered this way, and this spring I uncovered it to find clear water, albeit with some debris on the bottom. Much to my surprise, after months being covered, I still had a FC level of 4.5! No damage to the pool, and around here, believe me, it froze SOLID.

I removed and dried the winter cover, and scooped as much of the debris out of the pool as I could. Then I raised the chlorine to shock level again, as the water temps were starting to creep up into a range where I was concerned algae could grow. I then covered the pool again with my mesh cover, trying to keep the tree pollen and blooming/leafing out debris out. I also cut in a Hayward thru-wall skimmer, and am currently working on hard-plumbing my new sand filter and SWCG.

nxYQFdenegGfovbQjh9tXxPVI3UBWE0MSaCUwcDIYvNBQaRuQtPkTYNNNgJhZjyTnJLoUGEolPRoNJgG2GPSABpcN9VuyDOaOZ_eETuuxtL0ZiWattckTjTEOJ0MuC1ppAhHSMxJ5iY9D3YTXXRDggQjfK7eVrtcCrR6RduUzNKYa-G9Dc1nACDOSaTn2pyuC2SKQY-A9fmxtScHt-8grMBgJjXiD-ZzB85l6e8D_t60_uvuT0Qhu6jQMmCht1iSDfY6yJUV6VPsYZA5b_Pzj41sxdo-juHgC-Ig5QGp7HOLTaZ-1c0VaJLHWXbtheCFg70t25ucPs1XCJqoNPofxkhXZIcELahnSPZ8qpyBD4tXVK2dU537sPbiaXUoZi3VmrN7SAKCbydWBDkZRqolio99fI9gG9MtZ3jys9LwDvAj-5P7dyumb3kaS-69wt1-LQgr3Yc6aUo7LcVf_odB2iXKpXrt4U88xL3PObD39DItzTruSDLeemHX9KgALyfnac5GRZs5Ny97_xwUo1Kz6qEo46anxpCib5J5xctRjw3-LsXQkVUQe2xODGQ3NJb08-SmFg=w1645-h926-no


Once the plumbing is done, we'll work on finishing the landscaping around the pool

More to come...

EDIT: Please let me know if the pictures aren't showing up. Google changed the way they handle the link addresses, and I had to rig a workaround.
 

Enjoying this content?

Support TFP with a donation.

Give Support
Gorgeous!!

I wish I had all that sod you rolled out....your entire yard is lush. I be jelly.
Thank you. 18 years ago, before this neighborhood was built, this was a cornfield. My grass was grown from seed that we had a local farmer plant. It's taken years to get this nice, but I do try to take good care of it, and having an irrigation system helps a lot.

I did manage to give away some sod rolls, but couldn't get takers for all of it. The rest was taken to a yard waste site for composting.
 
Great thread, I'm bookmarking this one, just put up the 26' Ultra and was wondering what to do over the winter with it here in MN. Are you pretty happy with how it worked over the winter? Would you do anything different?
I am happy that it survived. That was goal #1. Leaving a pool more than half full of water up, knowing it would freeze, was a little disconcerting. But it held up just fine. No real damage.

What would I do different? I might try to rig some lines across the top of the pool to keep the winter cover from "parachuting" in the wind, when it wasn't frozen to the water surface. Also, I'd probably remove the winter cover sooner than I did this year, as the birds discovered they could walk on it and use the small amount of pooled water on its surface as a birdbath, crapping all over the place.

Make sure you get covers that are oversized, too, especially the winter cover.
 
Update: So, two fairly big projects this spring/summer.

Project #1: I decided to upgrade to a sand filter and SWCG, and along with that wanted to hard plumb and add a through-wall skimmer. I bought the Intex filter/pump and SWCG you see in my signature, and also the Hayward skimmer listed there. I then went to the hardware store and bought a bunch of 1 1/2" schedule 40 PVC pipe, elbows, unions, clear PVC primer and cement (didn't want the purple stuff), and some PVC pipe dope for the threaded connections. I ordered a couple of different kinds of Hayward ball valves (to fit the standard intake/return lines and the skimmer). I also bought some of the infamous PVC box adapters to make the transition from the proprietary Intex threaded connections to the PVC pipe.

The skimmer came with a Hayward eyeball return port, but I needed a 1 1/2" intake port as well, since I decided I wanted to keep an underwater intake along with the skimmer. So, I ordered a Hayward port and cover, and I was all set.

First, I cut the liner and installed the skimmer, which was a little scary, but went fine. I did this before I raised the pool water level up to normal height from the winter level, so I didn't have to worry about the water line and water loss issues. I don't have any pics of this, but I followed several threads here that describe using the skimmer frame as a template, poking holes in the liner for the screws, cutting out the frame square, removing the frame, and installing the butterfly gasket in the new opening before reinstalling the whole skimmer and tightening it down snugly. I then added my threaded ball valve to the bottom of the skimmer, closed it, and raised the water level to check for leaks. All good! Whew!

Next, I prepped the box adapters by sanding off the raised lettering from the mating surface. I used my orbital palm sander and some 220 grit paper. The sander made much quicker work of the lettering than my first attempt at hand-sanding:

bFnu7q7EzSN2ZBbONv_DRMTSvZZo-Kpemd4d6XzgZChnNY6ZVvqjwGl-qaXllL-heleD_4K46BO2twsZ35FPr09tHTe1-9r3dlFWShL7ypzaWYV5sWeo4dYbgWtqACfpap_YiHUbjuIEqT7W3zqntwQoHSR26qReyXZx4xNHSQJQUVyYdKc1cOJRzDG9RM402QE6HD5A0ihwf_Oueh5xVPWupqP65IV7izq8N4Iq-Bn80cGOjxFLu9Of6Lf0P0pejbRxLGKzMfFCYEBbq5abpZGNUT7iyc-6fXf2k-qums4ydsxBkAKIfrpj32uIwDOJ-L6GBvpJ1FMQwWZiwtuYTk6V0Obzf-0c3aGJwEx3uvZflpXMDVnxVLX7J-U7CDcGg_LMNxrS6ybhNLYspO4zyLe6Lvfe9nQhPQHcBBrmEecr1RFu-Vr6i0iW3HyMR1d289qmQiYnwByZXRPqlrXAhkpaXIRrgVPLV76iNwTADcvGtCOwMFL7NU7kNKn917plq-4t_OxmgmMeagKNlv7jX6A2IFKFgl9TOWjtnLAQvaiMqhLbOvZY8e6rz5OCfHtk-F_jDZd1-HWtxZl3ITSBccdkL1zSI1Db=w2160-h1217-no


Below you can see the sanded box adapters on the left, unsanded on the right:

jMaCOhxAvufN9Ad6ADCehkcWayIBidl3LPAkBWnBYs6XiDinDMRkjopD6eoQBnUVR8tu24THCJLLY6GjFB9SJ4g8npvmjXyGvckIbjiEFSEVfnT-a5kLqKPsHXP4mXMXeqbZ71h3NEGXgEzOgZ4sXGxScNTplrn5D_sLEIWSIldas1bX0zgJovZxN4l8ylzHE9lBFXGXswZbdqtuIE4ilr2PkLY0quzmihJcAmCX13348Aex65XvIMKzroA0HCNCcBgeEHJ7qvSYL_iOZZPY5E0E7C_w083vnD5p9YiLaMUtWyjltXFkbt4uabYsQRET6mhYKIFZKl_0x_DXfx94J7-1x2KZ_JJtZUXyirjQKKgSZIAQHFG2aXukiSeMtdgqEMSiz5UPeFwHb2s8re7af_K-dWXuhViV37xvQn_vmHQd-zUS9YrlqJ6BvnpPDzTfBkTukl3NPM8APYqHY0kJxROnLHlY5aNVCkHj7Ponf61wTNrRf_0HHpFY4DvXdQ_7fwfzkBvpk0QGe-0LRmv_gOycvg1npn7vQ7l7HKNjE2qyqAdCxThG_UrEH_fqNix7Oguivg_4mH0wpOFyVHNFV2zAcFXjHU3T=w2160-h1217-no


Then came a lot of positioning, measuring, cutting, fitting, and gluing of PVC parts and pool equipment. Oh, and several trips to the store for stuff I either didn't get the first time around or more stuff that I needed because I screwed something up.

QjMjOj2GFCQVLwg4VeoK5aoBuzwM58PFtP1GHk5beQL9eVMUS9MP8XrQzvblAlGCd-EwjoPTNyGj2ZL6YG-_CJfRhYi8Roek9dG4IzBKlD9-vTK_CguOpPLdqXOiWdw9G-MdwVZz9CLA7IJqqVw63Oc3fvITq85qblLYGUmKy26haxVVuvo6SLBqkTKgO28MUOF_osq62AaRkduRk-wMQ6xj4yRGnxVRZwZnI6BA9Usja-pkdL_yCLWiFWtd7hWUCIRM7IluKIHmbeKpKjTS0076y-lUakAVe81jBjwWGKnJm32byZHhAD_iGYcFpYIDF4e1VP4QmOX_oGhhHgAK-VX9AsjS7KCVqH6Dmoc1pVQuidBIGkpoNmjV02NypTPHjo3YotVOqxjQF9nEb8Zq-xXEmK-zySoIbc658UeJuwwDbqcqOo6t8knuw1nRlzsXBgUqro7-AedP0R8gF8NkHc_LkeBTfzjZGlq3MN3CO63ZhYxAVaVzsal_SNZyCu4xHO0MefZFbQCWZI08_52r7qp2D8JgxqVzAe3085lDewJrtuz1QaRUOFhDWeAbG_zsVKlc-o51bvFzovUTFPLfxjIKOeD2SLW6=w2160-h1217-no


I also decided to use flex PVC for the down pipes from the intake/return/skimmer lines. I know it probably wasn't necessary, but after seeing my three boys roughhousing in the pool and watching the walls rock back and forth, I'm glad I have a little extra flexibility in the plumbing.

Anyway, after all the measuring/cutting/fitting/gluing, here is the final result:

FReM92H5zYcP8HJy66ZWgDmY9_qkQYnJc6tgaTCWW0uIOFie563_rv6qg7Tlk2CsJvPWoM4Uloe2bPqbiSANgCFS0t-WVGmWFPaps9TiOBqEMf7-pHpZ4QeFbLy5IMZGi9kmP-JF-r6tSi8Xo96JSiKrcrFQB04rF2_96ZWAOdNRwqdxrnBDSkBKMVyQ2OzlgyTIz5bcx1fWJwczjlwz-smeCOVvb-VLMwMw4-E9dM2tP7VwyHGtWDik2sR1J3nJd0tGIZgs7EvIjgiuaGx79IHa1kCTIpy9E-WpfkF6uL-r85rOUPZs2XDd_Nvny5FeRxa7PU7pZRqbh3wkffrrEy21tee2jVFZuSKsl1oo_gVvP-X9wKFYnsDd6omspe--dRRm4jgwglBll1aMORf8RihRIguI-0jURvn6bzG-P8m5itHgEMBpyIiwy648jBy8m0z1g3ed2fk57wW2cvitKof66yIjrkNxLZLEkCuzPxLEBrapOytdvShaUTjKO3lNvLzmfsZOt4PH7LmNJjOyDxqVUIukabecMJu1hBVIZWr1Qb8Bb-hok54e7ySu0m4W2dBVH_5SLB2qINRuEjQ-nj8cDIDroDKY=w2160-h1217-no


Had a leak at one of my homemade intex adapters, so I had to remake one fitting (poor gluing), but otherwise, no leaks! Yay! Was impressed by the increased flow from the new pump and plumbing. Discovered that if I don't leave the underwater intake cracked open a little, I get a fair amount of air in my pump basket. I don't have a vortex in the skimmer sucking air, so I'm guessing that underwater intake valve has a small suction side leak that only presents itself when the valve is closed. No water leakage is present, though. Leave it cracked open a bit, and the problem goes away.

Project #2 was to finish the landscaping around the pool area. Tired of the dirt.

So, we bought a bunch of bullet-nosed edging blocks, and a bunch of mulch. Already had a bunch of extra river rock from other projects around the house, so we got to work. We made a complete circle around the pool area with the edging blocks, and then lined it with good quality landscaping fabric (the kind that lets water drain through it). This area was filled with river rock.

f4g8w-JC3-pgiA92pupnAdAC4xDt-IORa9zFxMBKG1VafMA6HVoVh_ja0lUTrMF21O1MRjne7-3DmEwxPjNadkAOA7IPbamTv84zNXcbJwp6JxsgYtE91XrrQEtNfzP9SalxPcc35lc2gmsVMvh75kPun1rNRfY4IuEeKC_2eTu8uyRtDkHm_bpN7aUM2l9VO262kLt2HUC8ID_hL63YRbUVCxyLjC5F0HIYSkMqGI9RfaAWXIaQQHfZ1JrRTFhpZBDkuL8HEIsI-wKfsnDQgUj8nUIICErz4JeOLCuqgZMwM6Xqxy-FtpkEmS4RTwtToAYhr_7aS6wd-Kz75XzwLpczkTtqv79yXXbg30RCjDOESflAzZ_jKmjz6zsFthobrcmnXAC2UGWHYEsXg6-wsDDQy4VaW2FXnrfJ9Y4Ikz_vcg2gIgU_vvOQ0MSyjt3IsfmeqYMxW9ZpFerj9Ev3-OcjfuzNdxwlOtFUgnMXBS6Ye0ZnfTIoVcw6NDAyj3X0uXkKIcW6stuiUKJYEpc_wcW-_JG6EjJ_05cFMFawNHGcYw0BSjq4gBwV_0gx_z6BG6FnLqGz2gDXWV1j4kc4vpT3DeG6-nbH=w1670-h1253-no


vFwIZmksySj0ksJhFOMyl6299t0Nq7yGj2wO4EX_9fFmWNs9ridDIw50ZFixH1vHqcT33RsDgwV3ftkeMnRPno7Epv7DzEaaPwMKxhjHMBZiuSN2TX36Lt6vSqrSNF-32ipoMPXH_Be03EQVsn5mrTX1-Oapv9Q_BVX_gqZ_SOyvMRluB7xfx7BuX-44vbPoUPwLVvvfnuIflTtGc0cIbvLDmSilknX06aKPYtU_sGfUWc6ODEPTAtu1o42Qdf_wv0JD8g5P3FCWq-B4-TOga1uGingFoAGxLaX805E3uGLzRzYPX7MbryJ8ohFwUPZQdVmwfpG4wL1iGbKYXwNI6VBCj6Jb6DQ-2lY8wmg06Ko_VRjSHcehMRGuW3QCWzaTyNwszFkXVH19FD1iFeWAH4NJDuSlkklsApqge0TOH0VYYw9-f7uZtJdvqPWGpjALKhG14jqHY7QeNPsf2gncdZrlCSp18qa79TMAMv_Z_KytfFTkwCoeYqLCaQGXgQ0EoikEdC7Dh0tmWoedzYVqdl-yjthQWBUwNimrNAI87t6X-RCmWcmWXAFBVRA0ndn5ZalzkP2bGoImLfypGF8C07Olp3v8qCqQ=w1670-h1253-no


Al5ytB0wihPWPnr6HUNRUvPXta41nQLk7787qsydqpnMGz0Xd6mSYStUreUkmAQVKxzLQ_3P6VGjD32FQuNvR_3qFgwTsj8gq-LiVOX_HCqL0oVHG_nPJypUjdUqPxWQVdVaOhMdfR6xS5KVqPEvXVSwlTuVz40PHm-ZMxs8_VjR1dQUufFiMVwvZy36uN1OFMIb4hjkFUuAHjaLfiMEpDXOv6f67KZyJpaCNO6AeZYvONiS2UXoPy-sDb9MAdDa8IN5vkWWCEUZS5d3syVY5L_DwnGPjVqBFr0wOGLipZviWm5pQ0l_jt1CO6ndVtspEqWqp3Duza4nvLgw9UcTEduyTbjHfbD-c4C7szvqVcDkofr-FE4RrVzp8MXJ3jT4W8n82dUK8aAkzyLg1yzUc2MytAFPdfcLe0uApDHEZhEspuwongQjK-2siaF4kklesS7Nw6vrHNd-qZ4UhuxXSMlRNDYTZv28jwl5JBFn_LlzFUXDMLRGxS3n7BuIfH2WJlEuT-JSe-ZYPBx_E66uEXGtt6sgks1_rJbkGpxpKk79b93MfHTgb1x42p6RjUcHM416BJ2h6qbAu9vNnPHrBnKCDC42v8XM=w1670-h1253-no


kWHcYwxlrT0KASKQmd169eAXYymq9nZTD5bvKbSLOgJFcQgckmO9DtOXxzwBYG0fjZb9wIpVn_n8XfCI6GlYYtof8NkPISn62DpWLm38WemPMto3XfM9il4GXdfbW0wA_wQ37n2HC_w5PewLuLICDBvPW-qbISlxzlmFvCCyU2brj-da2sAQKcrPkVWoBUXexdBsaNStvvVAz3BHGg7GEgRRNG5p5CbQiLJ5oNhxzInyj30GSltJAloCAvtAcrLQ_OISZ4AWKopwvXEmDWadiHbDmYXazBSx5X1Ra9MIvWFdgwE1Qhl03KxXkUAxkmlDewouotg4gyGldwip9Bot2OgpIVadR5FHkEqBD6ey6ERwGXxAKfTkCKJM1-ccofHXdl2nffuj2JsPZT4Bi4XNkb_fz_aOHEJ6eVE155rP5vh67RAoTFyt0TQ6BF2-xMJON8VEmXkzg107pjpCpMqCBBQnwvn9BI0lqwOXt9YBsaaEJP6PImyjVQbbKA1gGnM9w7BqOEK9RaR-GYc_u4xSK_s71y7lxqO7ASLrdKb1nNNuBz0WSEEyTFZxpgqBeC4ISdRu5z6Sada3i6ABBzt5xNOTTyj_1OO6=w2160-h1217-no


We then ran the edging blocks around the two trees that are part of the pool area landscaping, and filled in the remaining area with red mulch. We had pavers in place for the pool equipment and pool boxes, as well as placed for stepping stones. These areas were surrounded by mulch, to complete the project.

awQusDeJUjih4D83ho8QsJDa6Y5hgz2hWwutcp9xZhP6_fn6j2UpRAotLeg15gg1RUTSOLAGbwbspYphDjIkXisUJ-eiB7Q0fWtDtaVDyPOoAE0NVP5NawzFXWoedyP9nLWSLBwvnb8oBF9oS7KOZY7mtALztSF1Fylhc8oITha11Yr3H0SRludfxFjVhPotSska4gq--uJ0elpV8XK-b6S40idZsHFqNmMbr4CYxxsIFlflwfjd3Cfi2giBkelZvWjY9ErMxPNwFJ6HEveDBQfQyRLo091GmabA2C5x24uRl1l-ufl51ZfXbcqHSHiqz37VifsbJ0kQLBDI8FnbGc66xKra8Qyr4-2VC_ZzlkXH8PUN_-kR_XLB089cHHkII28San-82vQnixoaTn8XaMFy3ljcrrmm-QGni3QDO-92GcqEGsw4eTFAPRjXiOGAFLNeXchGXA6OsZNu-GKiYaEPQ4B-0noN5u1DgFsRkXH469tN8b85fdhdtSU2Z2fGr_JkupJTBWo2qeof3-3NRQmftUUf-4x4yf-5Wv1SdLRQ57cXhhKL11wdHZX12NFOZFHGKaux6NzpJzMo3VGRTfX_67x6EXq6=w2160-h1217-no


XgBKoVArSn2Rlc6HcWKhvBMWX8-2PKGz5Y412cWQguZwpNxVQ_7VqW-CP9jIdkbEGaEHr4brX9THGDNfTAa91LqX1bYQhCfPrrQHiPhD-eS3LG2yiHtBG1YjAcbmaqaV7cxk5YLdxvyFJzlEDkhhllAuxBtMhqrCsugUxWzxZtqMjmUTLqW7sJHEf0nkJR7bxb6_cqnaQ_AROl3QquEZCrlfR80t4Rs_yQP0d8Aamye1r95XpwkBS4kvWlLN94IdQZP5oJKL6N6yDVQyDRCWYt1quu9ryg9jMprkMfCcr-fwyHixkEU2Vju9DNHbx8YXIL4n2HH5Qp53uyQ5aKXI3Cz1yvUgbwjtoPkyXPg8AK_-jh_-GL_8cNYYEBSq8yoQEaqVAz8oukGTVkRlFLs4dPdAwPQ8QM9jhTcl1ynYH_siss0WCjX1EphA34N1p9_S3hSUXh6Fx4on8sWDcuSLCcUK-OILIY0ZGfx59Ss3HEfyN8i4ZZyBRDWjpJH2LwWuz7ztNVpWYZHPtLkQX2i-owkhwSgGq0kFQigwM4sVRxPElU34THrTs9KjXHFFTeNTY49tftCebX2z0huGovg6hpP60SqtPReK=w2160-h1217-no


So, that is all for now. We'll see how the pool frame holds up to corrosion. I'd like to build a deck partially around the pool, but don't want to invest the time, money and effort if the pool will only last a few years. We'll see...

- - - Updated - - -

Please let me know if the pictures don't show. Sometimes, Google photos is weird with their links.
 
Great Job! Looks beautiful. I am JUST getting started with the exact same project more or less. Did you fold back or trim your tarp do that it was only under the pool and covering the foam boards? Can the tarp cover your pavers if you are planning to cover everything with pea gravel? Just asking your opinion on the second question.
 
Thread Status
Hello , This thread has been inactive for over 60 days. New postings here are unlikely to be seen or responded to by other members. For better visibility, consider Starting A New Thread.