Last year about this same time a sudden wind / rain event caused a lot of bamboo needles to blow into my pool. As luck would have it the same thing happened again this year.
Needles clogged the pump and I had to go through the process of unclogging it again. Thought I would repost this just in case you have the same or similar problem with a sudden pressure drop.
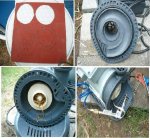
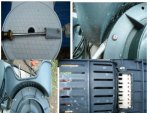
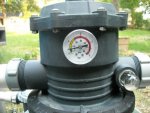
My new Intex 1600 pressure dropped all of a sudden from almost the yellow mark to around 2. I took it apart and found it clogged with bamboo needles. I'm sure pine needles would do the same thing. Here are some pictures of the process and I’ll be more than happy to answer any questions you might have.
Here are some step by step instructions which might make things go a little smoother if you find you need to unclog the impeller.
Since I was going to have to remove my connections from the pump anyway I decided to make some new gaskets for the screw on Intex fittings. I had noticed a very slow drip and wanted to correct this while I was at it.
You can purchase a sheet of rubber gasket material ($3-4 dollars) and trace around one of the regular Intex gaskets and cut your own from the sheets. The sheets come in 1/16” and 1/8” thickness. I think either one would work fine but I made mine from 1/8”.
Install these along with the regular Intex step washer and you won’t have a water or air leak when you reconnect. And you won’t need to apply too much pressure to the screw on fitting.
There are 8 bolts and nuts around the impeller housing that can be removed with a screwdriver. Use caution when removing the 3 bottom bolts that you don’t lose the nuts. Once removed the housing will separate, there is an O-Ring gasket that makes the seal so you don’t have to pry anything apart.
I used a small air compressor to blow the needles out that was clogging the impeller. You can also just pull them out by hand it just takes a little longer.
Once that is completed you just need to put everything back together. The first 7 nuts and bolts are simple to install. The nut on the very bottom of the housing is a bit tougher because you can’t reach it to hold the nut in place.
Fold a piece of duct tape over itself leaving the sticky side out and wrap that around a flat blade screwdriver. Put the small nut on the tape and slide it into place with the screwdriver. You can see through the hole that you have it in the correct position, and then start the screw from the top side. You can turn the pump over and look through the bottom side to make sure you see the threads and that the nut is in straight.
Put the strainer basket back on and reconnect the hose fittings and when it fills up with water turn the pump on. The pressure should be back to normal.


