Hayward H400 Heater / Bypass Valve Kit and Thermostat Replacement Installation

Apr 23, 2014
14
Texas
I believe I have a broken or stuck bypass insert and possibly a bad thermostat. I had a grid from the de filter break a few months ago and send a few pieces through the heater. I believe I got all of the pieces out however now when I turn on my heater it begins to make a boiling sound after about a minute of operation.

I purchased the items to install and would like to tackle it this weekend. I know nothing about the heater but from the manual it doesn't look like there's much to it however its not 100% detailed either.

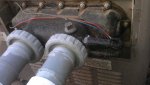
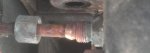
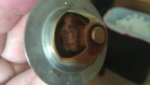
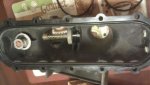
I have attached a few pictures for reference. If I am correct and please correct me if I am not I believe I need to kill power, turn off gas, drain the bypass valve, loosen the two union nuts on plumbing, then loosen and disconnect the 2 nuts for the hi-limit switch*, disconnect the pressure switch tube*, and disconnect the thermostat bulbs*, remove the 12 nuts on the bypass valve and pull forward.

* Any special procedure or precautions I should take in removing these?

Once this is all removed I'm hoping to see the way everything needs to go back in from the look of the old parts.

Any and all help is appreciated.
 

Attachments

  • 3.jpg
    3.jpg
    96.7 KB · Views: 195
Turn off unit, shut off pump, loosen/disconnect unions where water comes and out, then disconnect the hi limits to the right side of header(just disconnect the wires), remove temp sensor on the left side, remove the pressure switch from where it connect into the header, then remove all of the nuts. Hopefully none of them are rusted to the point that they break off. Try some spray like WD40 first. Once the nuts are removed you can pull the header off and replace the parts you need to replace.

Does this unit have a digital display or dials?

Here is a little help. https://www.youtube.com/watch?v=UzHLiba3s1g

Good luck.

Paul thank you so much for your insight and video! It has the digital display.

In your description mention the temp sensor and pressure switch are on the left. I believe the guide calls these Pressure switch tube, and Thermostat Bulbs. At any rate the one on the left closest to the front in my picture that has the 3 wires going into the nut do I just loosen as I would any nut or is there any precaution to take as the wires seem that they will be twisting a lot.

Thanks again Paul. Your wisdom is greatly appreciated!
 
Yes just use an appropriate wrench to remove the "thermostat bulb." I use an adjustable. Yes also remove the tube the pressure switch is connected to.
 
Yes just use an appropriate wrench to remove the "thermostat bulb." I use an adjustable. Yes also remove the tube the pressure switch is connected to.

I have removed the nut around the copper tubing however the tube wont pull away. Have I done something wrong? Turning the other nut only turns the entire tube. I have attached a pic. Thanks!
 

Attachments

  • 4.jpg
    4.jpg
    7.8 KB · Views: 150
You just need to pull hard. I usually grab it by the pressure switch and pull/turn at the same time. Some of these are a pain in the rear to get out but they do come out.
 
You just need to pull hard. I usually grab it by the pressure switch and pull/turn at the same time. Some of these are a pain in the rear to get out but they do come out.

Pulling it by the pressure switch was key. Inside I found another two pieces of broken DE grid and the exsisting bypass valve kit looked great and was the strong plastic so I didn't need to replace it. However the thermostat was in really bad shape. Replaced it and the heater ran great for an hour test.

Your help has been greatly appreciated. Do you by chance have an email address connected with a paypal account?
 

Attachments

  • 5.jpg
    5.jpg
    10 KB · Views: 143
  • 6.jpg
    6.jpg
    17.3 KB · Views: 150
I am glad that I was able to help you out in getting your system back up and running. Knowing that I could help is more than enough thanks. This is what this site is all about, helping others. Enjoy your heater and I hope it staying running good for much longer.
 
Paul,

Today was the first day I tried to use the heater since the repair and test. When I press the mode button it does not cycle to pool or spa. Is this possibly related to the repair? Any help is appreciated. Thanks
 

Enjoying this content?

Support TFP with a donation.

Give Support
Check and make sure all of the connectors on the back of the control panel are plugged in. This repair would not affect the keypad. It could be a fluke that the keypad went out as well. Check the connectors though.
 
Check and make sure all of the connectors on the back of the control panel are plugged in. This repair would not affect the keypad. It could be a fluke that the keypad went out as well. Check the connectors though.

Thanks Paul. You were right and it was a fluke the keypad went out as well. Installed a new one yesterday and everything powered back up great. However after about 60 seconds of operation I began to hear a sound best described as a whine or squeak. No error codes and heater is producing hot water to the pool/spa. I turned the heater off as the sounds didn't go away after a couple of minutes of use. Any help is appreciated.
 
The only thing I can relate this to would be the bypass which you already fixed. Are you sure you have good water flow thru the heater?

Water flow is great.

Originally when I opened the header I only removed the broken piece of de grid I found in there and replaced the thermostat as you could tell from the previous pic the one in there was majorly corroded. Is it possible the new thermostat is causing the problem? Everything else with the bypass looked good. Should I go ahead and replace the internals of the header? The previous picture also shows how the internals of the header looked.

I also noticed a bit of a funny smell when the heater begins to whine/squeak if that helps at all.

Thanks again
 
Pop the top and see if it looks like the heat exchanger is sooted. Although I have never heard a unit "whine" with a sooted up heat exchanger. How was the spring inside the header?
 
Thread Status
Hello , This thread has been inactive for over 60 days. New postings here are unlikely to be seen or responded to by other members. For better visibility, consider Starting A New Thread.