Lautner Edge Pool, Australia - Finally complete!

Sep 18, 2013
72
Hi all,

I stumbled on TFP while searching for design information on a Launter edge pool design and have found it to be an invaluable resource on all things pool.
As we all seem to love to watch pool builds, I thought I would log my build here as it may give others some inspiration and ideas with regard to this type of pool construction.

EDIT: Be ready for lots of waffle between photos!

Im a building contractor and so while construction is second nature to me, pool building isnt.
This is my first pool build and like everything else I do, if its worth doing, its worth overdoing!

A couple of years ago I sold my last home as it proved a little too much yard maintainence for my liking (1/2 acre lot, very large by Australian suburban standards,but small by US standards it would seem) and bought a smaller lot and designed a smaller house.
My family has always been active and we all love swimming so thought it would be great to incorporate a lap pool as part of the design.
I settled on a design where the lap pool is a central feature of the home.


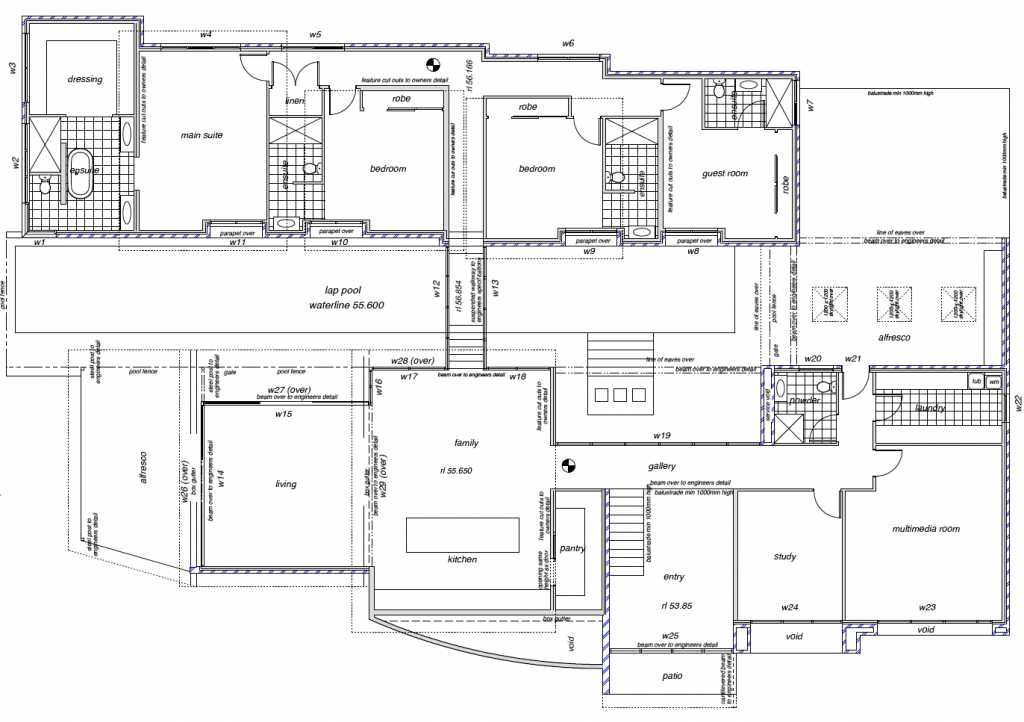
As such, the pool runs down the center of the house and the house wraps around the pool.
The house has been designed using passive solar design principles and much thought has been given to materials so as to minimize maintainence, reduce embodied energy where possible, ensure as many of the materials used as possible are recyclable and reduce the water and power usage of the completed house
 
The more I researched materials, the more we liked the idea of having all areas (except wet areas) with a polished concrete finish.

That idea was then refined as to how I wanted the pool and surrounding deck around to integrate and it was then I discovered a Lautner edge design.
The Launter edge was conceived by John Lautner, an American architect who was once a Frank Lloyd Wright apprentice and whos work is very prominent around southern California.

Ive seen quite a few infinity or negative edge designs but dont like the fact that the top thick edge of the walls are visible, so I found the Lautner edge to be a far more elegant solution.

Ive been able to find some Lautner edge designs on the net, but all had removable coping. My next issue was that I wanted the pool deck totally seemless.
Many sleepless nights later, I had come up with a design that would satisfy my desire to have a seemless pool deck and one that I could actually build!


What Ive designed is a 150mm (6") concealed perimeter pipe that runs around the pool and is fed by 100mm (4") vertical drop pipes at maximum 3 m (10ft) centers with 50mm (2") breather pipes at maximum 6m centers (and thats been only at the start of each pipe run) to prevent gurgling of the water as it flows to the catch tank.

The way the pool is built is also rather different than a typical pool as only the bottom sits on the ground. I have concrete core filled blockwork walls that support the upper level slabs all around the pool, but I also have a void between the pool wall and these block walls to allow room for the perimeter pipes, pool plumbing and insulation.
I know its fairly "high hanging fruit" to insulate the bas and walls of the pool, but I figured it would pay for it self many times over during the life of the pool, and it was pretty easy to do at this stage and with the way the pool sits inside the block walls.

Due to the way the pool sits inside the walls (but isnt supported by those walls) there is a fair amount of reo as well as an expansion joint in the pool

My other dilema was pool cover and I really didnt want a roller for a cover visible, so we have settled on a Remco pool cover. The US equivalent is a Hydralux pool cover. It is a rigid slat cover that retracts away into a basin under the bottom of the pool. Had I not gone with a Lautner edge design, the cover could have retracted into a poolside basin.
While its slightly more complicated to build, its not really any more expensive.
 
So far, lots of waffling on but no specs, so here they are.

Size: 25m x 3m (82ft x 10ft) plus "faux" beach entry and steps
Depth: 1.8-2.1m (6-7ft)(plus extra at one end for the pool cover basin)
Volume: 170kl (~45000 gal)

Piping is all minimum 2" and much of it is 3"
In-floor cleaning system with 10 circuits (all looped)
55kw (~74hp) heat pump to heat pool all year round.
4 x Astral Viron P600 Evo VS pumps (1 for cleaning, 2 for filtration, 1 for the heat pump)
2 x Astral FG905 media filters (900mm or 36")
SWG
I also have included a provision for solar heating, but havent thought too much about pump, etc as I probably going to go with an oversized evac tube solar hot water system to heat all hot water for the house and will have that plumbed so that once the storage tank reachs max temp, it dumps all extra heat into the pool

Everything powered by 10kw photovoltaic system mounted on my roof

The "faux' beach entry isnt quite a proper beach entry as it has a minimum depth of 25mm (1") so I can continue the Lautner edge right around the perimeter of the whole pool.

A couple of more thoughts.
Yes, the pool is rather deep, but it is a pool made to swim laps in, not so much to play ball games etc due to the position of the pool and the amount of glass adjacent to the pool.
Lot of pumps and filters, but my plan is to turn the water over a bit quicker than one would normally bother as all the power is to come from the PV system, so everything will be done during the day.
Power is rather expensive here in Oz now (wrong side of 25c/kwh) so I need to have as much of the power comsumption occur during the day while the PV system is working.

So all in all, a ridiculously ambitious project for a first self build, but thats the way I like things. As I said, if its worth doing, its worth overdoing!
Will start posting some photos of the build so far tomorrow after I download the photos from the camera.
 
Finally had a chance to download from the camera so here are a few pictures thus far.
Lot before we started excavation

Start of excavation.

Excavation is for the whole building rather than just the pool.
Took away some 2000 metric tonnes of rock/dirt. I expected the rock to be deeper so only got an 8 t excavator (later used a 15t to finish)

- - - Updated - - -

Bulk excavation completed and me marking out the footings

This me placing reo for the retaining wall at the end of the pool
 

Enjoying this content?

Support TFP with a donation.

Give Support
Reo of the walls next to the pool. Laser level is in the pool

Poured footings that will end up under the pool (supporting adjacent core filled block walls)


- - - Updated - - -

Blockwork around the pool going up

Core filling of blockwork walls. Pool is to the left of the picture with the steps and faux beach entry infront on the concrete pump
 
Start of the pool plumbing. Perimeter overflow drainage pipes being hung on the blockwork walls.
Pipes are set on a 1:100 fall. At that gradient, a 6" pipe can flow 22.6 liters per second (~6 gal/ sec)

You can also see about half of the underfloor cleaning pipe curcuits completed.
Loop at the far end of the pool is the outflow for the heat pump
 
It wasnt my intention to detail the house build as well!
Im just trying to give you guys an idea how the pool is coming together and some of the extra details Ive had to consider. Lots of sleepless nights so far!

- - - Updated - - -

More of the plumbing completed.

A quick run down of whats what
Lowest run on the left is the heated water inlet from the heat pump. I wanted to locate these returns as low as possible as I really didnt want a temperature gradient in the pool.
Next pipe up is the looped return from the heated water inlet
Then I have the filtered water inlet. Again, I wanted this as evenly distributed throughout the pool as possible. Trying really hard to eliminate any dead spots!
All the infloor cleaning circuits are completed here

- - - Updated - - -

Pool plumbing completed.

Due to the insulation I am going to install underneath the pool, we needed to provide piers for the pool shell to sit on.
Here you can see the piers poured (sitting on solid rock) as well as footings running along each side. I plan to thicken the pool walls at the bottom to allow the walls to also sit on a solid foundation.
I really dont want to go to all this trouble and have the shell crack later.
 
Insulation to the pool floor completed as well as reo.
Wall insulation underway

I have 300mm waffle pods over the pipework, then comes the insulation proper.The reason I have the waffle pods is twofold.
First is to cover the pipes, but more importantly, the pool coping on that side is cantilevered off the block wall and the pods act as formwork
Im using a 50mm (2") extruded (closed cell) polsytrene insulation right around the whole pool.
It gives me a R value of 1.82 W/m2K (or a R value of a bit over 10 in the US). More than enough to maximise the benefit while keeping costs down (not really!)
Yes, I know its very high hanging fruit when it comes to heat loss in a pool, but it was fairly easy for me to do due to the construction method of the pool and it will pay for itself over time in reduced heating costs.
 
Thanks guys.
I always tend to over think and over design things, especially on my own homes!

Insulation complete and continuing with reo.
Reo is all double layered due to the fact pool is not supported by the block walls and so the pool walls need to resist all forces on their own.
Bottom reo is double layered welded mesh (F92 9mm bars @ 200mm centers ~0.35" @ 8" centers).
Walls is high strength (not annealed so you cant bend this stuff over your knee) N12 at either 150 or 300 centers (1/2" @ 6" or 12" centers) depending on whether its the inside or outside reo, joined with more N12 bars horizontally at 300 centers


Photo of stairs formwork, underfloor cleaning pipework and reo
The formwork is a permanent form (called bondeck) that span across supporting walls underneath and acts like a lower layer of reo. I am also adding extra reo in each "pan" incase the bondeck ever corrodes away

Starting erection of all the falsework supporting the detailed formwork
I used laminated 150x80mm (6 x 3) bearers as I want this solid.
 
Falsework pretty much complete


This is a close up of the falsework that will support the ply.
The 75 x 50mm (2 x 3) timber will form the safety ledge for the pool cover and the inside top edge will set the water level (aprt from the pebble finish on top of it) so I wanted it as accurate as humanly possible.
So we set the top of that timber using a water level (as I find lasers not as accurate as I wanted) to +/- 0.5mm (+/- 0.02 inches).
Overkill no doubt, but Im desperate to avoid any high/low spots on the top knife edge as they will reveal themselves if I was to have a few people exit the pool with the filtration off (as it will fill the pool to level as soon as it is switched on)
 

Enjoying this content?

Support TFP with a donation.

Give Support
Thread Status
Hello , This thread has been inactive for over 60 days. New postings here are unlikely to be seen or responded to by other members. For better visibility, consider Starting A New Thread.