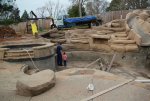
My pool construction started December 1, 2013 and is ongoing. Yes, I know I have been lazy to not post pics and things so far, but so far we have too many pics to count spread across 3 different cameras. I'm thinking a set of representative photos at the completion of my build will be a good thing once I have a chance to sort through them all. It's a fairly involved build with extensive rock feature, spa, fire pit, outdoor kitchen, and outdoor bathroom. Our rock feature is composed of sprayed gunite over a rebar/mesh form with lots of carving/texturing to look like real rock. Unlike some of the cheezy painted rocks of previous decades it's actually fairly convincing. The outer surface is essentially a mortar/stucco type material with neat little fossil shell/starfish imprints in some spots. The rock feature is approx. 35-40 ft of waterfalls ranging from 3-8 ft above the water surface with a deep grotto/slide combo near the deep end of the pool. My question for the best and brightest of the TFP forum: My PB has given us the option to seal or not to seal the fake rock formation. He thinks that unsealed will better suit the surrounding flagstone used for the beach entry, coping, spa wall, patio. He is worried that a sealant (which will apparently make the rocks look wet all the time even where the waterfalls do not course) will make the rocks look more "fake". He says that there is no difference in terms of durability with or without sealing. Anyone have any opinion or experience with something like this?
[This forum is a fantastic resource for building and maintaining a pool. Thank you all!]
[This forum is a fantastic resource for building and maintaining a pool. Thank you all!]
 :
:") For the most part, the rock feature won't be walked on except for some steps on the far deep side leading up to the top of the slide. You can definitely "scramble" around on the rocks (and this is necessary for accessing some planters), but this will probably be fairly limited especially due to the risk of slipping when the waterfalls are running. We looked at a similar rock feature the PB had done a few years ago with complete sealing, but unfortunately it was raining buckets at the time so it was pretty much impossible to appreciate any difference between wet and dry areas with the sealer... My pool will not be SWG. PB recommended against using this with flagstone which is pretty extensive in our build. We already had a flagstone patio so it was easier to match the pool to it instead of ripping it out. A tablet feeder will be installed which I plan to use for start up/vacation only. May look into other in line chlorinators depending on how worn out I get from adding stuff manually. I'm especially anticipating huge acid requirements with new plaster, tons of aeration, and a TA of 450/pH 8.2 in my fill water. At this point I'm hoping to start filling the pool in a month or so. As expected with a build like this and the horrendous weather we've had in East Texas this winter, it's already past when I initially hoped to fill. No worries, though. PB is good, and work continues.
For the most part, the rock feature won't be walked on except for some steps on the far deep side leading up to the top of the slide. You can definitely "scramble" around on the rocks (and this is necessary for accessing some planters), but this will probably be fairly limited especially due to the risk of slipping when the waterfalls are running. We looked at a similar rock feature the PB had done a few years ago with complete sealing, but unfortunately it was raining buckets at the time so it was pretty much impossible to appreciate any difference between wet and dry areas with the sealer... My pool will not be SWG. PB recommended against using this with flagstone which is pretty extensive in our build. We already had a flagstone patio so it was easier to match the pool to it instead of ripping it out. A tablet feeder will be installed which I plan to use for start up/vacation only. May look into other in line chlorinators depending on how worn out I get from adding stuff manually. I'm especially anticipating huge acid requirements with new plaster, tons of aeration, and a TA of 450/pH 8.2 in my fill water. At this point I'm hoping to start filling the pool in a month or so. As expected with a build like this and the horrendous weather we've had in East Texas this winter, it's already past when I initially hoped to fill. No worries, though. PB is good, and work continues.