solar panel installation

Okay...so here's today's progress... (I finally gave up on trying to get the pics smaller...nothing's working for me! :) ) Does it look like I have/am doing it right? I had to get as much as possible done on this today since we are expecting high winds and storms tomorrow night. When the guy came to open my pool on Tues I had him hand them up to me and this was the 3rd time I've had someone do that, only for wind and storms to knock them down! Guess we'll find out if it holds or not! That's not a "real" roof. The roof of the sunroom and ceiling are one in the same. It's a high density or something Styrofoam. I had it shingled because that would drastically cut down on all the "popping" it would do when the sun would hit it. So we'll see how it makes it through these storms....

IMG_0633-1.jpg~original


IMG_0636.jpg~original


IMG_0635.jpg~original


186d345e-4d31-4512-9775-0f7b49863ce4.jpg~original


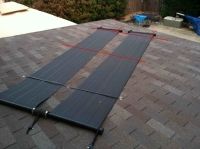
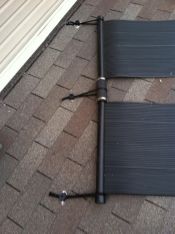
I'm short on a couple of the tide-downs for the ends so I will need to order those before I can finish.


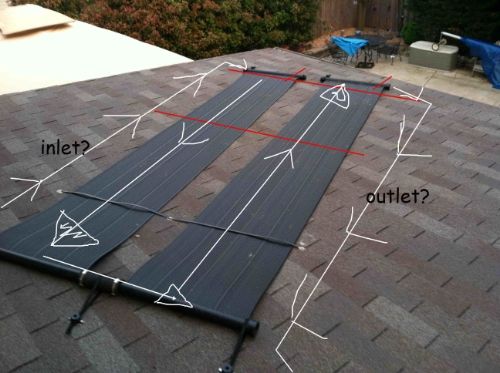
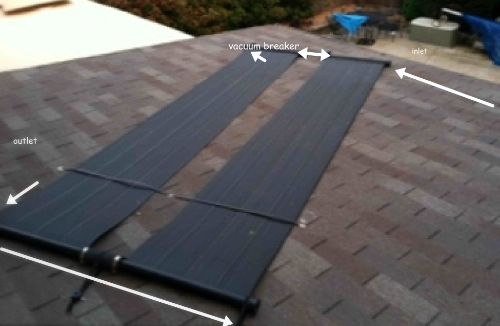
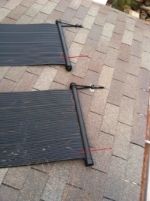
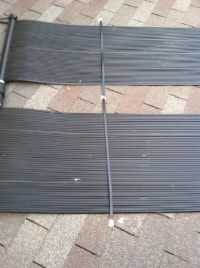
And as far as the piping...do I have this correct? As in which way for inlet and to outlet...


IMG_0633.jpg~original
 
It would be best for the inlet to be on the bottom right and the outlet to be on the upper right due to the way they are sloped.

You will need to connect the 2 panels at the top as well.

Oh wait, am I looking downhill in the last picture? If so, what I said was wrong. You want the inlet the lowest point and the outlet the highest point.
 
What you have will work, assuming you have all the open points plugged, but as Jason said you will get slightly better performance if you join both panels together and run the flow from corner to corner. Also if you configure it for corner to corner flow and feed from lowest to highest point you will have less problems with trapped air in the system. If you don't have one you also need a vacuum breaker valve to let the water out of the panels when there is no flow to keep them from overheating.

Ike
 
It would be best for the inlet to be on the bottom right and the outlet to be on the upper right due to the way they are sloped.

You will need to connect the 2 panels at the top as well.

Oh wait, am I looking downhill in the last picture? If so, what I said was wrong. You want the inlet the lowest point and the outlet the highest point.

Okay...now I'm confused! :) j/k Yes, it's "downhill" as in the house is behind me in the last pic. The two are connected at the top, it's kinda hard to tell that though. So, really the bottoms of the panels (on the right side) are both about the same, as far as slant. In some of the layouts that Ike showed me, they have drains on the panels that aren't connect to piping. Is that something I should probably do? There's caps in the packaging for those outlets...would that be good enough for draining them in the winter? Here's one with how I'm thinking is how this should go drawn.....

IMG_0633-2.jpg~original


So, is that not right?
 
It is up to you, what you have will probably work ok, but you may have issues with trapped air. If you don't have one of these http://www.watts.com/pages/_products_details.asp?pid=815 (or equivalent) You need to add one somewhere in your plumbing going to the roof, anywhere on the pressure side feeding the panels should work ok, although it is traditional to have them at roof top level, having them lower is only a major issue with multistory installations))
 
What you have will work, assuming you have all the open points plugged, but as Jason said you will get slightly better performance if you join both panels together and run the flow from corner to corner. Also if you configure it for corner to corner flow and feed from lowest to highest point you will have less problems with trapped air in the system. If you don't have one you also need a vacuum breaker valve to let the water out of the panels when there is no flow to keep them from overheating.

So, connect the 2 at the bottom as well and put the inlet at the top left and outlet at bottom right?

I do not have a vacuum breaker valve but can certainly get one. I just read through that thread and I take it this needs to be on the roof with the panels and not down by the pump....yes?
 
If you replumb to run corner to corner you will want the cold water to enter at the lowest point corner and hot to leave at highest corner, the safest place for the vacuum breaker valve is at the feed point going into the panels or anywhere on the lower side (you can get these at most big box hardware stores, or online from amazon, etc. for about $10-$15). See the animations on this page for the idea, the second one shows proper sloping to prevent trapped air

http://www.h2otsun.com/PG5ht.html
 
Okay...here's the latest configuration...will this be the most efficient and beneficial way to do this? I'm not able to show it on the pic but the plumbing would be outside of the panels in the bottom left side of the pic. (I have obviously messed with this pic way too many times! :) ) I also have ordered a vacuum breaker...link below.

42714.jpg~original


And here's the vacuum breaker valve I ordered...

shop.solardirect.com/product_info.php?products_id=341


Thank you so much for all your help!!!
 

Enjoying this content?

Support TFP with a donation.

Give Support
I received my vacuum breaker valve today.... :confused: I don't think this is the right thing...or is it?

This is what I ordered...

p_part_vacuum_breaker3_d.gif~original


And this is what I got...

photo.jpg~original


I expected that I would need to get (probably already have...) the elbow but I thought I was getting the top part of the gadget above. This looks like just the bottom. For $27 I sure hope there's more to this than that!! Does the metal drill-bit-looking thing screw out? I've turned it several times but it doesn't seem to be coming out, just rotating. (Remember...I haven't a CLUE what I'm doing here...well for the most part anyway!) I did try to call, but they are already closed for the day. Just thought I'd see if anyone here knew before I talked to them tomorrow.

Thanks!!

p.s. I'm proud to say that there is only a minor leak in my handy-work at the pump! I bought some pvc epoxy today and am waiting on it to dry before to see if that will fix it before I saw it apart and try again....
 
My guess is that is their new encheapend model with a vacuum breaker of some type inside, just without the expensive brass body.

So, if that's the case then this top should come off, correct? It's just rotating..not coming out. I guess I will have call them tomorrow because this doesn't seem to be what I ordered or something that can be used to drain the panels if there's nothing to unplug....right?
 
Yes. It is a vacuum breaker. When there is a vacuum inside, it is sucked open and allows air in.

Although I have never seen one like that and not really sure what it is or how it mounts.
 
Well, the bottom is a snap-on so I opened it...

photo1-1.jpg~original


And here's what it looks like closed...

photo2.jpg~original


I'm gonna go with...this isn't what I ordered even though the packing slip says this is what it is. Or, they need to splain to me how this IS the same thing! :) Thanks as always for your input!
 
But, like you said...how do I mount this? It doesn't appear to be something that can be cemented in nor even screwed in! I'll have to see if maybe they will exchange this for what the pic I ordered from shows. THAT I can work with! :) Nighty-nite! :sleep:
 

Enjoying this content?

Support TFP with a donation.

Give Support
Thread Status
Hello , This thread has been inactive for over 60 days. New postings here are unlikely to be seen or responded to by other members. For better visibility, consider Starting A New Thread.