Just Finished-Almost

Aug 6, 2013
9
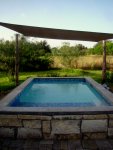
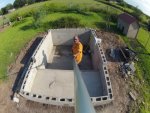
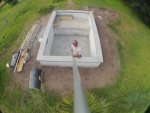
[attachment=0:3gt6y7qb]1-DSC00275.JPG[/attachment:3gt6y7qb][attachment=0:3gt6y7qb]1-DSC00275.JPG[/attachment:3gt6y7qb]Hey folks, I'm new here. Just finished constructing my concrete block pool. Tile and epoxy on the inside, limestone on the outside. The top edge will be wrapped in wood soon. I have a GAME Sand Pro 50 attached, and it is running beautifully, but I already want to hard plumb it. Anyone out there ever done that with this brand? I am looking for a parts list and/or fabrication requirements. Thanks in advance.
RP
 

Attachments

  • 1-DSC00275.JPG
    1-DSC00275.JPG
    191.2 KB · Views: 333
Good job Robert, it looks great!

What size is your pool (LxWxD)? Do you have a ledge at the close end in the picture (the darker blue section) or just the step?

I'm in the process of constructing a block pool for my dogs and would love to hear more about your build if you care to go into any details.

A few specific questions if you don't mind my asking...

How did you install your skimmer into the block wall?
Did you do all the tile work and epoxy yourself?
What epoxy product did you use and are you happy with it?
Any waterproofing for the block other than the epoxy?

Again, it looks fantastic. I hope mine turns out that nice.
 
Thanks Bob. Dimensions are 12' x 8' x 4' deep, except for a three foot long section at the end where you see the blue tile. That section is only 2'deep. Just something big enough to get in and cool off in the South Texas heat. The block is dry stacked over rebar dowels and all the cells are filled with concrete. It was then covered in Quikcrete Quikwall fiberglass reinforced plaster inside and out. The four foot deep section is half in ground and half above. Wrapped the above ground section in limestone, which still needs a little cleaning and point work by the way. The blue tile is glass 1"x1" that came in one square foot sections that we got pretty cheap from Overstock.com. Same with the shade sail. The inside was coated with Prime It and Dura Seal One Coat from Leslie's. Looks really nice. The skimmer was simply installed by leaving out a section of block. It was then secured in place when I formed and poured the bond beam around the top, which will soon be wrapped in wood. The return was just plumbed through the block and secured with Quikcrete anchoring cement. Oh yeah, there is a four inch slab with an eight inch perimeter beam underneath the whole mess.
 
I appreciate your reply Robert, thank you. I like what you've done with the tile and outside limestone work. I plan on doing something similar, so seeing a build much like mine helps. If you care to add any other pictures of your construction process, I'd love to see them! A picture of the outside where the skimmer is may help with my install - if you have one.

Here is a link to my build which is still in it's very early phases. Block work starts tomorrow!

concrete-block-puppy-pool-in-progress-many-questions-t67964.html

When you built your shelf/ledge, did you add a rows of block inside the already excavated hole and back fill it in or did you just not dig down in that area?

What exactly do you mean by your wanting to "hard plumb" your pool now? Hopefully someone can help you with you questions there, but I don't understand what you are wanting to do.

Thanks again.
 
Here is a shot during the construction. We added the shallow area as an afterthought, so I dug down a bit for that and bent the rebar over to connect into the upper slab, and of course, the block wall is only half as high as the rest. We put a radius on the edge that is the transition between the shallow and deep ends. I think I have another pic that was taken after I poured the bond beam. I'll see if I can dig it up.
 

Attachments

  • 1-pool 2.jpg
    1-pool 2.jpg
    58.9 KB · Views: 197
Here we go. This one includes the bond beam and skimmer in place. You can also see that the Quikwall has been applied, and I built a step in the corner that also acts as a sitting area.
 

Attachments

  • 1-pool 1.jpg
    1-pool 1.jpg
    50 KB · Views: 194
Oh, and by hard plumb, I mean connect the pump and filter with PVC. I want to move them into or near the little irrigation pump structure you see in the photo. Right now I just have it sitting next to the pool.
 
Thanks Robert. I'm learning stuff here and getting ideas!

What does "We put a radius on the edge that is the transition between the shallow and deep ends." What is a radius? Probably something I need, but I'm new to this type of build and appreciate any and all schoolin'.
 
It simply means that I curved the edge instead of leaving it at 90 degrees. Easier on the bottom. You might also note that in both construction photos, there is a beer sitting on the edge of the pool. Very important.
 

Enjoying this content?

Support TFP with a donation.

Give Support
Here we go. This one includes the bond beam and skimmer in place. You can also see that the Quikwall has been applied, and I built a step in the corner that also acts as a sitting area.

I really like what you've done. Regarding the bond beam along the top, does it increase the structural integrity of the walls, as opposed to simply filling the walls full of concrete and tiling the top, covering with wood, etc?

BTW, before reading further in your post I thought your top bond beam was a nice looking finished feature.
 
Thread Status
Hello , This thread has been inactive for over 60 days. New postings here are unlikely to be seen or responded to by other members. For better visibility, consider Starting A New Thread.