Cedar on top of my durock

May 21, 2013
21
Thanks for 100 ideas on what to do and not do. I am in the process of steel framing, and then skinning with 1/2" durock all around. On top of that, I was hoping to do a combo of stone and cedar. Stone on the outside face, and cedar on the inside. I know I want non-combustible materials for my box, but would wrapping it in cedar cause me any undue fire hazards, besides the obvious that wood is indeed flammable. The cedar would be directly around the front of the base of my Napoleon 30" head unit.

Sketchup and current progress as follows:
 

Attachments

  • kitchen-boarded.jpg
    kitchen-boarded.jpg
    205.1 KB · Views: 626
  • BarGrillSmaller.jpg
    BarGrillSmaller.jpg
    183.9 KB · Views: 617
Could you do a stone or tile mosaic directly below where the grill be touching... kinda like a 6" border outlining the bottom / sides of grill? Not sure how that grill is constructed, but I would guess you would have less than 2" to the firebox in that configuration.
 
Getting closer. About 1/3 framed. I will be using the corner brackets that I have seen others here use to built the bar overhang. That's the part of this project that worries me the the most, but I am sure it will be fine.

IMG_20130525_133843.jpg


IMG_20130526_191934.jpg
 
Finished the framing today. The bar overhang will give me a very usable 12" bar top. Next up, getting electric run and outlets in place. And then it's on to skinning the whole thing in 1/2" Durock. Also, I have a patio storage box I built to try and learn how to work with the studs and durock and the cedar. It is just coated with a single coat of Clear Thompson's Water Seal, and it really made the wood come alive. I am looking forward to seeing if it looks as good on the grille as it does by itself on the box. The wife isn't too sure about cedar and stone veneer in conjunction with a tile countertop. She thinks it might be too busy, and I might agree (but don't tell her). I will know more when the stone and cedar is done.

And once again, thanks for the corner bracket idea. Those were a lifesaver for building an overhang.

CameraZOOM-20130601162632988-1024x768.jpg


CameraZOOM-20130601162624229-1024x768.jpg


CameraZOOM-20130601162612001-1024x768.jpg


CameraZOOM-20130530154818191-768x1024.jpg


CameraZOOM-20130530154732912-1024x768.jpg
 
I have broken down in my updates on the project, but today the granite was installed on top, so I am now left with backspash (which includes the area under the grill as well as under the bartop), and connecting the grill to the NG blackpipe (which is turning out to be the most frustrating part of the project.

First a few pics from when I was done framing until now:

Mostly skinned in durok:
CameraZOOM-20130613164222019.jpg


Adding boxes and running electrical. The two holes are for NG (right) and electric (left). Added a 20AMP circuit to the box in the basement, and there is a GFCI at the beginning of this run, and 4 20AMP weatherproof outlets all around. Full disclosure, I had to remove all the boxes AFTER I had them wired, because they were too low and close to the eventual countertops. Live and learn.
CameraZOOM-20130613164011390.jpg


The stacked stone veneer (from Dutch Quality) turned out better than I could ever have hoped. I ended up paying a couple stone workers to install it so that I knew it was going to last. $300 well spent. I am not 100% sold that this all works with the red pavers below, but time will tell whether it works or whether it will be something I just get used to. Adding the Cedar will make a difference too.

CameraZOOM-20130628194224639.jpg


CameraZOOM-20130628194136500.jpg


So here we go with the Cedar and the Granite installed. I ended up with two 14" doors on the grill portion, and 1 18" door on the bar portion. Simple hammered black iron hinges and knobs. I layed all the cedar first, then cut the door openings to match the openings in the durok. 1 cut got away from me in a big bad way and I need to create a new door to mask it, later on.
GrilllAndGranite.jpg


Now, if I could only find out the proper way to find and run a line form my 1/2" black pipe connector on the house to the 1/2" male connector on the grill. I have read 100 different suggestions. Even my plumbing guy doesn't have a solid definitive answer. "It depends" isn't really what I want to hear at this point. I will let ya know what ends up happening, and you can surely drop your two cents here as you see fit.
 
Once I cut them out, I just glued and screwed two cedar planks across the back of the cut-out pieces at the top and bottom If they were any bigger, I would have done a third diagonal piece as well, but it wasn't needed. Each door is 4 planks wide.
 
Now, if I could only find out the proper way to find and run a line form my 1/2" black pipe connector on the house to the 1/2" male connector on the grill.

Not gospel, as codes vary. But here's my recommendation:

The takeoff from the black pipe will usually be with a threaded-to-flare fitting. Example, let's say you have 1/2" black pipe. Use a brass 1/2" IPS to 1/2" flare fitting. "IPS" is "iron pipe size" so the female thread count and cut on the brass fitting will match the male threading on the black pipe. Use proper gas dope on the threads. The other side of the fitting has the flare, as most copper gas runs requires flare fittings. Flre fittings do not use dope. The fitting:

flare-fittings-flarexfips.jpg


Depends on the gas you're using, but for propane I'll then use flex copper tubing that's coated with a protective plastic sleeve. Yellow in color. It's actually rated for underground use, but I like it for exterior exposed above ground installations too. When people see the yellow coating the tubing just gets a little more respect. Example:

http://www.ebay.com/itm/1-2-Gas-Tec...opane-Natural-Gas-Tubing-100-ft-/121083159227

So threaded fittings on the black pipe side with gas-appropriate pipe dope. And flare fittings once you transition to copper. And don't forget your shutoff valve.

Now for a different approach: If your black pipe runs relatively close to your grill, if both your grill and your local code allows you might be able to connect it with a simple flex run: http://www.grainger.com/Grainger/fl.../plumbing/ecatalog/N-a92?op=search&sst=subset

Hope it helps!
 

Enjoying this content?

Support TFP with a donation.

Give Support
Thanks, Mongo. That does help. I am not sure what the code is in Ohio, but somehow I would think that flex line would be against code. But if it
s not against code, that is exactly what I need, and 3 feet is about dead on for the distance.

I actually got a couple of those brass fittings, and they fit perfectly on the black pipe and on the grill, but of course there are fit issues with the hose. This is a Natural Gas system. I have a feeling it is time for me to break down and call in an actual expert so I know it's covered right for our area, and applicable codes.
 
For natural gas, probably the easiest would be to continue the run of black pipe that's in your house and stub it out through your exterior wall. Due to the makeup of NG, some states prohibit copper for NG piping. Sulfur levels versus copper, etc.

There are some flex hose alternatives, like CSST. It's a corrugated stainless steel tubing that is typically coated with yellow plastic. The plastic coating gives the pipe a fairly smooth appearance, but you can see the shadowing of the corrugations through the plastic. You could use that, but you'd have to bond it to ground. Don't confuse CSST with gas appliance hook up hoses. They can also be corrugated and coated yellow, but the yellow coating on the hook up hose is a very thin coating of plastic, so the exterior of the hook up hose has that rough corrugated appearance.

CSST-vs-Gas-Connector-440x214.jpg


If you shop, you might also see what looks like a simple yellow polyethylene gas pipe. It looks similar to PEX for household water supply, but it's yellow. Do NOT use that. It's for outside service burial runs. This stuff is a no no for interior use:

web_12ips500_usn_tif.jpg


Black pipe is usually simpler.

Once outside, you can add a shutoff valve on the stub out and then you can transition to a flex hose connection. Flex hose is allowable, and even preferable.
 
OK, I already have the black pipe outside, and the shutoff valve is on there. This black pipe from the house runs right in to the island, as shown:
13+-+1


From there to the inlet on the grill is maybe 4 feet. Do I run black pipe from there to near the grill and use one of the flex hoses you mentioned to then make the final connection to the grill?

I have read conflicting answers on the CSST outside. It is what I have inside from the main line to the black pipe outside, and it is grounded and bonded. So which is preferred for that final connection between the pipe and the grill, the appliance hose or the CSST, for an outdoor installation in a northern climate such as Ohio, knowing it is completely inside the kitchen island?

I am hoping to have a plumber buddy take a peak at it all when he is in town, I just never know when that is going to be. This kind of help from you is immensely informative.
 
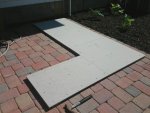
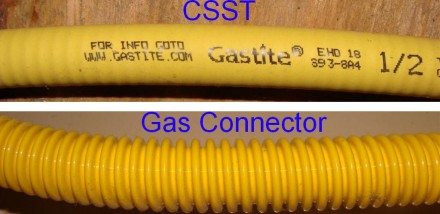
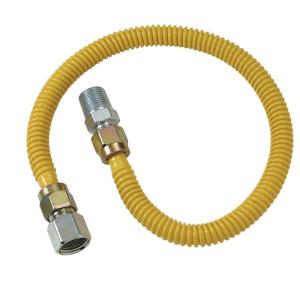
The CSST would have been for inside the house. And that's fine, because it looks like you're all set with the stub out and valve already in place.

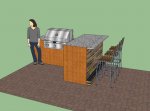
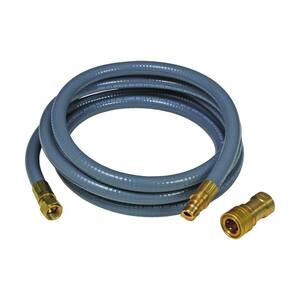
The only thing you have to figure out is if you want a quick disconnect (QD) or if you want a threaded connection. Quick disconnect is common for grills on casters, less common for permanent island installations like yours.

If you want a QD, it's probably be best to remove the black pipe nipple and cap and thread the QD right into the valve. Then just run a regular connection hose to the grill.

If you don't want the QD, you can leave the black pipe nipple if you want and thread the flex hose right on to the nipple. Or you can pull the nipple and thread the flex hose right into the valve. It really depends on what threads (female or male) the hose has. So you have options.

Did you grill come with a connection hose? Many do. If it's long enough and if it has the properly sized male or female threading, it can be threaded "as is" onto the nipple or into the valve.

If you don't have a hose, then any of the QD or regular connection hoses like this will work. My apologies for linking to a box store, but it was the first google hit that came up:

http://www.homedepot.com/p/Brinkman...onnect-Hose-812-7227-S/203016478#.UgbhZVOXIrU
a5d45d1d-c906-4e28-b1c6-43533db3aef3_300.jpg


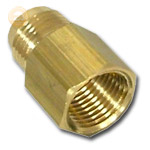
For the quick disconnect, just to give you more finger room, I'd recommend you remove the black pipe nipple and get a fitting like this (properly sized) that will thread right into your valve, the QD fitting will thread on to the other end:

http://www.amazon.com/Parker-Brass-Fitting-Nipple-Length/dp/B000FMZ418/ref=pd_sim_lg_3
41sSHX9C0BL._SL500_AA300_.jpg


Then just look at the grill end fitting, and see if the hose will thread right on to the grill, or if you need another fitting to connect the hose to the grill.

Remember, for all threaded connections, I recommend pipe dope rated for gas connections even when yellow teflon tape is allowed. I prefer RectorSeal.

If you don't want a QD hose, then just connect a "regular" hose from the valve or nipple to the grill.

Here's a good link I just found that has a nice selection and explanation of hoses and fittings:

http://www.tejassmokers.com/NatGasHoses.htm

Now get that thing fired up and start grilling! :cheers:
 
OK, I ended up with 1 four foot black pipe coming out of the stub at the house to near the grill, and then a couple of fittings to get the flexible stainless steel appliance hose to connect the final 2 feet from there to the grill. Pipe dope all around. I have it hooked up to the point of connecting the grill (capped the end), and haven't seen any leaks so far. I will leave it sit and let plumber buddy inspect it all this week, and then it's go time.

53b3e8af-c795-42ec-aba3-9e73a0a33e8c_300.jpg


https://lh6.googleusercontent.com/-7cD1 ... -no/13+-+1
 
OK, stone and rock, done. Gas hooked up and leak checked. Burgers have been grilled. I am going to call this one done.

CameraZOOM-201308151722391741.jpg


GrillStoneSurround.jpg


Thanks for all the hints and tips and pointers. Here's hoping I can offer up similar advice to others.
 
The last thing I needed to do was protect this from the elements, as needed. Since it is not covered, I do get quite a bit of rain, and eventually snow, on this. I also found that no matter how much I hope, there are still gaps around the grill where water can pentrate the cabinets underneath. So I had a local awning company fabricate me an marine-grade canvas cover for the whole thing. Well worth a few bucks for protection from Ohio weather.

Uncovered:
100_1121.jpg


100_1126-1024x768.jpg


100_1122-1024x768.jpg


And covered:
100_1142-660x495.jpg


100_1144-660x495.jpg
 
Thread Status
Hello , This thread has been inactive for over 60 days. New postings here are unlikely to be seen or responded to by other members. For better visibility, consider Starting A New Thread.