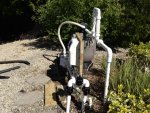
Help - Plumbing Question and Jandy Valve

king908

0
LifeTime Supporter
Apr 14, 2013
52
Afternoon,
In the middle of cutting out the old plumbing and re-installation. I cut out a old Hayward 3 Port Valve that is bad. I bought a new Jandy 3 Port Valve.

Issue is, the old Hayward Sat between the 1.5" Plumbing. The new Jandy Valve is Wider and doesn't fit between. HELP.

QUESTION OF THE DAY:
Can I put (3) 90degree Elbows together in a Row to give the added Width that I need? Or will that cause a flow issue into the pump.

Pictured proposed below, HELP. PLEASE SAY YES ")
Or Suggestions.

[attachment=1:1rb8dnhn]photo(1).JPG[/attachment:1rb8dnhn]
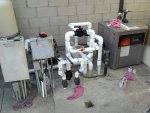
[attachment=0:1rb8dnhn]image(1).jpeg[/attachment:1rb8dnhn]
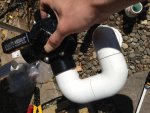
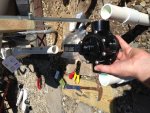
 

Attachments

  • photo(1).JPG
    photo(1).JPG
    129.9 KB · Views: 109
  • image(1).jpeg
    image(1).jpeg
    107.2 KB · Views: 110
Yes you can put the 90's like that, and yes it will affect the flow some. If I were going to do it I'd use 2" 90's and reduce right above the union or I'd probably even replace the union with a 2" one as well.
 
You picture does not actually show enough of the problem to propose a solution.

Back up and show what you are actually dealing with and the pump location, etc.

What you show will work, although may add more restriction than you would have to with some other, yet unrealized, solution.

EDIT: I agree, if you have to go with all the turns, increasing everything above ground to 2" pipe will certainly help.
 
Bama Rambler said:
Yes you can put the 90's like that, and yes it will affect the flow some. If I were going to do it I'd use 2" 90's and reduce right above the union or I'd probably even replace the union with a 2" one as well.

So Take the 1.5" PVC to a 2" Union. Then Take the 90 off the Union to the Left and Right..
Extend the Piece off the First 90 Up High Enough so I can just use (2) 90's and tie in the Jandy then.
 
More Pictures-
I guess another trip to Home Depot is in Order.

[attachment=1:r5hcv19a]photo(2).JPG[/attachment:r5hcv19a]

[attachment=0:r5hcv19a]image(2).jpeg[/attachment:r5hcv19a]

Not sure why the photo rotated in the attachment. Sorry
 

Attachments

  • photo(2).JPG
    photo(2).JPG
    165.8 KB · Views: 105
  • image(2).jpeg
    image(2).jpeg
    130.8 KB · Views: 103
Hmm ... from that pic, sure looks like it should fit between the 2 pipes ... oh well.

Why are you looking to put a union on the vertical pipes? I can not think of why that would be useful. I would just put one in front of the pump.

I would maybe even cut below the couplers in your last picture and then immediately increase to 2" pipe. and then only reduce right at the pump if required.

Note that you can use a 2" pipe and a 2" coupler to attach to the Jandy valve ... hmm actually you could come up one of the 2" pipes and use a 2" 90 to turn toward the other pipe ... slip the Jandy directly into the 90. Then for the other pipe you can use a 90 to turn and then a short piece of 2" pipe and a 2" coupler to attach to the other side of the Jandy. You may have to shift the pump a little to line up, but that would be very few turns.
 
jcowart said:
Looks like your valve will go between the two vertical pipes. Just use a street 90. Slip fit inside the valve and outside the verticals.

I tried, Trust me I tried, Once the 90 is on, its sticks to far out.

Question. I threw away the idea of the Union there, to just use the one on the Pump.
So now I was thinking of installing 2 - Two Port Jandy Valves on each line to have a way for Winter Shut Off.
 
It's more fittings to mess with but you could use two 45's back to back and that will increase the center to center distance between the verticals. Do that on both verticals so it does not change the center on your horizontal run.
 
Finally Done

Guys,

Thank you so much for all your help the past week. I finally got it all done.
Just need to open the pool next week now, so I can do a leak test (Crossing Fingers)

I really do appreciate all the help and suggestions you have all offered.
This is a amazing site, and a great bunch of knowledgeable and helpful guys.

THANK YOU !!! :cheers:
[attachment=0:20es5w6p]image(3).jpeg[/attachment:20es5w6p]
[attachment=1:20es5w6p]photo(3).JPG[/attachment:20es5w6p]
 

Attachments

  • photo(3).JPG
    photo(3).JPG
    130.2 KB · Views: 82
  • image(3).jpeg
    image(3).jpeg
    128.6 KB · Views: 82

Enjoying this content?

Support TFP with a donation.

Give Support
I had the same issue and used a couple 45s to give me more room.

In the picture you can see where I needed top do this on two runs. [attachment=0:3fht57uf]uploadfromtaptalk1367784371627.jpg[/attachment:3fht57uf][attachment=0:3fht57uf]uploadfromtaptalk1367784371627.jpg[/attachment:3fht57uf]

Sent from my LG-P769 using Tapatalk 2
 

Attachments

  • uploadfromtaptalk1367784371627.jpg
    uploadfromtaptalk1367784371627.jpg
    166.6 KB · Views: 65
Re: Finally Done

king908 said:
Guys,

Thank you so much for all your help the past week. I finally got it all done.
Just need to open the pool next week now, so I can do a leak test (Crossing Fingers)

I really do appreciate all the help and suggestions you have all offered.
This is a amazing site, and a great bunch of knowledgeable and helpful guys.

THANK YOU !!! :cheers:

:goodjob:

Not sure why you decided to use 3 Jandy valves though :scratch:
 
Re: Finally Done

[/quote]

:goodjob:

Not sure why you decided to use 3 Jandy valves though :scratch:[/quote]

Wanted a way to adjust the incoming flows. I sometimes when doing a vacuum to waste close off the flow to the one port, otherwise it sticks to the bottom of the plaster, or collapses the hose. But also for extra protection in case the main valve fails in the winter. I get paranoid. I would have more if you all didn't stop me. :)
 
Thread Status
Hello , This thread has been inactive for over 60 days. New postings here are unlikely to be seen or responded to by other members. For better visibility, consider Starting A New Thread.