Skimmer Epoxy Kit

I'm going to guess my skimmer is leaking.

[attachment=0:13qb1tlh]IMG_1416.JPG[/attachment:13qb1tlh]

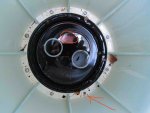
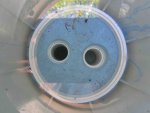
Water level has been stuck at the lip of the skimmer for a couple of days, and the water has remained at the same level in the pipes. I have the dreaded "black bottom skimmer". You can see an arrow pointing to a screw that was stripped. I've also circled my prominent balding forehead, lest it be confused for part of the skimmer.

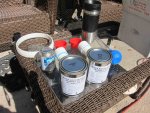
I've seen a product that epoxies the entire bottom of the plate, and provides extensions for the pipes along with a shallower skimmer bucket to compensate for the longer pipes. Has anyone here tried it? Thoughts?

Or could I just squeeze my own tubes of A+B, get my own PVC, and get a smaller skimmer bucket? Their kit is about $160.
 

Attachments

  • IMG_1416.JPG
    IMG_1416.JPG
    205.2 KB · Views: 525
Well, here is the kit. It has a two part epoxy, and pvc glue. It also has two tube extenders with red caps, and a new ring for the float stop. The pvc is supposed to be dry as far down as the new fittings will go. My main drain line was easy to drain below the pools waterline. I suspect that means my main drain has a one-way valve at the drain. For the suction side line, I just ran the pump for a second, and then used the turkey baster to get out the residual water. Coffee not included.[attachment=0:1j6fqtha]IMG_1481.JPG[/attachment:1j6fqtha]
 

Attachments

  • IMG_1481.JPG
    IMG_1481.JPG
    393.6 KB · Views: 439
Here is the skimmer with the tubes inserted, and cap covers in place.

I had to push pretty hard to get the main drain extender in, so go easy if you are testing it. You don't want it to get stuck before you glue it. The suction side pipe was almost too easy, but two coats of the pvc glue sealed it up well.

I considered putting the red caps in upside down, like hats, to keep the epoxy out. Don't do that. I stuck to the instructions which said to shove the beveled side into the pipe opening. It wasn't a great fit, but it worked. Thing is, the epoxy will run up over the pipe height, so if I placed them like hats the epoxy would have shoved them off and run down the pipe. The way it's set up here, the epoxy will climb above the pipe head, and a channel will be formed when it dries.
[attachment=0:3fukzhcd]IMG_1486.JPG[/attachment:3fukzhcd]
 

Attachments

  • IMG_1486.JPG
    IMG_1486.JPG
    169.3 KB · Views: 415
Here is the skimmer with epoxy poured in. I've got to leave the plugs in for at least four hours, but I'll let it go a little longer. I'm watching the stuff cure in the bucket I mixed it in, and it's setting slow. It's about 55/60 degrees here, so it may need some extra time. I'll take a pic tomorrow after the plugs are removed.
[attachment=0:t4xxsoke]IMG_1487.JPG[/attachment:t4xxsoke]
 

Attachments

  • IMG_1487.JPG
    IMG_1487.JPG
    179.2 KB · Views: 416
Whoohoo! Epoxy set, and the caps came right out. I filled the skimmer, and leak is gone.

The real test will be whether it lasts until the end of summer. In any case it looks like at least a short term fix for a leaky black bottom skimmer. I'll be redoing my pool deck in a year or two, and will likely do a full skimmer replacement then, so this is what I needed. I'll try to update this later in the summer to let you all know if it stuck.
[attachment=0:129rwxew]IMG_1489.JPG[/attachment:129rwxew]
 

Attachments

  • IMG_1489.JPG
    IMG_1489.JPG
    179.6 KB · Views: 387
Interesting process that I had never seen before. So do you have an equalizer line or the floor plumbed into the 2nd hole of your skimmer?

Does the use of the epoxy now prevent you from using the float diverter to adjust how much water is pulled from the floor?
 
I believe the second line goes to the main drain. I noticed while draining that tube, the water level in the tube was far below the pool line. So it's possible the tube to the maindrain is plugged, or governed by a one-way valve. My diverters flap looks like it's been broken for a long time, so its probably been years since that main drain tube has been exposed to any pressure.

I took a picture below of the ring that goes down into the skimmer. The ridge on the inside fits my float diverter perfectly. The diverter says 8650-39 on the top. The instructions say to just glue it down with some of the pvc glue. I'm leaving it all loose for now. I'm going to bring things online in stages, while checking for leaks with each stage. Its an old pool, and I'm not sure the skimmer was my only leak.

[attachment=0:1l7x1bdp]IMG_1490.JPG[/attachment:1l7x1bdp]

The main drain line is probably copper not too far down. It's a 45 year old pool, and all the other original piping is copper. I know a bottom drain is useful for circulation, but if mine is plugged, copper, and old, is there a good reason for me to push water through it? If there is a one way valve down there, I'd bet it will crack the first time it moves. I don't have any sediment or silt issues at the bottom.
 

Attachments

  • IMG_1490.JPG
    IMG_1490.JPG
    174.6 KB · Views: 385
Late for me to chime in but here goes:

Plastic and epoxy don't stick together well but a mechanical bond can be formed. You can improve the bond by roughing up the surface with sandpaper before you add the epoxy.

As for the main drain - supposedly it improves circulation, but many people retrofit without them or eliminate them without problems. You may need to aim a return down to the deep end if you have one in order to improve circulation at depth but otherwise you can get by just fine without one - at least that's what I have read here.
 

Enjoying this content?

Support TFP with a donation.

Give Support
I don't recall which vendor I purchased it from. I did find another listing in the attached link below.

http://www.h2oco.com/online_catalog/catalog/k/k_7.htm

But if you Google BBP-1 Black Bottom Epoxy Kit, you should be able to find a vendor. I don't know if it would work with another type of skimmer.

So far so good on my pool. My only concern is the epoxy may not keep its bond to the plastic long term. But the little strings of expoxy you see in the photos simply will NOT come off the plastic, so there appears to be a decent bond there.
 
Fix finally gave up. Pool is leaking again at the skimmer. There is no obvious problem with the seam around the edge of the skimmer wall. I'm guessing its in the pipe connections to the skimmer, or between pipes themselves. Brutal dry in northern California, and the clay is dryer than it's been in probably 40 years. Would shifting be expected?

In any case, it was a good two season band-aid. Contractors are coming out to demo and replace the skimmer and pool deck. The whole point was to delay the skimmer issue until funds for the deck were in place, so all's well.
 
Thread Status
Hello , This thread has been inactive for over 60 days. New postings here are unlikely to be seen or responded to by other members. For better visibility, consider Starting A New Thread.