
Pool Build - Baltimore
- Thread starter bmoreswim
- Start date
You are using an out of date browser. It may not display this or other websites correctly.
You should upgrade or use an alternative browser.
You should upgrade or use an alternative browser.
- Jul 16, 2012
- 7,204
- Pool Size
- 27000
- Surface
- Plaster
- Chlorine
- Salt Water Generator
- SWG Type
- Hayward Aqua Rite (T-15)
Thanks. Spent a decent amount of time getting the layout as we wanted. The PB's experience was helpful on plaster day getting them set in a pleasing fashion. Our tile is 'unobtrusive' at best bordering on 'blends right in'. Glad to see though that it shows up fairly nicely on the steps. From a distance the water line tile is the opposite of bold. It's not exactly what I had envisioned before making the selection but it works. Shouldn't show much scum, kind of like a silver car for masking dirt, doesn't mean it won't be there though.Nova13 said:like the squares on the steps so you know where they are
- Jul 16, 2012
- 7,204
- Pool Size
- 27000
- Surface
- Plaster
- Chlorine
- Salt Water Generator
- SWG Type
- Hayward Aqua Rite (T-15)

- Jul 16, 2012
- 7,204
- Pool Size
- 27000
- Surface
- Plaster
- Chlorine
- Salt Water Generator
- SWG Type
- Hayward Aqua Rite (T-15)
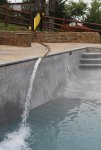
Here are a few after the equipment was up and running for a few days. The water color is lighter than in person.
[attachment=1:3t0o9n9w]IMG_7453 - TFP.jpg[/attachment:3t0o9n9w]
[attachment=0:3t0o9n9w]IMG_7455 - TFP.jpg[/attachment:3t0o9n9w]
[attachment=1:3t0o9n9w]IMG_7453 - TFP.jpg[/attachment:3t0o9n9w]
[attachment=0:3t0o9n9w]IMG_7455 - TFP.jpg[/attachment:3t0o9n9w]
Attachments

- Jul 16, 2012
- 7,204
- Pool Size
- 27000
- Surface
- Plaster
- Chlorine
- Salt Water Generator
- SWG Type
- Hayward Aqua Rite (T-15)
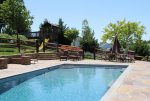
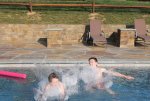
Here is the first swim!!!!! May 30, 2013. Dig day was 2/14/13. Autocover is scheduled for 6/7 which will be the last big piece.
The water color in these pics is representative of a bright sunny early evening that was perfect for a first swim, air temp at 90 and water at 77 and rising.
[attachment=1:9dkyai9w]IMG_7469 - TFP.jpg[/attachment:9dkyai9w]
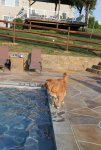
"Boy, this is the biggest water bowl I've EVER seen! But where's the big food bowl to go with it?"
[attachment=0:9dkyai9w]IMG_7478 - TFP.jpg[/attachment:9dkyai9w]
The water color in these pics is representative of a bright sunny early evening that was perfect for a first swim, air temp at 90 and water at 77 and rising.
[attachment=1:9dkyai9w]IMG_7469 - TFP.jpg[/attachment:9dkyai9w]
"Boy, this is the biggest water bowl I've EVER seen! But where's the big food bowl to go with it?"
[attachment=0:9dkyai9w]IMG_7478 - TFP.jpg[/attachment:9dkyai9w]
Attachments
denaw
0
I love the remark about what your dog must be thinking!..I can see it! Your entire place is absolutely Stunning!!! We looked for a pool water delivery service in our area and could not find one!...So with 3 hoses running it took us about 24 hours to fill...
I bet the kiddos are Loving the water, and just in time for the 'hot' summer to begin!
Congratulations, again it all looks amazing!
Dena
I bet the kiddos are Loving the water, and just in time for the 'hot' summer to begin!
Congratulations, again it all looks amazing!
Dena
bmoreswim:
I have been watching this build all winter and have been looking forward to seeing the finished product almost as much as you have. It...looks...awesome! Congrats and enjoy!
I have been watching this build all winter and have been looking forward to seeing the finished product almost as much as you have. It...looks...awesome!
Congrats and enjoy! bobby1017
LifeTime Supporter
- Jul 16, 2012
- 7,204
- Pool Size
- 27000
- Surface
- Plaster
- Chlorine
- Salt Water Generator
- SWG Type
- Hayward Aqua Rite (T-15)
Thanks much all! On the benches, I commented to my DW the other day (while relaxing by the pool) that I was really pleased with how the bench layout was working. I think having substantial bench space in the deep-end is a pleasing feeling to any swimmer, adults or kids. We've all been tired at one point or another in water over our heads and while access to the sides are fine, having benches available gives that extra safety and comfort factor.
My youngest was going back and forth on the shallow end bench the first night. It wasn't overly warm and I think he didn't want to be up to his chest in that water after a while but still being able to move around in the water, but only up to thigh level, was fun for him. It does give plenty of in-pool seating for the non-swimming crowd.
I'll post some follow-up pictures as more details get finished up over the next few months.
dougzdog
0
Do you know what kind of metal wire fence they used on your split rail fence? I want to do a fence like yours, but fence here has to be 52"s and all the metal wire i've found is 48".
- Jul 16, 2012
- 7,204
- Pool Size
- 27000
- Surface
- Plaster
- Chlorine
- Salt Water Generator
- SWG Type
- Hayward Aqua Rite (T-15)
It is 48" tall 1"x2" black vinyl coated steel. I didn't need to look for anything taller so I don't have any other info. I'd expect it could be found but may be disproportionately expensive due to the limited production, but hopefully not.
- Jul 16, 2012
- 7,204
- Pool Size
- 27000
- Surface
- Plaster
- Chlorine
- Salt Water Generator
- SWG Type
- Hayward Aqua Rite (T-15)
I thought I'd share information from the autocover installation folks today regarding its use as a winter cover since I know it's a bit of a controversial topic on the site. This doesn't necessarily jive with what is in the manual (it didn't address nearly the ideas i did with the installer) but is all to be considered by the pool owner when deciding whether to use an autocover as a winter cover or to use a dedicated one.
First off, we have a Coverstar cover which was installed by Coverstar East Coast who operates in MD, PA and CT and we are in MD. I asked him whether they recommend using it during the winter in our climate, which freezes often though not like a northern tier state and can have monster snows at times. He didn't actually say whether they recommend it but said that about 50% of their customers do use them in winter. He said to do it we should lower the water level to winterize the lines and plug them. Then raise the water level to 1-2" below the tiles (6" water line tiles on our plaster pool). This would still provide adequate support for the cover when precip. comes. The 1-2" would also keep the water level from rising to the tile level after freezing expansion occurs. The reason being that you do not want any water/ice at the tile level to keep it from getting behind it and popping them off. My thought is that 2" may be more appropriate but would also provide less support.
You would still need to be pumping off the cover during winter. Another option you would have is to open the cover when a snow storm comes and just let it go in. Then if the water level gets too high, above the 1-2" below the tiles, you would just pump it out by putting the cover pump on the top step and lowering the level.
He said that some covers did fail (they ripped) after the back-to-back blizzards a few years ago (roughly 48" in 4 days) but they only failed after the second storm because the first storm had displaced water under the cover and expelled it out over the dam wall under the cover. And then the owners did not remove the snow (not easy I suppose but do-able by pulling it off with a broom or some other device) before the second storm. The lowered water level was also not raised by adding water and the second storm put too much weight on the cover which didn't have proper support because the water was too low.
His feeling (and that of his firm) seems to be that they can be used as winter covers if done very carefully and actively managed throughout the winter. It is NOT a close and forget scenario. The other interesting comments were on cover life. He said that they are seeing about a 10 year life of the fabric when used in our 4-5 month swim season. When used as a winter cover, the extra UV exposure causes shrinkage and other issues which accelerate breakdown and the average life seems to be about 8 years. Incidentally, he said that the replacement cover cost today is $4.50/sf. So a roughly 20x40 cover for our pool would be $3,600 plus tax. Not sure if that was installed. So two more years life on average but you have to buy/maintain a separate winter cover at several grand for a nice Loop-Loc type spring cover and a no maintenance winter with a dedicated winter cover.
Life is full of trade-offs I suppose. I'll go swimming now and decide later!
- Jul 16, 2012
- 7,204
- Pool Size
- 27000
- Surface
- Plaster
- Chlorine
- Salt Water Generator
- SWG Type
- Hayward Aqua Rite (T-15)
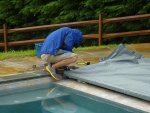
Here are a few pics of the cover being installed. You can see from the first one that the bar sits above the dam wall when open so it will not block any water from escaping over the wall during swimming - oh well. The cover operates well though I haven't taken any pictures of it while covering the pool. The bluestone coping pieces to cover the cover pit were not in stock yesterday. They should arrive Tue/Wed to give a completed look to the cover area. Today I was a little more focused on the issue in the following post.
[attachment=1:sy0jne23]P1030490 - TFP.jpg[/attachment:sy0jne23]
[attachment=0:sy0jne23]P1030491 - TFP.jpg[/attachment:sy0jne23]
[attachment=1:sy0jne23]P1030490 - TFP.jpg[/attachment:sy0jne23]
[attachment=0:sy0jne23]P1030491 - TFP.jpg[/attachment:sy0jne23]
Attachments
- Jul 16, 2012
- 7,204
- Pool Size
- 27000
- Surface
- Plaster
- Chlorine
- Salt Water Generator
- SWG Type
- Hayward Aqua Rite (T-15)
I had been suspecting there was an issue with our filtration system for over a week now. It started when, while adding CYA, partially diluted, to the skimmers, much of the undisolved CYA shot back out the returns into the pool. Then over the next week the water, though fairly clear (I could still see ethe screws on the main drain covers) seemed to be losing its sparkle. And after I'd brush the pool and any accumulated dirt into the main drains, it would seem to reappear on the pool floor near each return.
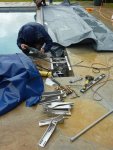
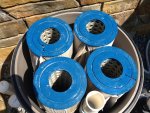
So today when I had time, I opened up the cartridge filter for the first time to sleuth. The pics below immediately show something obviously had gone awry. After reviewing the filter exploded parts diagram on how the innards should be installed, it was clear that it was assembled wrong and the flow through the cartridges was backwards. It had "exploded" all four cartridges by forcing water into the central tube and pushing it backwards out through the pleats. They all broke at the top and the pleats gave way on each too. So it is doing some filtering I suppose but basically just recycling the detritus back into the pool.
Called my PB this afternoon and he said that he had in fact not opened the filter upon arrival but it seems that the filter was first bought by someone else then returned to the vendor and sold to him as new (but mis-assembled). He was extremely apologetic and will have a whole new filter here Monday morning.
I was glad to see there was an issue as I could see the problems in the pool. So hopefully all will be well on Monday with the properly installed and assembled filter. For now I just reassembled and turned it back on. I didn't want to readjust the insides to correct the water flow because whatever dust/etc. that had accumulated backwards in the cartridges would be ejected back into the pool. Only two more days anyway. The circulation still works for chemicals and the water is hanging in there.
[attachment=1:3wkzur48]2013-06-08 15.33.57 - TFP.jpg[/attachment:3wkzur48]
[attachment=0:3wkzur48]2013-06-08 15.34.18 - TFP.jpg[/attachment:3wkzur48]
Attachments

OK, I am a bit confused. I love your decking....is it stamped concrete or something else?
- Jul 16, 2012
- 7,204
- Pool Size
- 27000
- Surface
- Plaster
- Chlorine
- Salt Water Generator
- SWG Type
- Hayward Aqua Rite (T-15)
It is concrete with carved joint lines with a faint texture created by mats. The concrete has Stonemakers chemicals (must be a licensed installer to get these) added to it which is discussed earlier on. Not as many chemicals are needed for the decking versus the walls because you don't need the decking concrete to be stackable during installation. The real key to the appearance I think is the amount of effort put in the painting of it. The decking was painted over various days in two stages, base rough color coat then spraying of individual stones. Then one guy two days to paint the grout lines with runny mortar mix. The mortar mix never became smudge resistant when contacted while wet even after days of drying. So they sealed quickly and that locked it all in place though it is a little slippery.
Thread Status
Hello , This thread has been inactive for over 60 days. New postings here are unlikely to be seen or responded to by other members. For better visibility, consider Starting A New Thread.