New Build in Maryland

I agree - great progress! Thanks.

They used 1/4" pegboard in places that were dug out behind the rebar farther than the shell thickness was specified. Places like where pipes were dug or where some of the hurricane rains washed away some dirt. They also used it for the spot that the skidsteer went in and out to make a form.

The wooden things in the foreground were just saw horses basically that they weren't using when I left for work... Unfortunately, by time I got home it was dark already and they were long since wrapped up. I think they used them to support forms when they shaped the stairs in the shallow end.

I'll take some more pics in the morning. From what I could make out, it looks good.

Karl
 
Starting to look like a pool!

[attachment=2:469msdle]IMG_1696.jpg[/attachment:469msdle]

[attachment=1:469msdle]IMG_1697.jpg[/attachment:469msdle]

[attachment=0:469msdle]IMG_1698.jpg[/attachment:469msdle]

Karl
 

Attachments

  • IMG_1696.jpg
    IMG_1696.jpg
    60.6 KB · Views: 211
  • IMG_1697.jpg
    IMG_1697.jpg
    56.6 KB · Views: 211
  • IMG_1698.jpg
    IMG_1698.jpg
    61.2 KB · Views: 211
Gunite guys did a nice job it looks like.

I'm a little concerned with our design - not much of a shallow end in the pool for little kids to hang out. A little late to change that though! It may just look deeper than I imagine without water...

[attachment=1:33aszza5]IMG_1699.jpg[/attachment:33aszza5]

[attachment=0:33aszza5]IMG_1700.jpg[/attachment:33aszza5]

Karl
 

Attachments

  • IMG_1699.jpg
    IMG_1699.jpg
    61.8 KB · Views: 210
  • IMG_1700.jpg
    IMG_1700.jpg
    71.5 KB · Views: 210
That'll just make the little buggers better at water polo. But like you said, with the water level 3" below the top of the gunite, you'll probably be just fine. What is the access point for right next to the skimmer in the last picture?
 
Nice looking pool and they are making a lot of progress!!

I'm from Western MD and MD Pools just completed our pool about a month ago so we were able to swim some last month. Unfortunately, it's getting closed up next week! You'll be really impressed with it when they are finished. From watching your progress, it looks like they are using the same contractors as they did for our pool.

Good luck with your project!
 
Thanks! Any pictures on this forum (Jeremy24)?

We have designated the standard plaster finish, but since they won't finish that until spring we have an opportunity to switch to an upgraded material like their diamond bright or pebbletec. Anyone have any input on the value of upgrading? Price difference is about $3,500 for Diamond Bright and $5,700 for Pebbletec.

Karl
 
I can only provide limited thoughts as a non-pool owner. Our quotes from sources other than the PB we are actively negotiating with we're $4,000 for Diamond Brite and $6,500 for Pebble Tec...so the pricing seems in line with other companies...ours might be for a little more surface are too, not sure.

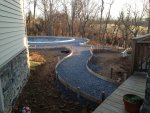
We are planning to go with plaster but just tinted grey, so it will have a marble effect to it, at no additional charge. So we'll get the color effect we want but not any added lifespan that might come with the others. I've heard very good things about the lifespan of standard plaster so long as water chemistry is kept in the best range consistently.

So for me, it's a matter of whether the insurance for a hopefully longer lasting surface is worth it (again given that we are already getting the look we want with grey plaster) for the added cost. We plan to be here for a long time so either way I see myself having to refinish it once in our lifetime with the pool, so probably won't go with the upgrade options. That, and as many others, we are at the top of what we want to spend prior to ticking that box.
 

Enjoying this content?

Support TFP with a donation.

Give Support
Haven't updated for a while... Tile and coping are done:

[attachment=2:16i1bvbf]IMG_1718.jpg[/attachment:16i1bvbf]

[attachment=1:16i1bvbf]IMG_1720.jpg[/attachment:16i1bvbf]

[attachment=0:16i1bvbf]IMG_1721.jpg[/attachment:16i1bvbf]

Karl
 

Attachments

  • IMG_1718.jpg
    IMG_1718.jpg
    47.6 KB · Views: 145
  • IMG_1720.jpg
    IMG_1720.jpg
    66.7 KB · Views: 144
  • IMG_1721.jpg
    IMG_1721.jpg
    74.5 KB · Views: 144
Electric is done. Just waiting on inspection and we will have the deck poured. That will probably wrap it up for the year... maybe a little landscaping, but not much else.

[attachment=2:2pesovlv]IMG_1835.jpg[/attachment:2pesovlv]

[attachment=1:2pesovlv]IMG_1837.jpg[/attachment:2pesovlv]

[attachment=0:2pesovlv]IMG_1839.jpg[/attachment:2pesovlv]

Karl
 

Attachments

  • IMG_1835.jpg
    IMG_1835.jpg
    69.6 KB · Views: 144
  • IMG_1837.jpg
    IMG_1837.jpg
    91.9 KB · Views: 144
  • IMG_1839.jpg
    IMG_1839.jpg
    81.1 KB · Views: 144
Update. Getting ready to pour the deck... Maybe tomorrow depending on the weather.

[attachment=1:11kuk7wo]IMG_1859.jpg[/attachment:11kuk7wo]

[attachment=0:11kuk7wo]IMG_1888.jpg[/attachment:11kuk7wo]

Karl
 

Attachments

  • IMG_1859.jpg
    IMG_1859.jpg
    71.6 KB · Views: 114
  • IMG_1888.jpg
    IMG_1888.jpg
    93.6 KB · Views: 114
Finally getting around to post some updates! They poured the deck in January during a few nice days.

[attachment=2:1gph3r8u]IMG_1972.jpg[/attachment:1gph3r8u]

Stairs to the walkout:

[attachment=1:1gph3r8u]IMG_1976.jpg[/attachment:1gph3r8u]

Dive rock:

[attachment=0:1gph3r8u]IMG_1978.jpg[/attachment:1gph3r8u]

Karl
 

Attachments

  • IMG_1972.jpg
    IMG_1972.jpg
    83.2 KB · Views: 72
  • IMG_1976.jpg
    IMG_1976.jpg
    62.1 KB · Views: 72
  • IMG_1978.jpg
    IMG_1978.jpg
    89.1 KB · Views: 72
Put the lattice in. Just needs some stain - hard to find square pattern pressure treated! Found it at a "real" lumber yard - Barron's in Gaithersburg, MD.

Still need to back fill with gravel.

[attachment=1:2foaf8fb]IMG_2148.jpg[/attachment:2foaf8fb]

[attachment=0:2foaf8fb]IMG_2149.jpg[/attachment:2foaf8fb]
 

Attachments

  • IMG_2148.jpg
    IMG_2148.jpg
    73.3 KB · Views: 71
  • IMG_2149.jpg
    IMG_2149.jpg
    53.8 KB · Views: 71
Cutting the beds in... Ouch... doing it all myself, so it's a bunch of weekends of back/knee/hand breaking work!

Before:

[attachment=2:2272ug0s]IMG_2146.jpg[/attachment:2272ug0s]

[attachment=0:2272ug0s]IMG_2143.jpg[/attachment:2272ug0s]

Got a few feet done and put some groundcover down to see how it looks:

[attachment=1:2272ug0s]IMG_2151.jpg[/attachment:2272ug0s]

Karl
 

Attachments

  • IMG_2146.jpg
    IMG_2146.jpg
    82.9 KB · Views: 71
  • IMG_2151.jpg
    IMG_2151.jpg
    63.7 KB · Views: 71
  • IMG_2143.jpg
    IMG_2143.jpg
    86.5 KB · Views: 71
All the beds are cut in, contoured and raked...

[attachment=2:qxk7udl8]IMG_2159.jpg[/attachment:qxk7udl8]

[attachment=1:qxk7udl8]IMG_2160.jpg[/attachment:qxk7udl8]

[attachment=0:qxk7udl8]IMG_2162.jpg[/attachment:qxk7udl8]

Just need about 40 tons of gravel to cover it all.

Fence materials should be here any day now.

Final plaster goes in June 13th!

Plants, trees, etc... in the fall.

Karl
 

Attachments

  • IMG_2159.jpg
    IMG_2159.jpg
    57.4 KB · Views: 69
  • IMG_2160.jpg
    IMG_2160.jpg
    49.5 KB · Views: 69
  • IMG_2162.jpg
    IMG_2162.jpg
    51.1 KB · Views: 69

Enjoying this content?

Support TFP with a donation.

Give Support
Thread Status
Hello , This thread has been inactive for over 60 days. New postings here are unlikely to be seen or responded to by other members. For better visibility, consider Starting A New Thread.