Hi everyone, just want to say thanks to all for all their valuable contributions on this site. It's a great resource.
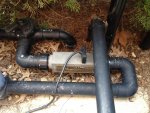
I know there have been a lot of these types of questions in the past, but it seems each case is a little different depending on current plumbing. I need to replace my old model 2-port Jandy Auqapure 1400 to the new 3-port style. In my circumstance, the existing cell is plumbed in tightly.
[attachment=0:30hdm3v6]Salt Cell Existing.JPG[/attachment:30hdm3v6]
I believe the new cell is the same length so would otherwise fit in the same location if I can somehow change the plumbing for the new couplers (2.5" versus 2" on existing). Can anyone who has done this confirm whether its the same size and should fit in that spot?
To fit the new coupler, it seems other posts have suggested cutting flush with the 90-degree fitting and using an inside pipe extender. If I do that, will I still have the same space to work with or will that fitting consume space where the new cell will fit?
Anyone with experience making this change out have any better ideas for me? My skills are somewhat limited but I figure I can cut and glue pipe if I have a solid game plan for how it is going to fit together when I'm done. I'm not too stoked to start cutting then figuring out what to do...
Thanks in advance for helping me out... I'm feeling kind of stuck right now!