Repair fiberglass in/around skimmer

jackj

0
LifeTime Supporter
Dec 5, 2008
32
About every year, I've had to repair leaks in the bottom of the skimmer, using epoxy each time. The first time, I noticed that it had also been done before (we're not original owners). Now I was having a harder time detecting a leak, and thought it might be down the pipe a bit, as previously I'd had to go down it with epoxy to also seal a leak. But now I'm getting concerned that the pipe opening is getting too small if I repair it again with another layer.
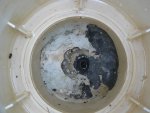
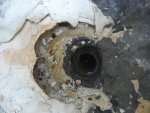
So, I decided to pull up some of the older layers of epoxy, which occasionally had come up when checking for leaks. Well, now I apparently overdid it. I'm not sure what it looked like pre-first repair, though I'm guessing it was a fiberglass bottom (with a pipe coming up into it?) But I seem to have pulled up that bottom, too, and don't know if I can try to repair with epoxy (see photos - it's now not a crack, but a hole), or if I should try some fiberglass repair of some sort, or if I have to call in a pro.
Also, I still never got the epoxy repair that went down into the pipe/tube pulled up, but stopped when I saw how much of a repair I had to do, and not wanting to make it worse.

Any and all advice feedback would be much appreciated!
E1dj7E2ldlY

i27JiwFOd
 
Arghh... It looked like to attach pics one puts in the url; I'd uploaded them to screencast. I'll include those in the text body here, just in case.
Also, it appears that the last leak is about 1.5" below the top of the opening - very hard to get to. At least that's the level that the water is dropping to. If there was a leak lower, such as in piping underground, is there any chance that it's staying at this level because of pressure but it's still leaking further underground? Assuming it's not, do I try to go further down on the outside of the tube and repair instead of the inside? And should I try pulling the black repair that goes down into tube? Thanks in advance for any help!
http://www.screencast.com/t/E1dj7E2ldlY
http://www.screencast.com/t/i27JiwFOd

Ahhh... it appears I wasn't in the full editor before for attaching pix! Sorry about that.
 

Attachments

  • fiberglass skimmer repair 1.JPG
    fiberglass skimmer repair 1.JPG
    290.1 KB · Views: 145
  • fiberglass skimmer repair 1.JPG
    fiberglass skimmer repair 1.JPG
    290.1 KB · Views: 135
  • fiberglass skimmer repair - closeup.JPG
    fiberglass skimmer repair - closeup.JPG
    312.8 KB · Views: 134
  • fiberglass skimmer repair - closeup.JPG
    fiberglass skimmer repair - closeup.JPG
    312.8 KB · Views: 135
24 hours later, the skimmer pipe level (see photos) is 3.5" below the top. Pool is only a tad, likely simply evaporation. But, as that's a 1" pipe, that's barely any volume of water lost? Any thoughts? Could it be that tiny of a leak that it would only lose a couple of ounces (guessing at that quantity)? But might it be a lot more when the pump is running? I guess I'll know when I get the skimmer fixed and can run it, but just thought I'd add that info now.
 
As long as there's still no response, I'll just add... The level in the pipe at the end of the day is now up 1" from that low - temp increase? I filled to top again and will monitor. I've heard that the skimmer often has two lines; mine doesn't appear to, but is it possible that the one that I see branches off a bit down the tube?
- Should I either try to remove the black epoxy patch that goes down the tube, or sand it thinner to enlarge the tube hole (is it possibly getting too small?)
- Would there be a way to plug the tube and pour something to seal the bottom of the skimmer well, rather than using the piece-meal of the epoxy?

Thanks again.
 
I'll continue to humor myself :) I may as well get all my thoughts/questions out here for when someone does pop in.
I think that this pipe does vent to the outside, hence the up-and-down variance (after filling, I can even see it doing so in small amounts) due to wind blowing over the vent pipe?
Any thoughts on using Plumber's Putty instead of epoxy? Again, or something other than the epoxy as patches, so as to both make it look AND WORK better, longterm.
Should I try using a dremel with a cylindrical sander/grinder to enlarge the interior diameter of the pipe, or is it not a factor to risk doing damage?
 
Thanks for the feedback. Glad to know my stream-of-consciousness updating was being read, anyway :) Just had another thought: Shoe Goo. Similar (same?) as a plumber's glue (though don't know if that's simply an advertising term by the glue company) that cures hard like the epoxy? I always understood it to be polyurethane, though looking on the tube it doesn't say that specifically (references the usual glue parts of toluene and petroleum distillates). Shoe Goo is for repairing shoes, and I've used it for that. Works great for that, though harder than rubber, and I'm sure once cured is watertight. Though to apply it's supposed to be dry. The bottom of the skimmer is dry, so I could use it there, I think without a problem. I was also thinking of using it down the tube, too, as it would be easier to push it down a bit and spread it on the sides, though again it might start to reduce the interior opening size some.
If there's even a leak there, though? Anyone with any thoughts of the likelihood of that, or why the water goes down a couple of inches below the bottom of the skimmer if not due to a leak? I did just run the pump to try to get it lower so as to create a dry surface down there, and the water level came back up. Via the vent a few inches down, that joins with other piping with water in?
 
Sorry, one more question. Not surprisingly, starting to get algae on the sides. As my water level is below the skimmer line, I can't circulate it. Would pouring a jug around the edge without being able to circulate it do more harm to the fiberglass surface than good. Am I better off just letting it go green and address it later, or is the surface damage not that much of a concern (or would not being able to circulate it reduce the chlorine's effectiveness too much to be worth it, anyway). Thanks!
 
Going to go with the Goop for Plumbing. Turns out Shoe Goo is made by the same company, and though they appear to be the same, there are subtle differences. If anyone's interested, per the company:
Amazing GOOP® and Craft GOOP® contain a thinner formula for precise, detailed work.
Wood & Furniture GOOP® is a thicker, non-slump formula perfect for vertical and overhead applications.
Automotive GOOP®, Household GOOP® and Plumbing GOOP® are all the same formula.
Lawn & Garden GOOP®, Marine GOOP®, RV GOOP® and Sport and Outdoor GOOP® are all UV-resistant.
Shoe GOO® is a more rubbery formula allowing for greater flexibility.

Just have to make sure it's clean and dry. I poured some rubbing alcohol down and will vacuum the area. Not sure if I'll be able to address the tube or not due to wetness.
 

Enjoying this content?

Support TFP with a donation.

Give Support
Thread Status
Hello , This thread has been inactive for over 60 days. New postings here are unlikely to be seen or responded to by other members. For better visibility, consider Starting A New Thread.