Assuming yours has been fixed in the last 3 years.......I just replaced mine (posting for the benefit of others).
My heater would fire, start making a popping noise, then shut down. At first it was intermittent...but then it became constant and the heater was non-functional.
I tore it apart to find mama rat had torn the bottom insulation apart and made a nice nest. She was in there when I opened it. It was disgusting (note to self open this thing up a couple of times a year to check for wildlife). I no longer have a bottom insulation blanket but so far this doesn't seem to be a problem. Perhaps it would be more of an issue if I was heating a pool in Minnesota in January....but I am in Houston in the Summer. Getting the hot tub from 96 to 102 is not a huge challenge.
But I digress..after my neighbor gave $400 that he didn't need to a repairmen to repair his heater (his was more rat-related than mine!), I took a chance and ordered the bypass valve and gasket kit (important!!) from InTheSwim for about $50.
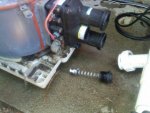
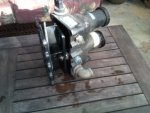
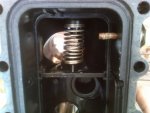
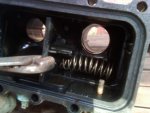
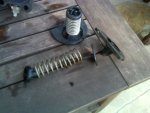
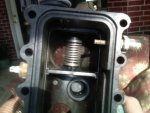
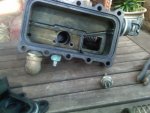
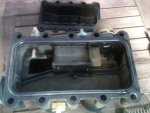
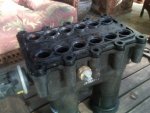
Replacement was pretty simple. Take off front and rear panels, remove manifold side cover, and and remove the bolts that hold the manifold. There was red high temp Permatex all over the bolts from the manufacturer. I scraped it off as best as I could. Takes a screwdriver and hammer to get the manifold assembly apart. Sure enough, the valve was broken. What a piece of junk. I'm going to order another so I have a spare when this one comes apart in a few years. Compressing all of the o-rings and gaskets back in place requires alternate tightening of the bolts. Kinda like torquing head bolts on a motor.
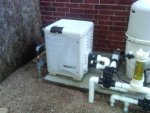
Overall it was a simple job and the heater works fine...and I am about $350 ahead.
Hope this helps someone else.
Forgot to mention I wouldn't have been able to repair or even diagnose this problem without the helpful information posted on this forum. Y'all saved me a bunch of money! Thanks!!!
Anyone have a clue how to replace/repair the manifold bypass valve in a Pentair Mastertemp heater? I'm not even sure this is a repairable item.
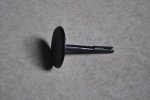
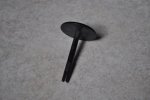
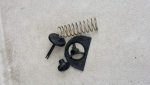
It appears that the bypass valve popped loose and made its way to my chlorinator (which subsequently broke the flow switch and stopped my chlorinator from working). Conveniently so, the valve is just the right size to make it through 2" elbows in PVC piping!
I've since replace the flow switch, but now I have the bypass valve in may hand and think its probably a good idea to put it back.
Of course, I don't want it popping loose again to required another flow switch replacement.
Thanks.