Help in coverting to 3-way valves

garyvz

0
Mar 18, 2012
10
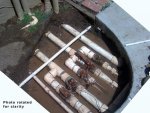
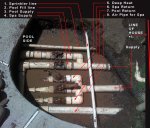
One of my valves is leaking pretty badly from the stem so I think it is time to change out the entire valve assembly. These are in-ground valves for an in-ground pool and spa. THere is also a "deep heat" valve that my local swimming pool company suggested I just cap.

See my photos and I have tried to annotate what you are looking at. I was hoping to use 3-way valves and mount them up against the house, next to this planter. There is a single supply line that feeds this assembly. The pipes are 2" dia. The smaller pvc pipes are sprinkler piping and the fill line for the pool.

My question is given the design of the 3-way valves, will this be a clean looking assembly once brought up out of the ground? This is in plain view of the entire yard and behind a fence by my equipment so I want it to look decent. I am a little confused if the valves would be parallel or perpendicular to how they run now. I was hoping perpendicular so they could be assembled rather tight to the house. However, with two openings in each direction and then one at a 90º I am not sure how this would work. I assume having them above ground is superior (and easier to plumb, maintain, and use).

Are Jandy valves the best valves to use? My other option would be to try and just replace these one for one and keep them in-ground although the assembly is very tight and doing an "in-line" repair is tough unless slip connectors are available (speaking from sprinkler repair experience only).

Can anyone help me understand:
1) What the assembly would look like and how the valves would be oriented and plumbed? If you can point me to some pics or online resources it'd be great (or images of your own).
2) How hard of a job this is? The pool contractor wanted $600!
3) Specifically what valves I should use.
4) Do I have to do anything special before cutting the pipes? I am not sure how I would cap or do I have to?

I hope I have explained this good enough but if you need clarification please let me know. I would be indebeted to anyone that can help. I am pretty handy so I was hoping to do this myself but let me know if this is something I should not tackle! My brother in law works for a pump company that supplies farmers so I have his knowledge and experience available but this is slightly different.

Thanks in advance,
-Gary
 

Attachments

  • Pool Valves 1.jpg
    Pool Valves 1.jpg
    185.3 KB · Views: 178
  • Pool valves.jpg
    Pool valves.jpg
    208.2 KB · Views: 178
So my suggestion would be to leave the valves in the ground but to dig down around them to remove the dirt and then fill in with pea gravel for drainage and so the valves aren't in the dirt. I'm suggesting that for aesthetics as I don't think that having the valves on your wall are going to look good plus it will be less plumbing changes. I'd also recommend d some kind of cover too if possible again for aesthetics and also protection for the plumbing.

3 way valves are the way to go - either Jandy or Pentair brand - both are good and offer lifetime warranties and never lube designs.

Any one of the three openings can be the supply side in a three way valve. so it's just a matter of aligning the valve however makes sense. For 3 & 4 you could put the three way where that T fitting is though of course the valve is bigger so you'll end up having to reroute some pipe for the t-off leg.

For the other set you need to decide if you're going to abandon the deep return or not. If you keep it then you'll need two three way valves. So decide on that first and then we can discuss a layout.
 
Thanks Carlscan! I can see how that would be easier and look better. Any downside of keeping them unground?

Would I place a valve box over each valve?

Also, do I have to drain the pool down or plug anything before I start cutting?

Finally, I will need 2 3-way valves WITHOUT the deep heat right? If I kept it would I just add a single valve for that function in addition to the 3-ways?

Thanks for the rec.! No one else has jumped in so I assume they agree?!?!

Gary
 
garyvz said:
Thanks Carlscan! I can see how that would be easier and look better. Any downside of keeping them unground?

Would I place a valve box over each valve?

Also, do I have to drain the pool down or plug anything before I start cutting?

Finally, I will need 2 3-way valves WITHOUT the deep heat right? If I kept it would I just add a single valve for that function in addition to the 3-ways?

Thanks for the rec.! No one else has jumped in so I assume they agree?!?!

Gary

I can't think of a problem leaving them there provided you get them out of the dirt by doing what I suggested with digging under them and putting in a gravel base for them to sit on. Many people's valves are outdoors and exposed to some amount of the elements. I think the biggest concern with your placement is making sure they don't get dirt on them.

Covering the valves isn't a bad idea; I'd put whatever fits and looks good. Probably two of those landscape/sprinkler boxes side by side will work.

Are these valves are above pool level? If so then no need to drain. If they're not then you will need to plug the returns and skimmer, etc. or drain down some water but be very careful if you have or are unsure of how high your water table level is.

Yes, you will need two 3-way valves if you abandon the deep heat. If you do choose to keep it you could do it as you suggested but that wouldn't ever allow you to run just the deep returns. So, I would recommend another 3 way valve: the first one selects between spa or pool returns, the second one between the two sets of pool returns. Of course, with the way your pipes are laid out (deep-spa-pool) you'll have to move some stuff around. Thinking about this I guess it doesn't matter to much, you'll just have to move two valves if you want to go spa only vs. the way I described above you could switch between spa and pool with just the first valve.

I hope no one disagrees and didn't chime in...that would be unlikely around here so I think I haven't mis-led you so far.
 
Thanks Carlscan. I think I may just cap the deep heat. If that is the case, I'd have one 3-way for the returns and one for the supplies, correct? In other words one valve will more or less go right where two of them currently are.

The valves are pretty close to the same elevation as the water level so if I have to drain down it shouldn't be too much.

Thanks for all your assistance.

Gary
 
Besides the above question one more about the Jandy valves. You said any port could be hooked up to any pipe. I just wanted to clarify that all three ports are the same size? I see a lot if references to 2" - 2 1/2" valves which leads me to believe one leg is larger. All my pipe is 2" so if this is the case I reduce it down to 2" on the 2 1/2" leg? Thanks for your patience!
 
Just learned this myself. The smaller of the 2 numbers is the pipe size that will slip into the valve. The larger of the 2 numbers is the pipe size that matches the valve size and requires a (EDIT) coupler fitting.

For your 2" pipe either valve size will work but you will need fittings for the 1 1/2-2 valves.
 
There are slip connections but you won't find them at Lowes or HD.

The two sizes on the valves indicate the two size of pipes it supports. The first number is for the size pipe that can slip into the valve. This is the easier one to use in most cases. The second number is for the size pipe that can go over the joint, but as mentioned, it will also need a coupler fitting. The sizes are the same at all 3 ports. I'd use the first option myself.
 

Enjoying this content?

Support TFP with a donation.

Give Support
Great Carlscan! Thanks again for all your help and passion about helping people.

I agree that using the inside connection is better than the outside. I'll look around for the slip fittings online I guess or at a plumbing supply. I think I'm ready to tackle this - I just need to find the best place to buy the valves. I'm open to any suggestions.

-Gary
 
FYI I have been searching to buy valves as well and seem to be finding the Pentair valves to be slightly cheaper than the Jandy valves. Both do not need lube and have lifetime warranties and are similar quality.

Let me know what you find and I will do the same. Currently norcalpoolsupply.com seems to have the best prices I have found.
 
Jason, I ended up buying the Jandy off Amazon. I got them from Glenridge Pool Supply. I bought at a pair price for just under $99 including shipping. It was the best deal.

Carlscan, I am ready to try this but i need one last clarification. The flow line of my pipes is about 3" lower than my current water level so I will need to drain at least that much. But don't I need to drain below the wall inlets? It would seem that would be the critical spot to be below. If I only drained it down 3" wouldn't pressure push the water out the inlet and drain at the cut pipe several inches above?

I hope I am being clear. Asked another way, where does my pool water level need to be (relative to the wall inlets or valve pipe elevation) so as to not drain out when I cut the pipe at the valves?

I look forward to hearing back. Thanks again!!

Gary
 
There are two ways to approach joints below water level. You can either drain the pool below the level of the pipes you need to work on, or you can block the pool end of all related pipes with winterizing plugs.

Given the pool is lowered below the level of the pipes you are working on, water will only flow for a moment while the pipe right near where you are working, and anything above that level, drains out. After than you can work dry.
 
My water level is 3" ABOVE the pipes.

So I'd block the skimmer and the returns? You mean the drain at the bottom of the pool? Or do you mean the supplies on the walls? I don't mind draining it 3" if that is all I need to do. If I plug, how so?

Sorry I'm becoming a bit confused here.

-Gary
 
The water in the pool will not push the water in the pipes to a higher level than the pool. The water in the pipes will be at the exact same height as the water in the pool. So you either lower the pool level below where you need to cut (probably easiest ) or you have to block where all the pipes you are working on connect to the pool so the water can not equalize levels between the pool and the pipes.

Posted with Tapatalk 2
 
Thanks jblizzle, I appreciate it. I guess I will drain it down below the pipe level and then make the cuts. Admittedly I will have my fingers crossed as I cut.... :wink:

One more question. This is a photo of the air gap (not sure if that is the right name for it) that is connected to my spa.
[attachment=0:3ontjpbg]spaairgap.jpg[/attachment:3ontjpbg]
You may guess from the design that over the years little kids have managed to drop pebbles and rocks into the pipe - it was an attractive target for little kids! :? When I am in doing the valves I am going to cut out this piece so I can clean out the pipe and am guessing I will find a lot of little "treasures".

My question is whether someone can post a pic or a detail of a better design. I would like to fix the nusance even though my kids are grown now. If this is the best option then I will likely just rotate the slot so it faces the house and is less visible to little eyes. Any info anyone can provide would be great.

I will proably do the valve fix next weekend. I'll post pics when done.

Thanks,
-Gary
 

Attachments

  • spaairgap.jpg
    spaairgap.jpg
    150.4 KB · Views: 77
The simplest thing for the air vent pipe is to put a U on top, so the open end points down towards the ground. If you make the U fairly large it will be very difficult to throw something up into the pipe so it does anything but fall back out again.
 

Enjoying this content?

Support TFP with a donation.

Give Support
Thread Status
Hello , This thread has been inactive for over 60 days. New postings here are unlikely to be seen or responded to by other members. For better visibility, consider Starting A New Thread.