Doughboy inground Austin

Re: Doughboy help

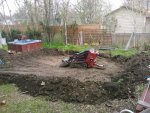
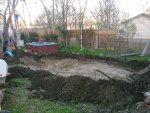
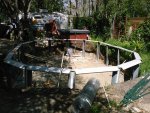
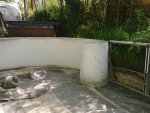
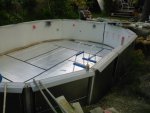
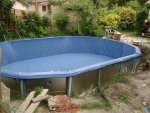
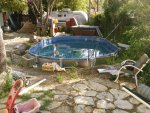
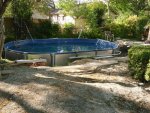
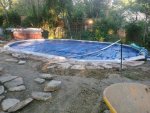
Tried to update pics but it seems I can't tonight. Progress has been slow. This is a used pool I disassembled and am reinstalling, so my posts are partially still assembled. After putting the bottom track together with the posts I decided to put together the top rails to get an idea how square it is. I'm using a laser transit level, the only way I could do this. 2 things don't seem quite right but might be typical and or less noticiable with a wall and water installed.
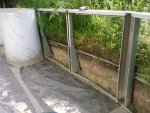
1) the flat sides to my oval, 3 panels each, my transitions aren't square with the panel between the butresses. That wouldn't bother me it they look similiar, but 1 goes in a few degrees and the other out a few. Its does the same on each side of the pool.
2) A few of my legs aren't square, they seem to lean a bit, like the bottom rail isn't quite aligned with the top.

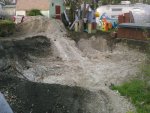
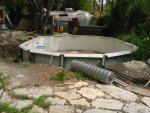
I think the 1st problem might be fixed by realigning the support butress pieces. Jeez I'm getting tired of adjusting and leveling! 2nd problem might be a symptom of the first, or maybe will be readjusted with wall install? OR is it common for the straight walls to have a little zig zag? My only comment on going inground is, beyond digging the hole, it seems to take a lot more effort, I'm leveling in bedrock with a pick axe! Waiting on my liner to be delivered, hope to have things parsed out before then.
 
Making progress when I can. Getting motivated with the heat and humidity.
I've been keeping the top rails assembled b/c concerns with the walls collapsing and general fitment. Even though Doughboy recommends an extra foot of perimeter for installation I've chosen to recess 1 side as close as I can to my utilities.
 

Attachments

  • posts recessed.jpg
    posts recessed.jpg
    165.6 KB · Views: 1,089
  • wall roll out.jpg
    wall roll out.jpg
    143.1 KB · Views: 1,090
Wide mouth skimmer is on order, should be in by Thursday. Since I'm re-cutting the hole my plan is to raise it and gain an 1" or 2" of water height. Not Pictured I've added rigid insulation to the outside of the walls, 1/2" R-max R-3 $9 a sheet at home depot. Also rolled thin foam flooring underlayment across the inside of the walls. Bottom is compacted calliche and clay, looks like I'll need a little sand to insure things are smooth. Floor will be landscape fabric, more R-max w/ duct taped seams, and old doughboy liner. The oem liner seems twice as thick as my replacement 25 ga "commercial rated" one.
I hope to be adding water this weekend!
 

Attachments

  • skimmer height.jpg
    skimmer height.jpg
    96.8 KB · Views: 1,087
  • wall no liner.jpg
    wall no liner.jpg
    193.3 KB · Views: 1,088
Walls and floor insulated

couple of belated updates. I found 3/4" insulation, r-5 for the floor, duct taped the seams and did sand coving where the seams and cove meet. Got the liner in on Saturday, despite high wind advisory. Took about 48 hours to fill just under the jets. I'm going rigid with the plumbing, got a little bit plumbed, 4 jets in place, 1 of 2 skimmers installed. Currently just have hoses going over the side of the pool so I can run the pump and get the chemicals circulated. Hanging the leaf skimmer over the edge to catch what I can.
 

Attachments

  • floor walls insulted.jpg
    floor walls insulted.jpg
    108.9 KB · Views: 1,031
  • liner2.jpg
    liner2.jpg
    205.1 KB · Views: 1,029

Enjoying this content?

Support TFP with a donation.

Give Support
In the above picture it is over the rails, per doughboy's installation instructions. As the water fills and the walls stretch and flatten out you remove the rails and install the coping. It does seem extra redundant, but I think it keeps the liner off the sharp edges. Currently water is filled just under the jets being shocked. Rigid plumbing 4 jets and 2 skimmers is taking me longer than I expected. I'm thinking I overkilled the piping, 2" and 1.5" with long radius fittings, when I got out my 3/4 hp pump the fittings are only 1.25".
 
Plagued by leaks! Finished with rigid plumbing yesterday, began filling above jets. All of my 5 threaded pvc fittings leaked despite teflon tape. Cut and resealed on 3 jets with way more teflon tape and paste, no leaks. 2 skimmer leaks are next after I buy more tape. 1 skimmer gasket leaks, screws are super tight, I'll try to reseat or replace, luckily(?) one skimmer was shipped with an extra gasket. 1 led light quit working, inspection revealed water inside the housing. I might have broken the seal removing it to repair the plumbing leak. All I know is I'm ready to be finished with this project!!! Advice to others trying the same, K.I.S.S.
 
I've been filled for a couple of days, bleach, triclor, borax and acid mixed in at the beginning of the week. I've used the pool calculator and my outdated 5 in 1 test kit for FC and pH...I was worried about cya since I can't test it. I took a sample to Leslie's, they ran their free 8 in1....water was perfect!!! I think the guy behind the counter was a little suprised, like they always find something wrong, and who brings in balanced water? Kudos to all the advice on the TFP board. My TF100 kit will be on order shortly! Water has been between 72 and 75 degrees this week. Put the solar cover on mid afternoon wednesday, by evening 78F. Hope to swim this Saturday!
 
jhalpinjr, thanks! Its a slow, tedious process. I'm near 3/4 finished with my back fill, bonding loop is in. We've had 6" of rain in the last week and its compacted everything neatly. I need about twice as much limestone for my decking. The rock was hand picked and loaded by myself from my friend's ranch, tired back week! I have a plan for a removable fence once the rock is in. Stairs are on order, should arrive this week.
 

Attachments

  • lg may 2012 041.jpg
    lg may 2012 041.jpg
    186.7 KB · Views: 747
Its been a lot of work by myself, but I'm starting to feel like progress has been made. We have a baby due in early June so there's a bit of a deadline with my free time. 2 more good weekends is what I've got left.
Picked up a 3rd load of limestone today.
Stairs were waiting for me when I made it home.
http://www.amazon.com/Blue-Above-Ground ... 702&sr=8-2
My pump is on a Intermatic digital timer. I found a 3 channel remote control outlet for my pool lighting, $20 at Lowes
http://www.amazon.com/ABC-Products-Cont ... B0075XHIY6
 
Re: Doughboy inground Austin updates

Its been a while. I think I finished the pool and rock before june, my son was born june 4th and all major construction ended at that point. Afterwards the main project was the lawn, the entire back is about 6" or more higher then original. mostly covered with caliche and limestone. I leveled it some by hand, and cheated...took me a while to fine the source for the green netting the DOT uses on the side of the highway. 2 rolls, $40 each covered the whole yard. I threw down a ton of fescue seed before hand, and as luck would have it we had a freak rain, 3" the next day. Grass is about 6" high now and ready to be mulched for more compost.

I have a leak I've been too busy to look for. I'll lose an inch a day from the supply side. I'm keeping water level at 30", my daughter is 36" so she can keep her head out. so i'm bypassing my hard plumbing. for return I'm using a diver dan robot and supply a loose pool hose that snakes around blasting the sides and bottom powered by a 3/4 hp protec pump. Previously I had a 1.5 hp hayward, I think the bearings failed, motor was smoking when I decommissioned it. Pool has been crystal clear and trouble free since filled, all BBB plus 3 pucks in the floater a week. I think the borax does quite a bit, I let my chlorine hover at 2.0 without issue.
 

Attachments

  • aug31 2012 lg 040.jpg
    aug31 2012 lg 040.jpg
    174.7 KB · Views: 539

Enjoying this content?

Support TFP with a donation.

Give Support
Thread Status
Hello , This thread has been inactive for over 60 days. New postings here are unlikely to be seen or responded to by other members. For better visibility, consider Starting A New Thread.