Difficult to replace a pump with a variable speed pump?

moyer02

0
LifeTime Supporter
Oct 11, 2010
73
Pensacola, FL
Hello, my electric company is offering $600 rebate to pool owners who change their single speed pumps to certain variable speed pumps. Seems like a no-brainer. I've seen the Pentair Variable speed pump for under $900 online. My pool guy has quoted me $1500 for the pump and installation. Won't install the new pump unless I get it from him.

My question is how difficult is it for an average dyi'er to change out this pump. It seems like I'd be able to use the same pipes. My current pump is connected to an Intermatic timer electrical panel, and I have a booster pump for the cleaner and a SWG. I'm hoping I may even be able to use the same electrical connection.

Any comments/recommendations will be appreciated! Thanks and happy new year!
 
Most of the time swapping out the pump is not too difficult. If you can post some pictures of your current set up we can give you suggestions based on how the current plumbing is layed out.
 
I consider myself an average DYI'er and I replaced my pump about 18 months ago. New pump was a different height than the old one so I either had to raise up the pump off the pad or lower in the intake. I choose to lower the intake. That meant sawing through 3 pipes below the 3 way valve and taking out about 1.5" of pipe on each of them. Went smoothly, but might have been easier to raiise up the new pump - that was not just a matter of putting something under it as it complicated the connections on the output side of the pump. Whole job took most of an afternoon including a trip or two to the hardware store for fittings.

Good luck
 
I recently did a swap-out of a Pentair WhisperFlo for an Intelliflo (010118) for the same reason, my electric company offered a $200 rebate to put in a variable speed pump. The only difficulty for me was having enough space to cut the intake line because the previous installers left little free 2" PVC piping for me to cut, and I didn't want to have to redo the intake manifold (since it has two Jandy 3-way valves). Instead, I cut the pipe out, used 2 screw on unions on either side of the pump, and a 2.5" coupler over the Jandy valve and a 2.5 to 2 inch transition to the 2 inch coupler. Cutting and installing 2" PVC is not that hard. It took me roughly 2 hours (once I figured out what I was doing), and now it works great. As for electrical, I simply used the same 220V connection that came from an Intermatic mechanical timer to run the pump. Since the 010118 is programmable, I took the little screw tabs out of the timer that turn on and off the power to the pump and let the pump's built in scheduler. It works very well. I purchased it at a local online retailer for about $858 and picked it up at their willcall. You will have to have it shipped. But, for less than $100 (including fittings and new PVC, etc), it was well worth it. Use this forum to get all the info you need for the install. Take a picture of your equipment pad as that will be very helpful for getting good instructions.
 
[attachment=0:8k7apm8m]pump3 1-3-2012 3-39-36 PM.JPG[/attachment:8k7apm8m]Thanks for all the responses. Here are some photos of my current setup if y'all have any other suggestions.
 

Attachments

  • pump1 1-3-2012 3-39-15 PM.JPG
    pump1 1-3-2012 3-39-15 PM.JPG
    56.7 KB · Views: 760
  • pump2 1-3-2012 3-39-27 PM.JPG
    pump2 1-3-2012 3-39-27 PM.JPG
    55.1 KB · Views: 670
  • pump3 1-3-2012 3-39-36 PM.JPG
    pump3 1-3-2012 3-39-36 PM.JPG
    56.7 KB · Views: 666
I agree with Bama Rambler, this is about as easy as it gets. You don't really have any plumbing to do since the pump configurations, at least in terms of plumbing, are nearly identical.

1. Remove electrical to existing pump by shutting off the power to the pool panel, checking to make sure no power is being sent to pump using an electrical tester, opening the electrical wires in the existing pump's electrical connection compartment (two hex screws on the upper right side of rear of pump motor allow access), and then removing the wires and conduit. The wires will be either black and/or red (line voltage) and green (ground). After unscrewing the screws that hold these three wires, unscrew the flex conduit from the pump housing and you should have the free conduit plus the three free wires. Move this aside. The motor may also have a 6 or 8 ga blue or green wire connected to the bonding terminal outside the pump's motor housing. Unscrew this and set aside.

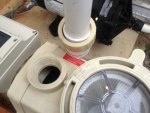
2. Using your hands first, try to unscrew the unions to the pump's inlet and outlet. Move these in a counter-clockwise direction to losen. If you can't do this with your hands, use a large pipe wrench.

3. Once you've unscrewed these unions, you should now be able to remove the pump (unless it is screwed into the equipment pad, in which case you will need to remove those bolts). Remove pump, remove the union fittings that are screwed into the inlet and outlet of the old pump, and set both aside.

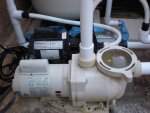
4. Screw old union fittings into the new pump. You may use teflon tape or plumber's sealant for this if needed. I didn't with my pump, but I did use a pipe wrench to fully seat those fittings.

5. Place new pump in same place on equipment pad as old pump. Make sure that o-rings on existing unions appear to be in good shape and grease them up with some silicone lube. Screw on the unions until secure with your hands. You may need a little help with the pipe wrench to prevent any leakage but don't over tighten, as this will pinch the o-rings in the threaded unions. Make sure both sides are secure. If the old pump was secured to the pad by bolts, secure the pump with those bolts.

6. Open the wiring compartment on the new pump, as described in it's installation manual. Thread the wires through the conduit opening into the compartment with the wiring terminals. Screw the flex conduit into the pump motor housing and screw the hot wires (red and/or black) to the "hot" or "line" terminals, and the green wire to the grounding terminal. Also, if there was a bonding wire, screw this into the new pump's bonding terminal.

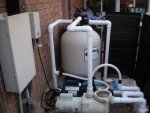
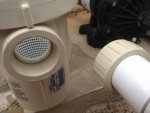
7. Fill pump's strainer pot with water, grease up the strain pot lid's o-ring with some silicone lube, and replace the strainer pot cover so that it's tightly seated and sealed.

8. Restore power to pump. Assuming this has its own controller (e.g. the 010118 IntelliFlo), you will need to learn how to operate the controller. To just test the pump, push one of the four speed buttons on the control panel. By default, the pump will enter priming mode (3450 RPM, e.g. full speed) for about a minute as it primes itself. After this, it will return to the preprogrammed speed for that speed button you pushed.

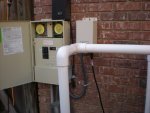
9. Since the pump was controlled by a mechanical timeclock (e.g. one of the Intermatic clocks seen in the photo), then remove the timeclock "dogs" from the face of the clock so that power is always on to the pump, as the pump will control its own scheduling. If you plan to purchase an automation system (e.g. Intellitouch or EasyTouch), use the supplied RS485 wire included with the new pump to connect with the contoller. If you buy an automation panel, but it's not an Intellitouch, EasyTouch or SunTouch, you will need to purchase the Intellicomm module from Pentair for the automation system to control the motor.

10. RTFM.

BTW, my system does not yet have an automation panel, just a mechanical Intermatic time clock. I just let the pump's built-in scheduler control the pump run duration and speeds. In my case, it's quite simple because I have it run at high speed (about 3100 RPM) for three hours to properly skim and operate my automatic suction side cleaner, and then it shifts to about 1700 RPM to cycle my water for another 4-6 hours. I do ultimately need to figure out the best schedule to maximize water turnover and minimize electrical usage. For this pump, this would be around 1000 RPM.

Best of luck and ask questions.
 
I just noticed in one of the photos that it appears you have a salt system installed. Is that correct? If so, you will need to make sure that the salt system is only on when the filter pump is also on. Can anyone chime in here as to how to do this? Can the pump be programmed and yet still be controlled by the mechanical clock?
 

Enjoying this content?

Support TFP with a donation.

Give Support
Awesome advice, I'm ordering the Intelliflo today and plan on installing myself, thanks to your advice. I do have a salt system installed and it's only on when my pump is on. I have one question: My side suction cleaner (Legend) runs off its own booster pump. Does having a variable pump negate the need for the (loud) booster pump? Thanks for all the great info.
 
swimcmp said:
You cant do away with the booster pump, you will have to make sure it runs only if the intelliflo pump is on. Also salt system doesn't matter it has a flow switch built in

In that case, do you have the the salt cell's power transformer connected to power all the time then? I don't have one, so I'm not sure how they are to be wired up. So, if he's got a mechanical timer, would the salt cell also be connected to the same 220 terminals or would it be hardwired to 220? We have a heater that is wired on the same circuit as the filter pump (on an Intermatic mechanical timer). Now with the way I've wired my IntelliFlo, power is on continuously to the heater (though I keep it switched off at the heater most of the time). It also has a flow switch, so it seems to be fine (e.g. the heater only starts when the IntelliFlo on.
 
The heater should have a pressure switch to sense water flow so it shouldn't start without the pump on. The Intellichlor has an internal flow switch so it wont run without water flow so it does not have to be wired to a timer it will be fine on its own.
 
A simple automation like suntouch would eliminate any issues concerning certain elements of your system turning on with no flow. We have a customer who, against our advice, ended up with a VS pump and a booster pump that weren't linked with automation and he went through about 3 booster pumps in a matter of months before he took our advice and went with a simple automation.

edit: now that I think about it, Intermatic has a system that may fit in your existing enclosure. You might want to look at what they have to offer as well.
 
Changing pump to VS pump (need a little more help please)

OK, Well, I removed my old single speed Pentair pump. When I went to put in my new Pentair (011018) VS pump, I realized that the new pump only has threads on the inside of the pump intake and outflows (female fittings). My old pump had fittings inside and out (female inside and male outside) and used a female union over the outside of the pump. So my question is this: How do I connect the pump? Is there a male adapter, or do I need to remove my old female unions? How do I remove my old female union....it won't slide off the pipe. Also, looks like the diameter of the new pump openings is larger than the old (2" vs 1 1/2") . See pics....what's gonna be the best way to connect this new puppy? Thanks again for all the help.
 

Attachments

  • Poolpumpconvert 023 (800x600) (800x600).jpg
    Poolpumpconvert 023 (800x600) (800x600).jpg
    200.8 KB · Views: 473
  • Poolpumpconvert 024 (800x600) (800x600).jpg
    Poolpumpconvert 024 (800x600) (800x600).jpg
    248.9 KB · Views: 468
  • Poolpumpconvert 025 (800x600).jpg
    Poolpumpconvert 025 (800x600).jpg
    262.6 KB · Views: 467
2" threaded cpvc nipple piped into your existing plumbing. Superflo unions will not fit on that. Pentair also makes some unions that will thread right into the pump that use orings so no messing with Teflon tape or anything. Not sure on the part number though. Someone else maybe can chime in with that.
 
Bill - How did it go? How long did it end up taking you, from start to finish? I'm curious because I'm just in the process of doing the same thing myself right now - I'm switching out an old 20+ year WhisperFlo to the new IntelliFlo 011018 VS pump, and my local guy's quoted an outrageous cost for the pump ($1,300, same as Leslie's) and even more outrageous labor cost. So, doing it myself. I'm pretty handy with most things, but never done anything like this. A little nervous, but I must say after reading this thread I was highly encouraged by the knowledge and experience that the folks on this forum have, especially the step by step instructions that CraigMW gave (wow!) and the support and encouragement they gave to you Bill, so, I figured, what the heck, I'm going for it too.
 
Thread Status
Hello , This thread has been inactive for over 60 days. New postings here are unlikely to be seen or responded to by other members. For better visibility, consider Starting A New Thread.