bbq island framing question

Jun 3, 2008
53
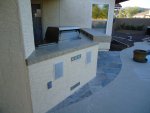
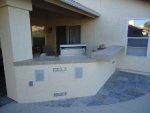
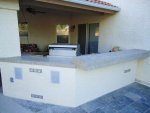
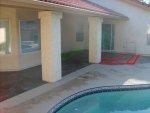
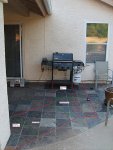
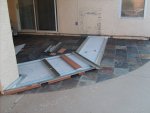
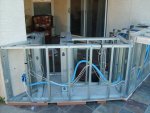
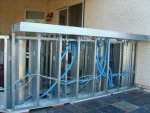
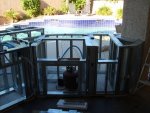
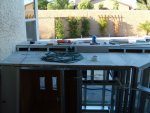
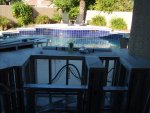
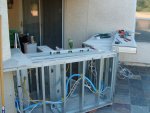
In the planning stages of a bbq island. It will be about 7 ft long and have a 36" Turbo 3-burner grill, matching burner element and mini-fridge.

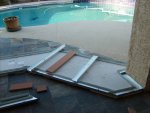
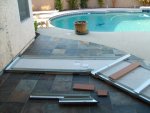
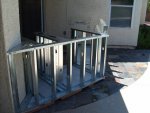
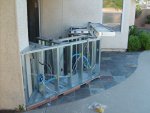
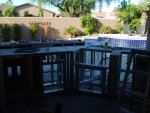
I plan on building the island out of trex (on bottom), metal framing, covered with 1/2 durarock on sides, double the 1/2 durarock on top.

Question:

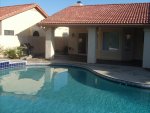
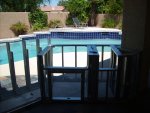
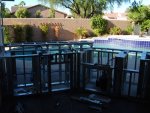
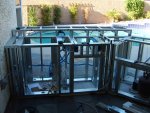
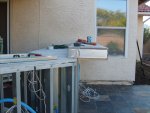
-In the area of my patio where the island will be built, it slopes one direction toward a 'drain strip' in our pool decking. What type of shims do I place under the trex tracking to level it?

-Do I need to fasten the trex and tracking down to the patio with concrete screws?

thanks!
 
Laid out some tape last night and took pic. I drew red lines over the tape in photoshop so you can see better.

The 16" rectangular portion of island that extends toward house will be raised/overhanging bar area.

The first green box toward bottom left of pic will be LPG tank drawer, followed by the grill. The burner will be near the bend of the island, followed by the mini-fridge, that will be almost next to the house.

I plan on mounting TV on pillar toward left hand side of pic. This is why I have the island laid out the way I do. I also didnt' want the grill closer than 3' from the house, and I didnt' want it under the roof overhang.

I'm open to any comments/suggestions...
 

Attachments

  • SD531897_edit.jpg
    SD531897_edit.jpg
    205.7 KB · Views: 1,446
  • SD531898_edit.jpg
    SD531898_edit.jpg
    76.3 KB · Views: 1,434
  • SD532162_edit.jpg
    SD532162_edit.jpg
    51 KB · Views: 1,436
update:

last weekend, went to the orange store and bought:

3 5/8" 25ga metal studs/tracking
1/2" hardibacker for bottom/top
1/4" hardibacker for sides
1" thick trex board
1/2" thick composite garage trim material
32" turbo grill
double turbo burners
double cabinet doors
drawer bank (3 drawers)
$99 mini-fridge at walmart

Started by laying down the base track. Then, flipped the track assembly over and attached 1/2" hardibacker. Little about cutting hardi...I bought the backerboard scoring tool w/ carbide tip, and it works well for straight pieces. But...sometimes I needed to cut an "L" shape out of 3x5 piece of hardi, and of course that didn't go so well! When I start skinning the rest of the island, I'm not going to be so concerned about wasting hardi.

After the track/bottom hardi was assembled, I started leveling the entire thing; what a PITA. The patio slopes from front to back and from side to side. Some places I needed to raise it 2", other places only needed 1/2" for level. That's why I bought the 1/2" composite siding material; I needed more leveling flexibility.

I also built 2" to 1.5" to 0.5" leveling 'feet' that i inserted under the hardi, spanning across the island. These supports are where the trex/track is laying across the base in the below photos. I was concerned that I would break through the hardi when lifting LPG tanks in/out from under the island. The supports under the bottom really firmed it up, I'm now able to jump on it w/out it bowing.

Tomorrow, I'm going to start by slightly twisting the island so its square to the house (notice how it doesn't exactly follow the grout line). I cut the hardi a little too long and it hits the house b4 getting square. Then, I'll start w/ vertical studs.
 

Attachments

  • SD532175_edit.jpg
    SD532175_edit.jpg
    209.3 KB · Views: 1,443
  • SD532176_edit.jpg
    SD532176_edit.jpg
    190.1 KB · Views: 1,429
  • SD532177_edit.jpg
    SD532177_edit.jpg
    204.9 KB · Views: 1,436
Txmat said:
Pool looks great and I like the layout of your Island. With the Hardie board raised and the slope of the patio I assume water will run under the Island.

yep, just had a monsoon, (literally) dump 1" in about 1/2 hr just 2 days ago. Although water did pool a little, right by the end of that drain strip, the bottom hardi was never in standing water, just the trex.

Due to the slope and crappy draining in this area of patio, the trex feet were the ONLY way to go.
 
Update after a 3 day wknd

finished framing the grill/burner side of the island. started on the raised bar area, but ran out of studs.

all in all, its going pretty well, this being my first ever framing project. i'm trying to keep things as square as possible. The grill and burner insert are 100% plumb.

In some places there is 1/4 inch difference in countertop height, but I think it can be leveled with a few shims prior to putting the 1/2" hardi on top. Anyway, next wknd, hope to finish framing. No more this wknd, its just too hot out...about 110 all wknd!!
 

Attachments

  • SD532179_edit.jpg
    SD532179_edit.jpg
    205 KB · Views: 1,401
  • SD532180_edit.jpg
    SD532180_edit.jpg
    213.1 KB · Views: 1,391
looking forward to thoose pics pecker88!
I think you picked the perfect spot for your kitchen! To be able to cook and at the same time facing the pool must be a optimal. It's gonna be stunning when it's done!
 

Enjoying this content?

Support TFP with a donation.

Give Support
Wow.
you gave us some great ideas on how to install the outdoor kitchen w/ your layout.
agree with keeping it true and straight at the beginning. it saves serious dollars and headaches having not done that on my first drywall install. too much work just trying to fix that problem.
nice job.
 
update:

Finished all wiring (2 out of 6 elec. outlets are switched) speaker wire, cat5e wire, TV and low voltage. Installed a few of the outlets last night, threw the breaker, and all was well.

I'm ready to start with plywood/durock.

I'm having a contractor do the 'final' stucco work, I'm just doing all the prep. How should the sides be prepared for stucco?

3/4" plywood, tar paper, mesh
or
1/2" durock/mesh

For the top, the side of the island opposite the grill/burner is going to have 3/4" plywood then 1/4" durock. Around the grill/burner, It will be 2 layers of 1/2" durock so the height is the same. The top will then be tiled.

Here are the pics...
 

Attachments

  • SD532182.jpg
    SD532182.jpg
    201.5 KB · Views: 1,261
  • SD532183.jpg
    SD532183.jpg
    201.1 KB · Views: 1,260
  • SD532184.jpg
    SD532184.jpg
    188.7 KB · Views: 1,259
quick Q:

I've added 3/4" plywood atop the portion against the house due to the lack of frame support. The top of this will get thinset, then 1/4 durock, then porcelain tile.

For the bar overhang, i just want to put 1/2 durock directly atop the metal studs. Adding 3/4" plywood, durock, then tile would raise the height close to 2" and I'm concerned the barstools would then be uncomfortable.

So.....is adding the 1/2 durock atop the studs for the bar overhang OK? It seems stable?
 
update:

Today I finished all the horizontals except for the bar overhang.

The portion against the house had 3/4" ply due to the lack of front to back support track. I had to shim the front about a 1/4" so the slope wasn't so great. Liquid nails was used to fasten shims to metal framing.

I was very hesitant to use any sort of ply on the other portion of the island where the grill/burner will be installed; combustible material. So, on this side a single layer of 1/2" durock was installed atop the metal studs.

For all durock fastning special "rock on" screws were used.

Versabond modified thinset was then troweled over all horizontals. 1/4" durock was then installed atop the 3/4" ply. 1/2" durock was installed atop the remaining portion of the island, the grill/burner side. This brought both sides up to the same height.

Joints were then taped/thinset twice.

Next, redguard will be applied to all horizontals.

For the bar top; I'm just going to apply another layer of 1/4" durock bonded with the same versabond. I'm really concerned about the height; wish I would of only made the overhang 40" high

Next I'll put 1/2" durock on all verticles, then tape/thinset all joints.

Here are the pics...(sorry for the crappy light; I always wait too late in the day)
 

Attachments

  • SD532189.jpg
    SD532189.jpg
    206.4 KB · Views: 1,200
  • SD532190.jpg
    SD532190.jpg
    211.3 KB · Views: 1,191
  • SD532191.jpg
    SD532191.jpg
    208.4 KB · Views: 1,189
Cool that project is really coming along nicely! :goodjob: I have been toying with a similar setup for my pool area also but have a few questions.

Did you get a permit for the build?

What were the gas plumbing code requirements in your area? (I imagine thats why you used steel studs and concrete board)

Have you had an insurance update from your provider? Curious if they had specific requirements.
 
4JawChuck said:
Cool that project is really coming along nicely! :goodjob: I have been toying with a similar setup for my pool area also but have a few questions.

Did you get a permit for the build?

What were the gas plumbing code requirements in your area? (I imagine thats why you used steel studs and concrete board)

Have you had an insurance update from your provider? Curious if they had specific requirements.

-No, didn't get permit for the build

-We don't have Gas plumbed into our neighborhood, so my island runs off standard grill propane tank. If you look close in the last pic, you can see the yellow flex tubing lines. I mounted a 'T' just inside the under grill cabinet door, then off of this T there is a 3' hose/regulator, and 1 line to the grill, the other to the burner. Wish we had Nat. gas, but we don't, so this is all I could do.

-Prob. too late, but I never thought of the insurance update...

I started the proj. by setting up a 10' latter over the area, and taking a downward looking photo. I then brought this photo into google sketch-up and assigned it a measurement system, (which was easy considering the patio had 12" x 12" tile). I then started drafting 3D plans of where components would, and more often, would not fit. I then could work out the measurements, angles and the locations of the grill/burner/cabinet/drawer bank/refrigerator.
 
Project finally complete; about 11 weeks after project began. Worked all day sat/sun and a few hrs each day after work.

I did everything myself except for the stucco. I still have to hang the TV, hence the wires hanging down by the pillar, but everything else is done. Grill/burner/refrigerator/electronics all work great!

thanks again to everyone who helped/gave advice!!
 

Attachments

  • DSC00180.jpg
    DSC00180.jpg
    108.2 KB · Views: 1,140
  • DSC00181.jpg
    DSC00181.jpg
    100.6 KB · Views: 1,134
  • DSC00182.jpg
    DSC00182.jpg
    111.7 KB · Views: 1,131

Enjoying this content?

Support TFP with a donation.

Give Support
Thread Status
Hello , This thread has been inactive for over 60 days. New postings here are unlikely to be seen or responded to by other members. For better visibility, consider Starting A New Thread.