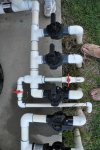
Hi all....turns out the valve for the shooters on our pool deck did not survive the winter. Attached are photos of the return plumbing and a close up of the valve and 90 elbow that are cracked. The trouble is that there is little or no room to cut out the bad connections and re-plumb. I don't see a way to simply replace the cracked pieces that are coming out of the 4-way fitting. I am hoping that someone who has experience with plumbing equipment might have a suggestion that I am not aware of.

Need help with plumbing!!!!
- Thread starter rockyboy
- Start date
You are using an out of date browser. It may not display this or other websites correctly.
You should upgrade or use an alternative browser.
You should upgrade or use an alternative browser.
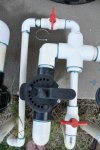
This is a close up of the valve (top one) that is cracked. PB just didn't leave me any room that I can see and the biggest problem is the 90 elbow (that is not cracked) that comes right out of the 4-way fitting. I am hoping there are some tricks of the trade that I am not aware of.
Thanks in advance
Thanks in advance
Attachments
Nope it all has to be redone. Things I would consider doing,
1- The Jandy valves that are glued in, use adapters to threaded pvc, so you dont have to buy new valves every time you have a pipe break.
2- Install a few unions so the piping can be removed easier.
Sorry you have to do this, I have yet to see any real thought go into plumbing a pump deck. There is more to it then getting the water from point A to point B.
I can do it, but it's a pain. Not nearly the pain to rebuild all that. Short version, take a saw and cut off that entire valve, except where the joint in question is, don't mess that up. Once that valve body is out of the way, take a hack saw blade and make a LONG ways cut, not all the way through the valve body, but pretty close. You will need to do this a total of two times.....meaning top and bottom or L side - R side. Once you have made those cuts, get a medium sized flat heat and GENTLY use it like a chissle to pull the two halfs' apart. You will be suprised how easy it will come apart. Once apart, get some plumbers sanding cloth (200 gritt) and sand off all the extra SOLVENT (not glue). Prime it and you're back in business.
As a professional plumber, this little tip has helped me out many times....the trick is to not score the the short nipple coming from the ELL. May I suggest you use top quality valves and parts. This sort of thing isn't something one goes cheap on....not saying YOU did (PB) but ....ya know..... Now might be time to install a tee that you can better winterize with. 1/2" thread that you can install to hook up an air compressor to blow all the water out and LEAVE OPEN when you shut it down. Good Luck.....BTW, this little tip, I wouldn't even tell the plumbers working for me about it. Tear it all out and do it over....I got bills to pay, so, your welcome!!
As a professional plumber, this little tip has helped me out many times....the trick is to not score the the short nipple coming from the ELL. May I suggest you use top quality valves and parts. This sort of thing isn't something one goes cheap on....not saying YOU did (PB) but ....ya know..... Now might be time to install a tee that you can better winterize with. 1/2" thread that you can install to hook up an air compressor to blow all the water out and LEAVE OPEN when you shut it down. Good Luck.....BTW, this little tip, I wouldn't even tell the plumbers working for me about it. Tear it all out and do it over....I got bills to pay, so, your welcome!!
G
Guest
Tankless concepts is correct in his repair practice, and it can be done this way. It takes some patience to not "bugger up" the valve, but if you go slow and pay attention you can do it!
Not alot of guys know this, so he is offering you good advice. I think you need to send him a six-pack via email
Not alot of guys know this, so he is offering you good advice. I think you need to send him a six-pack via email
That is awesome of Tankless Concepts to share some of his Jedi plumbing skills with you and everybody that reads this post!  I personaly love to tinker on stuff like that and would love to re-engineer it so the same thing wouldnt happen again.
Good luck! I hope you get up and running soon.
I personaly love to tinker on stuff like that and would love to re-engineer it so the same thing wouldnt happen again.Good luck! I hope you get up and running soon.
The Pentair valves are 1.5" inside and 2" outside. A 2" coupling can be used on the one side needed to be cut. This saves these valves.
The valve and T nearest the sneaker are fine. Cut 1.5" after that T, glue on a 2" coupling with a reducer bushing on one side, and rebuild the rest of the manifold with 2" plumbing, reducing where needed.
Scott
The valve and T nearest the sneaker are fine. Cut 1.5" after that T, glue on a 2" coupling with a reducer bushing on one side, and rebuild the rest of the manifold with 2" plumbing, reducing where needed.
Scott
Thanks for all of the responses but I have not had my coffee yet so I am feeling pretty dense. I put together my post in a bit of a hurry last night so I want to make sure I have explained the problem. Other than the tight plumbing, all of the pentair valves and their connections are fine. The 3/4" PVC valve (with the zip tie under it) and the 90 elbow to its left in the close up photo are cracked. This cheap pvc valve controls the shooters on the pool deck. The other 3/4" valve is for a slide and is fine. If the PB had come out of the cross fitting/reducer with a couple of inches of straight pipe before the 90, this would be a piece of cake. Instead, he came out with a tiny stub and the 90 and then straight into the bad valve. If we are all on the same page, then I am afraid I am not smart enough to understand the jedi plumbing trick offered by Tankless concepts or the fix described by Scott. I am sure the problem is on my end but if either of you guys could provide a little more information, I would really appreciate it. Beers all around! 
By the way, I was actually thinking the only fix was a total replumb as coloeb suggested and the purchase of 3 pentair valves. The fact that I may have some options is encouraging. Thanks for everyone's help!!!!!
By the way, I was actually thinking the only fix was a total replumb as coloeb suggested and the purchase of 3 pentair valves. The fact that I may have some options is encouraging. Thanks for everyone's help!!!!!
Let me see if I can help you understand how Tankless Concepts described repairing it.
First, in the closeup, just to the right of the buldge in the cracked valve cut the valve off leaving the cuff of the valve on the pipe. Then cut the piping below the elbow on the other side of the valve. Having that out of the way you then take a hacksaw blade and cut a slit almost through (being careful not to cut all the way through) the valve cuff. then opposite of that slit cut another one the same way. then use a large flat screwdriver of flat pry bar and peel the cuff off the pipe. Sand the pipe smooth and you can reinstall a new vavle over it. Replumb from the cut pipe on the other side to the new valve and you're back in business.
First, in the closeup, just to the right of the buldge in the cracked valve cut the valve off leaving the cuff of the valve on the pipe. Then cut the piping below the elbow on the other side of the valve. Having that out of the way you then take a hacksaw blade and cut a slit almost through (being careful not to cut all the way through) the valve cuff. then opposite of that slit cut another one the same way. then use a large flat screwdriver of flat pry bar and peel the cuff off the pipe. Sand the pipe smooth and you can reinstall a new vavle over it. Replumb from the cut pipe on the other side to the new valve and you're back in business.
Now I have it! Thanks Bama Rambler for taking the time to clear that up for me! I understand exactly what Tankless was trying to tell me now. If I can get this to work for me, it will be awesome. I am hoping that the PB's plumbing job is equal to some of his other workmanship. If that is the case, the bond should be really easy to break!!!! Thanks to everyone who helped out. I will let you know how it works out and I think I will get some extra supplies just in case the worse happens and I need to plumb a return without valves! Thanks again!!!!!!!
AWESOME!!!! Tried the fix that Tankless concepts recommended and it worked flawlessly in spite of me  Many, many thanks for sharing this jedi plumbing tip as it easily saved me a couple hundred dollars. Gave it a test run tonight and the shooters work great and no leaks at the equipment pad. Pump is running over night and I will check it again tomorrow but all looks great for now. Now if I can track down that darn leak in the pool.........but that's another post for another time. Beers all around
Thanks Again!!!!!!
Many, many thanks for sharing this jedi plumbing tip as it easily saved me a couple hundred dollars. Gave it a test run tonight and the shooters work great and no leaks at the equipment pad. Pump is running over night and I will check it again tomorrow but all looks great for now. Now if I can track down that darn leak in the pool.........but that's another post for another time. Beers all around Thanks Again!!!!!!
Happy New Year everyone! First of all, let me confess that I even though I got excellent advice on this problem last spring, I didn’t fully follow it. I was able to replace the cracked valve but in my haste, chose to replace it with another cheap valve.  As a result, the PVC valve has already cracked this winter in spite of being wrapped with a layer of pipe insulation. The end result is exactly the same as the original pics show. The valve with the red handle is leaking and I have very little room to replace it. I am hoping that the Jedi plumbing trick will work one more time but I was hoping for suggestions for what to replace it with. It would have been much better to have done this in warm weather!!!! Thanks in advance!
As a result, the PVC valve has already cracked this winter in spite of being wrapped with a layer of pipe insulation. The end result is exactly the same as the original pics show. The valve with the red handle is leaking and I have very little room to replace it. I am hoping that the Jedi plumbing trick will work one more time but I was hoping for suggestions for what to replace it with. It would have been much better to have done this in warm weather!!!! Thanks in advance!The Jedi plumbing trick may indeed work one more time. I hope it does.
I would move the valve to the long run of piping and use a tru-union ball valve in it's place. That way, at least, you can replace the barrel of the valve without having to replace the entire valve.
One reason those valves freeze and crack so easily is that water is trapped in the ball when the valve is closed and therefore any slight freezing will expand and burst the valve.
I use ball valve hose spigots around the house and drill a ¼" hole in one side of the ball to allow for just such incidents.
Bama…..thanks for the suggestions. I also hope the Jedi plumbing trick will work one more time. If not, I will have a situation that is critical since most nights are below freezing in OKC this time of year and I can’t afford to turn the pump off for an extended plumbing repair. In my design, there will always be water up to the valve and no way to keep it out that I know of. I guess I am not familiar with a tru-union valve. Is that a brand name or a type of valve? I am guessing that they are at least more freeze proof than the PVC. Does it glue in just like a PVC valve? Thanks!
bk406
0
Yep....once or twice but more in the last day or two :-D Wasn't sure I wanted to deal with the swamp since I dont have a cover and getting one for our large pool would be cost prohibitive. Neighbor is trying it this year so we will see how that works out.
A tru-union is a type of ball valve. It has two hubs the glue onto the pipe just like a regular PVC valve but the middle (ball) section comes out and can be replaced without cutting the piping. It basically is two unions, one on each side of the valve.
Waterway Plastics has a unioned 3-way valve that works. I had to use one last season for a customer that had black poly lines coming up in odd directions. The unions allowed me to put street 90s on 1st, then attach to the poly lines and adjust angling as needed.
Scott
Scott
I apologize in advance for the long post but thought everyone could use some comic relief today.
Update: unfortunately the Jedi magic didn’t work for me the second time around. Although I wasn’t able to get the cracked ball valve off of it’s stub this time, I was able to break off the connection just after the “cross†fitting with near perfect precision. Heck, I should have just used the sawz all and saved some time! But wait, this gets better. Since the ball valve was on the return side, I had an open line that I could not close off last night. So with defeat in my voice, I scheduled a service tech to come out and fix the mess I had created, closed the spider valve on the filter and cancelled the pump programs. But wait, there’s more! I was confident that the system could survive one night until the tech came today. After all, temps have been seasonable here (upper 40’s to lower 30’s) and pool temp was a balmy48…no problem. But wait, there’s more. A phone call at 4:30am from the neighbor lets me know that water is flooding his yard and he thinks it’s coming from our house. Apparently the pool water temp dropped from 48 to freeze protect temp some time during the night and kicked the pump on (should have just turned off the dang breaker!). Since the spider valve was closed, the fitting at the top of the pump blew and instead of my pool draining through a 3/4 “ line, it was draining through a 1 ½†line. Luckily my neighbor goes to work early or the pool would have drained dry instead of just a foot or so below the skimmers. There has to be at least one lesson learned here somewhere!
Now…with the water drained below the skimmers, I am thinking about just closing the darn pool for the rest of the winter and plumbing in the Spring. Any thoughts? I hope everyone was able to find a little humor here, it certainly could have been worse :lol:
Thread Status
Hello , This thread has been inactive for over 60 days. New postings here are unlikely to be seen or responded to by other members. For better visibility, consider Starting A New Thread.