Pool repair

Bellicusa

0
LifeTime Supporter
Sep 21, 2009
31
Bellmawr, NJ
I purchased a home with a pool back in November.
First home, first pool.

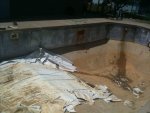
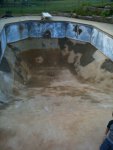
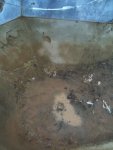
The pool was in complete disrepair.
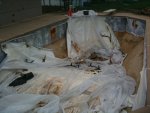
Vinyl liner brittle, cracked, and torn.
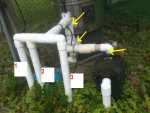
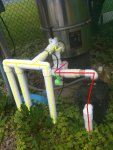
Pump and filter assembly never drained prior to either of the two winters the house was vacant.
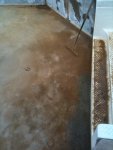
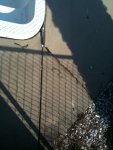
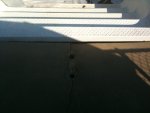
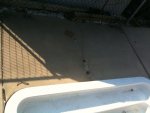
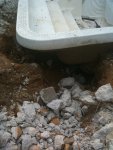
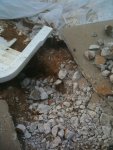
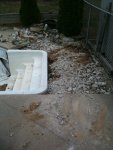
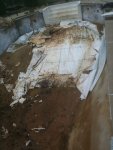
The concrete pad around the pool is cracked and settling/sinking near the stair end of the pool.

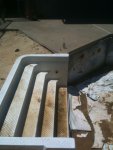
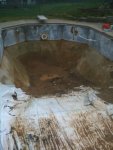
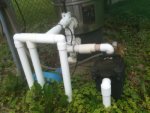
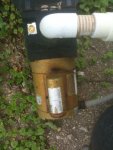
I have no idea the condition of the majority of the pieces of the pool...I see the steel walls...and fiberglass steps...and rusty-looking filter/pump.

I was planning on breaking up the already broken concrete...digging down to the bottom of the stairs and then make the decision to either reseat the steps I have, or replace them if they are broken. Set the steps more solidly than before, repack the dirt and get the whole thing ready to repour concrete.

I guess Im looking for ideas, thoughts, or reasons to continue/stop this current plan.

Added a couple pics in case it helps.

Thanks,
Anthony
 

Attachments

  • photo.jpg
    photo.jpg
    149.8 KB · Views: 559
  • photo 2.jpg
    photo 2.jpg
    96.9 KB · Views: 559
  • photo 3.jpg
    photo 3.jpg
    107.5 KB · Views: 559
Destruction began a couple hours ago.
Would love to say that my mighty sledgehammer make quick work of the concrete...but it didnt.
Honestly was nowhere near as much fun as they make it look on tv...but I did make progress.

Broke up the concrete around the steps to see how much dirt was washed out.
I expected a lot more washout than I found...but I guess it was still enough to cause the damage.

After taking another look at the steps, I dont think I will have to reset them after all.
This makes me much happier.

Have a bit more concrete to take out, cut some straight lines...and then I can work on backfilling under the steps.

Thoughts on what backfill makes the most sense?

Open to other thoughts and suggestions.

Thanks,
Anthony
 

Attachments

  • photo 2 (3).jpg
    photo 2 (3).jpg
    153 KB · Views: 539
  • photo 4.jpg
    photo 4.jpg
    166.8 KB · Views: 539
  • photo 4 (3).jpg
    photo 4 (3).jpg
    159.4 KB · Views: 539
Wow, Anthony! When you said you were looking for thoughts and suggestions, I thought you meant you had plenty of time! :shock: Well, let the demo begin :party:

I wish, for you, that the demo had been more fun :mrgreen: Sure looks like fun from here :-D

Looks like you got a good start today and some of our builder folks will be along with their input.
 
Butterfly said:
Wow, Anthony! When you said you were looking for thoughts and suggestions, I thought you meant you had plenty of time! :shock: Well, let the demo begin :party:

I wish, for you, that the demo had been more fun :mrgreen: Sure looks like fun from here :-D

Looks like you got a good start today and some of our builder folks will be along with their input.

I do have time...but figured either way the concrete would have to come up. That and Im really looking forward to getting moving on this.
Promised the wife I would make progress...so :whip:

So far from done...

Anthony
 

Attachments

  • photo 3 (2).jpg
    photo 3 (2).jpg
    125.8 KB · Views: 535
  • photo 2 (2).jpg
    photo 2 (2).jpg
    120.8 KB · Views: 535
Getting closer to swim season...and the kids are growing impatient...

Getting back to work on the pool...err, hole in the ground.

I am ready to order a liner, but need to get my measurements first.
Decided to empty the pool, bucket out whatever water was in the bottom and cut out the old liner.

The old floor has some issues. Cracking along the sides...tap on em and it feels hollow...thoughts? Im guessing Ill have to break up anything that isnt solid and reapply.

Main drain...I see one. Is this a safety issue? Never a better time to do something than now.
If I am correct, the plumbing looks to T the main drain and skimmer together underground. That sound right?
If that is right would that help to eliminate the safety issue associated with one drain?

Any other thoughts welcome.

Thanks!
 

Attachments

  • photo.jpg
    photo.jpg
    127.5 KB · Views: 449
  • photo 2.jpg
    photo 2.jpg
    136.9 KB · Views: 449
  • photo 3.jpg
    photo 3.jpg
    139.2 KB · Views: 449
Anti -entraptment drains I believe are required , if you renovate a pool as you are doing. There are members of this site that live around you and deal with construction, They could perhaps offer some advice.
 
I did some research on the anti-entrapment drains and it appears this one is already in compliance. From what I found the idea is to no longer have a flat plate on the floor...but instead to use a domed cover making it much more difficult for someone to form a seal across the whole face of the drain.

Either way, I am thinking of adding a second drain...this would be the easiest time to do something.

My concern is the plumbing underground. Im thinking that the skimmer and main drain are plumbed together. If they are and I add a second drain in the floor will this reduce the effectiveness of the skimmer? I know Im not changing the size of the plumbing, or the power of the pump...but Im not sure if there will be a reduced amount of flow through the skimmer.

[attachment=2:w0em5mbc]photo 2.jpg[/attachment:w0em5mbc]
Ok, using all the resources at my disposal I managed this overly professional diagram of how I think the pump works.
Thinking:
In to the pump through the red line. Depending on position of the black handle at the top the water will then either go the green route to waste or the purple route to the filter. After the filter all water goes to the yellow to feed the returns.
This look right?

I have 4 returns on the pool...but only 3 return lines. Guess there is no way of knowing which two are T'd together?

One last shot in the dark. I cant read any writing on the filter (besides the brand) or the pump. Anything here look remotely familiar? Thoughts on where I can go to find out what these are...besides antiques?

Thanks,
Anthony
 

Attachments

  • photo 2.jpg
    photo 2.jpg
    74.1 KB · Views: 416
  • photo.jpg
    photo.jpg
    120.9 KB · Views: 416
  • photo 3.jpg
    photo 3.jpg
    129.2 KB · Views: 416
Welcome to TFP!!

This is a game I've played many, many times and will certainly help with the project. Time's a little tight for me at this time of year, but let me tell you a couple quick things.

1) Pressure test the lines ASAP!! - while everything is as exposed as it is now - if you find a bad line, it'll be a LOT easier to fix!

2) A second MD can be added to comply with VGB ( :rant: ) - there are a couple different ways to do it & you'll have to wreck part of the floor, so more patching :(

Tell us what you plan and feel free to ask any more questions :-D
 

Enjoying this content?

Support TFP with a donation.

Give Support
waste said:
Welcome to TFP!!

This is a game I've played many, many times and will certainly help with the project. Time's a little tight for me at this time of year, but let me tell you a couple quick things.

1) Pressure test the lines ASAP!! - while everything is as exposed as it is now - if you find a bad line, it'll be a LOT easier to fix!

2) A second MD can be added to comply with VGB ( :rant: ) - there are a couple different ways to do it & you'll have to wreck part of the floor, so more patching :(

Tell us what you plan and feel free to ask any more questions :-D

Thanks for the advice.

I finished measuring for the liner yesterday. Faxed that to the company for a quote. Now I have a bit of time before the liner comes...so will get to work on other stuff.

Based on the above recommendation I will work on pressure testing the plumbing today.
Thinking I can plug 2 of the 4 returns, pressurize the 3rd and put a guage on the 4th. That make sense or am I missing something?
Not sure how to test the main drain/skimmer. I believe they are run together. Ideas on how best to test this?

I will do what I have to for the MD. I figure I can dig down and find the original plumbing. Cut back some and piece my own new line with drain across the bottom.

Thanks again,
Anthony
 
Took a look at the plumbing last night. Figured out (sorta) what I would need to plug up lines and try to pressure test the system. Went to the store to buy parts and came home empty-handed.

The best I can tell I will have to test the system as two pieces.
1. skimmer, main drain, and plumbing up to the pump basket where I have to find a plug that fits inside the pump basket.
2. 4 return eyes, plumbing back to the filter and the plumbing both underground and at the filter plus find a way to plug each of the yellow arrows in the pic below.

I ran into problems trying to test option 1 because none of the three locations (skimmer plumbing, main drain plumbing, pump basket plumbing) are threaded. I can try to find plugs for each of them, but wasnt able to find a plug that I could run pressure through. I had no way to pressurize this half of the system.

With #2, the issue was my inability to break the system into smaller pieces. I guess I could plug 3 of the 4 returns with 1.5" plugs. Then find rubber plugs to take care of the yellow arrows below. If I had that I could build some sort of contraption to pressurize the system with a gauge.

Using my professional MS Paint skills I wanted to run an idea past ya.
[attachment=0:2dby1zus]photo.jpg[/attachment:2dby1zus]
Would it make sense to pick up some valves to fit inline at 1, 2, and 3 in the picture?
If I did this I could test each line independently.

Im trying to convince myself that it makes sense to do this because I will have control over the return flows later on. Is that important at all, or just a waste of time?

If there is a better/easier way to test the system...please let me know.

Thanks,
Anthony
 

Attachments

  • photo.jpg
    photo.jpg
    50.2 KB · Views: 321
zea3 said:
Definitely add valves! I don't know if they will help you test the system but they are needed so you have a way to cut off the water in the future for maintenance and repairs.

I agree completely...so I added valves.

Decided to pressure test the underground plumbing prior to worrying about the floor or liner.

Came up with a plubming contraption...and it seems to work fairly well.

Tested the return on the steps and it held just fine. The step return is controlled by the first valve on the pool pad.
[attachment=1:1kcq3ubg]photo 4.jpg[/attachment:1kcq3ubg]

Moved to the next return and it held fine as well...this was controlled by the second valve.

Heres the problem. I have two more return eyes, but only one more return line coming out of the filter.
I tested the fourth return eye (closest to the diving board) and expected that return to be tied to the third return eye.
I was wrong. It is self-contained.

So I then moved to the third eye...plugged in the plumbing contraption and turned the water on.
Sounds like the water is running...but I cant tell to where. Im not building up pressure on the gauge.
[attachment=0:1kcq3ubg]photo 2.jpg[/attachment:1kcq3ubg]

Anyone have any ideas where this line (with the green hose attached to it in the above picture) might go?

Thanks,
Anthony
 

Attachments

  • photo 4.jpg
    photo 4.jpg
    124.5 KB · Views: 266
  • photo 2.jpg
    photo 2.jpg
    128.8 KB · Views: 266
I guess I figured out the line in question from above. I left the water running a while and sure enough I ended up with wet spots around the pool...must be leaking underground.

I have three additional returns, so unless someone explains to me why it would be real stupid to do...I will just cap off the offending plumbing and pretend it isnt there at all.

One more line to test (as soon as I get the right size plug to test it).

Anthony
 
Made some progress on the pool. :party:

Got all the old liner out of the pool and bagged it all up.
I had about 4" of dirt on the shallow end of the pool...guess this was where the dirt that was supposed to be under my steps was washing out to.
[attachment=2:544hckaq]photo 2(1).jpg[/attachment:544hckaq]
Broke up and removed all the bad pool flooring. Patched that.
[attachment=1:544hckaq]photo(1).jpg[/attachment:544hckaq]

Hung the liner this morning and it is filling as I type this.
Even have my assistant helping out.
[attachment=0:544hckaq]photo 2.jpg[/attachment:544hckaq]

Anthony
 

Attachments

  • photo 2(1).jpg
    photo 2(1).jpg
    122.1 KB · Views: 186
  • photo(1).jpg
    photo(1).jpg
    122.2 KB · Views: 186
  • photo 2.jpg
    photo 2.jpg
    162.1 KB · Views: 186

Enjoying this content?

Support TFP with a donation.

Give Support
Thread Status
Hello , This thread has been inactive for over 60 days. New postings here are unlikely to be seen or responded to by other members. For better visibility, consider Starting A New Thread.