
- Apr 8, 2009
- 33
-
-
I need some expert advice concerning the re-forming and re-surfacing of my pool bottom/hopper (according to the pool guys the shallow end just needs to be patched with pool-krete).
Sequence of events: (or skip to ‘A few important details that should be noted’) for my actual questions
2nd Week of October
My vinyl liner ‘floated’ in the middle of a nor-easter ( liner estimated to be between 15-20 yrs old ) ruining the liner.
Afterwards all the water drained from the pool.
3rd Week of October
After getting several estimates decided on a company to do the work and ordered a liner ( choice of company was based more on reputation and customer reviews than quoted price – though the final agreed upon price was better than most of the others – final price for patching the vermiculite (6 bags), new main drain, all new return plates/gaskets, new skimmer plate, custom liner and installation = $3,790 (+$250 if a well point is needed) – the next closest estimate from what I would consider to be an acceptable company was $ 4400 ).
4th Week of November
Liner arrived (took 6 weeks to manufacture and deliver due to my pool being an irregular ‘free form’ shape)
** This is also when the rains began.
1st & 2nd Weeks of December
Moderate to heavy rains every other day.
Decided to order a pool cover as well – solid with mesh panel ( another $1900 (installed)… got a love that custom shaped pool!... they originally wanted $2300 for the cover and installation but I was able to negotiate the price down to $1900 account of getting the liner work done as well ).
3rd Week of December
Pool company closes on December 18th not to re-open until January 4th
1st & 2nd Weeks of January
Average temperature drops to about 27°F (which is unusually cold for an average temp in this area, and far to cold to be installing a vinyl liner)
3rd Week of January (this week)
Window of opportunity opens: Monday, Tuesday & Wednesday – no rain, temperatures in the mid-to high 50’s.
During the above time frame the condition of my pool deteriorated drastically. It’s gone from SOME vermiculite patching to having to re-shape & resurface the deep end/hopper as well as patch the shallow end and then install the liner. After re-evaluating the job we negotiated a maximum of $1,500 in additional cost: this will cover:
- 3 well points they installed today to pump out the ground water
- An additional 10-15 bags of vermiculite (for a total of 16-21 40 lb bags of premix vermiculite)
- Filling in the now collapsed areas and re-forming/shaping the deep end
- Additional labor
And yes.. I did get the $1,500 additional cost agreement in writing ( I had figured a rough estimate of about $2,500-$3,000 in additional cost and the pool guy said that normally he would charge $3,500-$4,000 for the additional work now required, so it seems the $1,500 max for the additional work is a good deal.. almost too good.. but I figure since I’m already into em’ for $6,000 and they’re going to already be working on my pool anyways that maybe $1,500 for the additional work isn’t too good to be true).
A few important details that should be noted:
1) I live in a high water table area ( I live on a peninsula surrounded by tidal waters ).
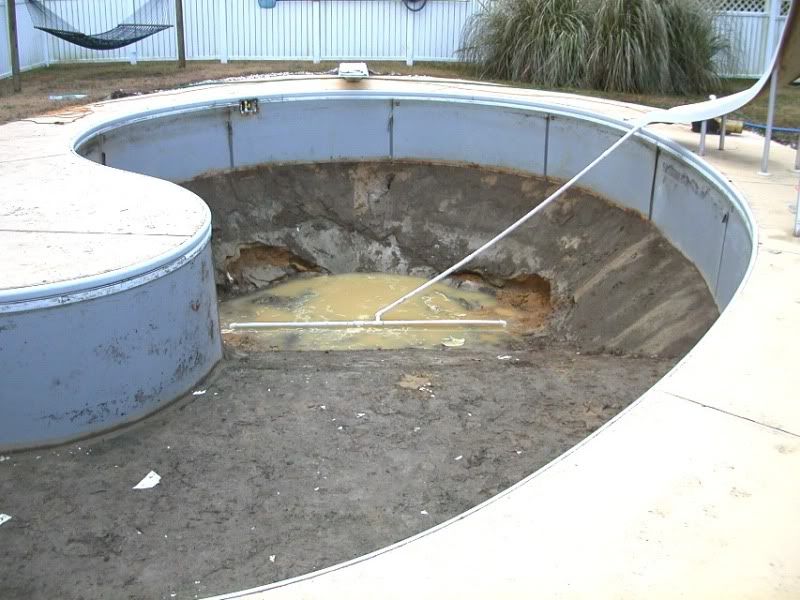
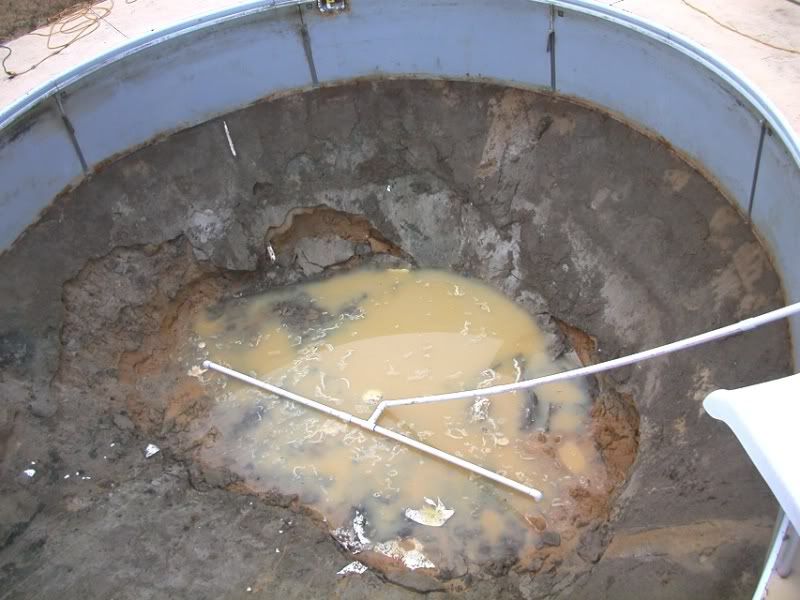
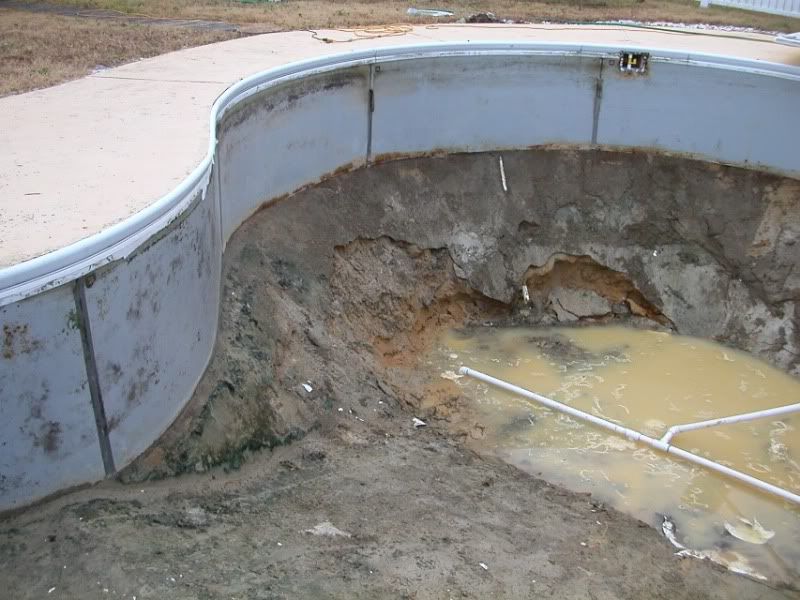
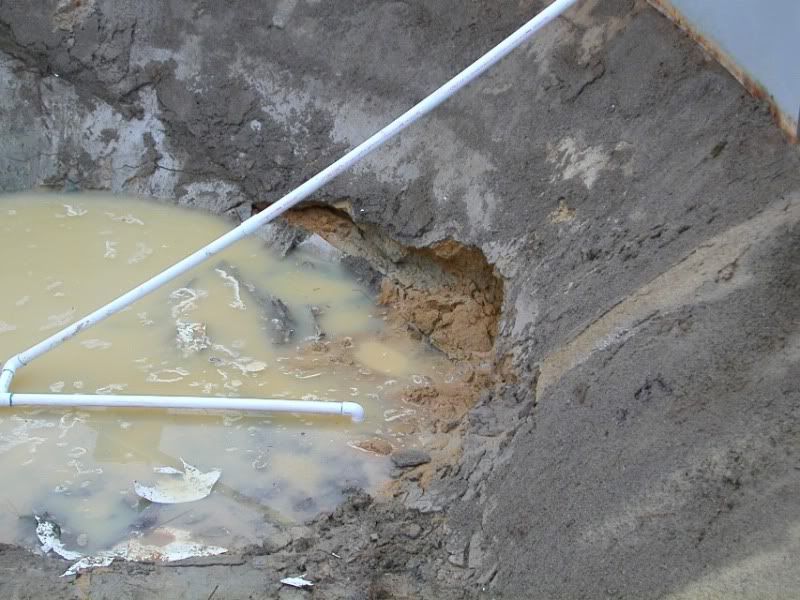
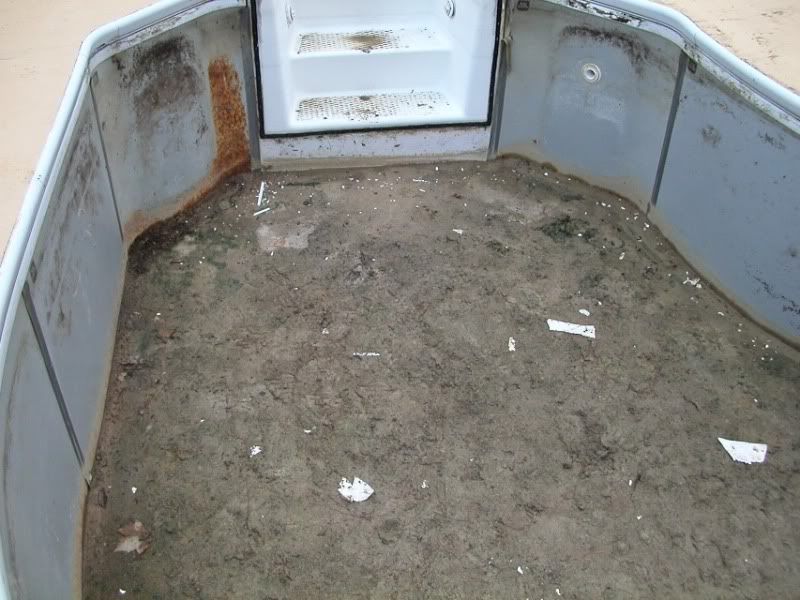
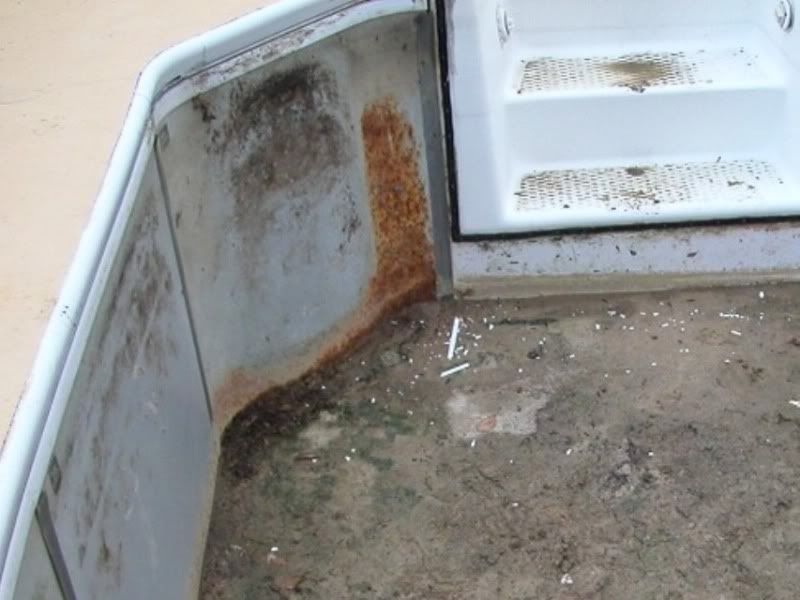
2) The collapsing is moderate-to-severe ( in my lay opinion at-least ): see pics below.
3) Existing pool bottom is dirt with vermiculite over it.
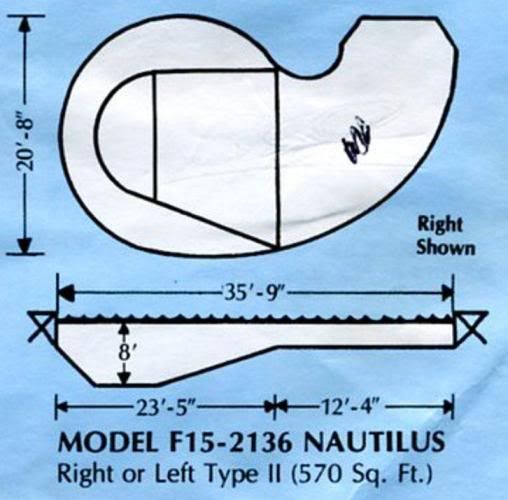
4) Pool Shape & Dimensions:
Question 1 : Filling in the washed out / collapsed areas: What would be the best material to fill the collapsed areas in with… dirt, concrete, gravel ?(they were originally saying concrete/quick-krete, but are now hinting at using gravel… I’m not sure I’m keen on either given that the rest is just dirt, however, I think given the choice between the two I’d prefer concrete.. but I’m just not sure as I don’t know about these things)
Question 2: Vermiculite layer thickness: From what research I’ve done on the web it seems that a 2†layer is recommended, but the pool guy pointed out that what is already there isn’t 2†(though most of what was there has been washed away by heavy rains) and that a thin layer (¾†or so) will be fine.. is this true ? (pool guy said that given the physical properties of vermiculite that a 2†layer wouldn’t be any more stable than a ¾†layer). EDIT: Just got off the phone with pool guy and now he's saying they are going to apply a 1 1/2" layer of vermiculite (which makes me feel a lot better about things) so I guess maybe I misunderstood what he was saying. ???
Question 3: Plastic bearer ?: Apparently there were no well point installed when the pool was built, instead they used a plastic sheeting bearer to keep the ground water at bay… should I insist that this plastic bearer be replaced?
Question 4: How concerned about the rust should I be ? (and what can be done about it?) : See pic # 6
Question 5: Well points: Should I expect that for a $250 well point that it should be a permenant ficture that is run throught the wall with access above ground (just a capped pipe a few inches beneath the ground that can be easeily dug up if needed).
# 1
# 2
# 3
# 4
# 5
# 6
-
I need some expert advice concerning the re-forming and re-surfacing of my pool bottom/hopper (according to the pool guys the shallow end just needs to be patched with pool-krete).
Sequence of events: (or skip to ‘A few important details that should be noted’) for my actual questions
2nd Week of October
My vinyl liner ‘floated’ in the middle of a nor-easter ( liner estimated to be between 15-20 yrs old ) ruining the liner.
Afterwards all the water drained from the pool.
3rd Week of October
After getting several estimates decided on a company to do the work and ordered a liner ( choice of company was based more on reputation and customer reviews than quoted price – though the final agreed upon price was better than most of the others – final price for patching the vermiculite (6 bags), new main drain, all new return plates/gaskets, new skimmer plate, custom liner and installation = $3,790 (+$250 if a well point is needed) – the next closest estimate from what I would consider to be an acceptable company was $ 4400 ).
4th Week of November
Liner arrived (took 6 weeks to manufacture and deliver due to my pool being an irregular ‘free form’ shape)
** This is also when the rains began.
1st & 2nd Weeks of December
Moderate to heavy rains every other day.
Decided to order a pool cover as well – solid with mesh panel ( another $1900 (installed)… got a love that custom shaped pool!... they originally wanted $2300 for the cover and installation but I was able to negotiate the price down to $1900 account of getting the liner work done as well ).
3rd Week of December
Pool company closes on December 18th not to re-open until January 4th
1st & 2nd Weeks of January
Average temperature drops to about 27°F (which is unusually cold for an average temp in this area, and far to cold to be installing a vinyl liner)
3rd Week of January (this week)
Window of opportunity opens: Monday, Tuesday & Wednesday – no rain, temperatures in the mid-to high 50’s.
During the above time frame the condition of my pool deteriorated drastically. It’s gone from SOME vermiculite patching to having to re-shape & resurface the deep end/hopper as well as patch the shallow end and then install the liner. After re-evaluating the job we negotiated a maximum of $1,500 in additional cost: this will cover:
- 3 well points they installed today to pump out the ground water
- An additional 10-15 bags of vermiculite (for a total of 16-21 40 lb bags of premix vermiculite)
- Filling in the now collapsed areas and re-forming/shaping the deep end
- Additional labor
And yes.. I did get the $1,500 additional cost agreement in writing ( I had figured a rough estimate of about $2,500-$3,000 in additional cost and the pool guy said that normally he would charge $3,500-$4,000 for the additional work now required, so it seems the $1,500 max for the additional work is a good deal.. almost too good.. but I figure since I’m already into em’ for $6,000 and they’re going to already be working on my pool anyways that maybe $1,500 for the additional work isn’t too good to be true).
A few important details that should be noted:
1) I live in a high water table area ( I live on a peninsula surrounded by tidal waters ).
2) The collapsing is moderate-to-severe ( in my lay opinion at-least ): see pics below.
3) Existing pool bottom is dirt with vermiculite over it.
4) Pool Shape & Dimensions:
Question 1 : Filling in the washed out / collapsed areas: What would be the best material to fill the collapsed areas in with… dirt, concrete, gravel ?(they were originally saying concrete/quick-krete, but are now hinting at using gravel… I’m not sure I’m keen on either given that the rest is just dirt, however, I think given the choice between the two I’d prefer concrete.. but I’m just not sure as I don’t know about these things)
Question 2: Vermiculite layer thickness: From what research I’ve done on the web it seems that a 2†layer is recommended, but the pool guy pointed out that what is already there isn’t 2†(though most of what was there has been washed away by heavy rains) and that a thin layer (¾†or so) will be fine.. is this true ? (pool guy said that given the physical properties of vermiculite that a 2†layer wouldn’t be any more stable than a ¾†layer). EDIT: Just got off the phone with pool guy and now he's saying they are going to apply a 1 1/2" layer of vermiculite (which makes me feel a lot better about things) so I guess maybe I misunderstood what he was saying. ???
Question 3: Plastic bearer ?: Apparently there were no well point installed when the pool was built, instead they used a plastic sheeting bearer to keep the ground water at bay… should I insist that this plastic bearer be replaced?
Question 4: How concerned about the rust should I be ? (and what can be done about it?) : See pic # 6
Question 5: Well points: Should I expect that for a $250 well point that it should be a permenant ficture that is run throught the wall with access above ground (just a capped pipe a few inches beneath the ground that can be easeily dug up if needed).
# 1
# 2
# 3
# 4
# 5
# 6
