Cheapest way to fix a leak?

Wes45

0
LifeTime Supporter
Feb 15, 2009
74
Garland, TX
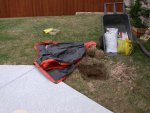
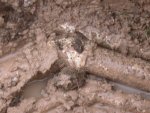
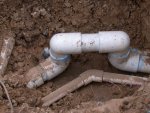
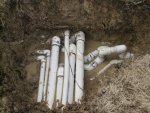
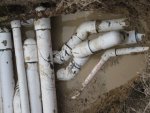
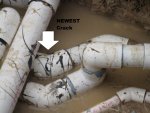
4 year old pool, had a leak repaired 2 years ago and now I have a leak again. 2 years ago the leak was just off the patio where a lot of the plumbing was criss crossed and a joint had a crack that might have been weak since the installation. Multiple pipes were crossing other pipes in about 3 layers in 3 different angles, it looked like a rats nest and was buried about 18 inches deep.

I just noticed my water level going down so I measured and watched it drop about 3/4" in 24 hours. Water temp is about 40 degrees so can't do much in the water without freezing myself.

My pool builder no longer has the personnel that do leak / PSI testing. I called American Leak Detection and got a quote of $350 just to identify where the leak is, then more to fix it.

I really suspect the leak is in the same place since the soil continues to sink in that area. I think it was a poorly planned piping job that may be to blame, not sure I can get the builder to admit or fix.

Any ideas on what to do? Of course 15 degree weather in Dallas in not going to help much the next 2-3 days. Looks like a few other Southern folks are facing extreme temperatures the next few days as the anti-Gore air mass moves south across the country.
 
First thing you need to do is locate exactly where the leak is. The cheapest way to do that is do-it-yourself. If you're pretty certain that the leak is in the vicinity you indicated the best thing you can do is get your shovel out and dig it up. Once you've located the source of the leak, take a photo or two and post back here and some of us will be able to give you good advice about how to fix it correctly.

If it's leaking in the piping you can reach you can seal off the skimmer/return/vacuum/etc lines with plugs to stop the leak until you can get it fixed. If it's a main drain you can place a thin rubber mat over it and it'll suck down around it and stop the leak.
 
Bama, ordinarily I'd agree with plugging the suspect line (s).

However, with 15* temps forecast fro the next few days, I'd leave the lines open so they don't freeze and cause worse damage :cool: This may mean having to add more water so the skimmers don't run dry but, until the possibility of freezing passes, I think it's the best way to handle this.

Wes, once the cold snap has passed and you can get out and re excavate the suspect area, it's the obvious place to start. You may want to review the Leak Detection article in Pool School (here) while waiting for the temps to come back up.

FWIW - we have a pool that needs at least 1 pipe reconnected every year because the pipes are in a wet location and shift every winter :rant:
 
Thanks, I thought I should keep the water moving during this cold spell and now the leak has the yard soaked and losing about an inch every 4-6 hrs vs was only losing 3/4 inch every 24 hrs. Guess I'm screwed since the temp is 25 and I have to keep the pool running.

Talked to builder's rep, said problem most likely in the return line, either the main return or the 3 separate scupper return lines. I had scupper return valves pretty far open and pump was running during the last 24 hrs due to cold weather so I just closed them so only a small stream of water gets through.
If the water leak slows, will have to let it go till monday since they said they did not want to get into the pipes with this temperature due to them being very brittle in cold weather. Forecast is for 50 degrees monday afternoon.

If this doesn't slow the leak, I'll open the scuppers a bit more and reduce the flow of the main return to see if that slows the leaking. Bet I'm not the only person dealing with this problem in the cold.
 
Wes, you're doing things correctly :)

As you're doing, reduce the flow through the suspect line (s) to minimize water loss.

A small bonus from this is that you have the wet ground to show you ~ where the leak is :cool: (though I imagine that it's the same area you were talking about before)

I hope the weather turns sooner than expected so you can address this issue ASAP :goodjob:
 
Re: Anyway to fix a leak in freezing temperatures????

Thanks for the positive comment, I'm feeling rather hopeless right now. It seems like the water is leaking out just as fast regardless of which return I try to keep mostly shut. The pool is loosing a lot of water and the entire back side of my house is soaked and water standing everywhere, soon to be an ice skating rink.

The pressure valve on top of the filter is 20 PSI vs usually at 14 and if I open everything 100% or try to shut one side, the pressure stays at 20 - not sure what that is telling me. Guessing the combination of the weather, water and constant pumping I probably have a few broken pipes by now. At this rate it'll be $500 for water and $500 for repair by Monday if I can make it that long.
I'm wondering if I should call a leak detector company and get them out ASAP on Monday rather than let the builder just send a few guys with shovels to attack the most obvious area that the leak is flooding from, which seems to be about a foot off my deck on the way to the equipment pad where the rats nest of pipes are?

I'll go out in another hour or so to make sure the auto leveler is keeping up with the water demand, might have to set the alarm at 2AM to recheck. WHat a PITA this has become.
 
Cheapest way? The cheapest way is simple but depending on your pool setup could be really ugly. When we come across a customer with a broken skimmer or return line that can't afford the expense of costly digging we simply plumb the skimmer or return above the ground, using either pvc of flex pvc run the line above the ground and over the edge of the pool, for skimmers and above ground skimmer can be mounted in the corner of the pool. You may also want to use pipe hangers to keep the new line stationary to the ground. Definitely the cheapest and it will work just fine, just usually really ugly unless most of the pipe can be hidden under a diving board or in shrubbery etc.
 
Kevin and Wes, I thought the probable leak area was known and a little shovel work would expose the leaking pipe :oops:

Wes, if you feel you need to call the pool dudes in, by all means, do so - I had hoped to save you the expense and allow you to make the repair yourself.

I've done the 'over the deck' method that Keven suggested a number of times when the pool owner simply couldn't afford excavating and repairing underground pipe leaks :( :)
 
I appreciate all your comments, I guess cheap was not really what I was looking for. My leak turned into a flood and was compounded by the 15 degree weather. I've just winterized my pool since the autoleveler could no longer keep up with the water loss and will get the pool company out here on Tuesday when it's in the 50's to fix it. Appears to be coming from a spot about a foot off the patio in the direction of the equipment pad which is at the end of the house.

Same area that I had a leak 2 years ago (pool was only 2 years old then), maybe this will be an every 2 year occurance?

I'll try to get a picture when they unearth the area and post it so you can see what the rat's nest of plumbing looks like under there.

Stay warm.
 
Pictures of former repair

Thankfully I found some pictures of the old leak and repair from 2 years ago. The leak appears to be in this same location and I won't be digging it up until Tuesday afternoon.

I was reading my builders design guidelines and they state that they use 45 degree angles wherever they can. It looks that was the case with the original layout but not with the repair.

Can anyone comment on the repair? Assuming the leak is at this repair from 2 years ago, do I have a valid claim that the builder should fix it at no charge?

Any ideas on how it should be fixed to prevent this from happening again? It's 2" sched 40 PVC according to the plans.

Thanks![attachment=1:2uaid0ol]Pool Leak 2 Mar 07 web.jpg[/attachment:2uaid0ol][attachment=0:2uaid0ol]Pool repair 4 Mar 07 web.jpg[/attachment:2uaid0ol]
 

Attachments

  • Pool leak location Mar 07 web.jpg
    Pool leak location Mar 07 web.jpg
    125.7 KB · Views: 277
  • Pool Leak 2 Mar 07 web.jpg
    Pool Leak 2 Mar 07 web.jpg
    136.2 KB · Views: 273
  • Pool repair 4 Mar 07 web.jpg
    Pool repair 4 Mar 07 web.jpg
    128.8 KB · Views: 273

Enjoying this content?

Support TFP with a donation.

Give Support
Wes, thanks for the pics :goodjob:

While the original piping called for 45* elbows, the repair you show is pretty much how I would have done it. The reason they went with the 4 90* elbows (2 regular and 2 'street') is because the sockets on the fittings is ~ 1 1/4" deep and you need ~ 10' of rigid pipe exposed to get enough movement in the pipe to allow the connection. The elbows being so close to the pool prevent being able to expose enough pipe, coming from the pool, to make using another 45* feasible :(

I can't gainsay the way they made the repair, though I'd have kept the 90*s closer to horizontal to keep it from possibly sticking up into the frostline - however, where you are the frostline is probably ~ 2", and only that deep for years like this one :)

I hope you'll get this repaired quickly and keep us informed as to the problem and the fix! :-D
 
Ted,
Thanks for the reply. When looking at the joint on the left, it looks like there is another coupler about 1/2 inch from the first 90 degree elbow that needs to be removed to get back to a longer piece of 2" PVC, correct?

Also, after the repair, what is the best method to refill the hole and provide adequate support to the repaired PVC? Do I put plastic under the pipes and use sand to cover the pipes and then fill the rest with dirt or just fill it back up with the chunky clay?

If I was going to DIY, I assume I need to:

1) buy plugs for the returns in the pool to stop the leaking (pool is still going down about 1"/day since I shut it down),
2) dig the hole big enough to have lots of room around the break(s),
3) cut out the break using pliar type pvc cutters or a cutter I have for the sprinkler system that looks like a piece of wire (?),
4) clean and prime the joints, figure how to remake the connection and fit everything together and glue it and let it sit 2+ hrs to allow the glue time to set up? Thought I could take a space heater and put it near the hole to warm the area up for an hour or so?
5) hook everything back up, turn on the pool and make sure it doesn't leak
6) fill the hole back up with dirt.

Might be easier to call the builder and pay to have this done, not sure how many breaks I might be looking at plus not the easiest job in the 50 degree weather with wet soil.

Does that sound about right? Probably $350 or so with the builder fixing it again.
 
If the location is the same as the one in the photos (kudos for stil having those). I'd definitely tackle that repair myself. However, I'll never fault someone for calling in the experts!
Wes45 said:
1) buy plugs for the returns in the pool to stop the leaking (pool is still going down about 1"/day since I shut it down),
2) dig the hole big enough to have lots of room around the break(s),
3) cut out the break using pliar type pvc cutters or a cutter I have for the sprinkler system that looks like a piece of wire (?),
4) clean and prime the joints, figure how to remake the connection and fit everything together and glue it and let it sit 2+ hrs to allow the glue time to set up? Thought I could take a space heater and put it near the hole to warm the area up for an hour or so?
5) hook everything back up, turn on the pool and make sure it doesn't leak
6) fill the hole back up with dirt.
(1) You're right about having to plug all the "below the water level" ports. How long before it get below the port(s) if you were to let it keep leaking?
(2) Dig the hole bigger than you think you'll need. Also dig it deeper than you need. That'll help keep the water away from the piping so you can clean it.
(3) The cable cutter is ok but the plier cutter is better in this situation.
(4) At 50º you're going to need to let it cure for more than 2 hours. Be sure to read the label on the cement container. I recommend using either All Purpose or Rain-Or-Shine cement. Rain-Or-Shine is very fast setting and is for use in wet locations.
(5) I'd let it run for a few hours before covering it back up.
(6) When refilling the hole, break up the clods and fill a few inches at a time and tamp between fills. Be sure too fill and tamp well under the pipes as you begin. That will support the pipes and hopefully prevent this problem in the future.

From looking at the attached photos. You might get lucky. It looks like they may not have glued the pipe between the 90's on at least one end. Good luck whichever way you decide to go.
 
Bama,
Thanks for the suggestions, especially on digging deeper. Pool builder is very backed up this morning as you can imagine with lots of pools with freeze problems but even though I called about my slow leak last Monday, I am being pushed to the back of the list. I guess I have always been a bit of a problem customer since I challenge them on whatever BS they throw my way.

I might try to get into it this afternoon, temp supposed to be mid-50's. Water might be down to the "below the water level ports" by then and really don't want to have to block them off unless absolutely necessary.

Maybe I get luck on the break, it does look like there is no blue around all the joints in the picture so maybe something came loose there. I'll post some pictures when I get it opened up.
 
Problem bigger than a DIY repair???

Finally got to digging my leak and found the crack in a pipe that is the adjacent to the pipe that broke 2 years ago. It's a 1 1/2 " pipe. Can anyone comment on the rest of the nightmare in this hole?

The cracked pipe is tightly wedged under this mess and I know it needs a lot more digging but not sure if it's still a DIY job.

Does this look like standard underground routing? I have a fairly straight forward pool, no spa, 5 return jets, 2 skimmer baskets.

I hate to call the builder back, only reason would be to try to get him to assume some blame and reduce the repair bill.

Appreciate any feedback![attachment=2:2tula28u]pool pipes 1.jpg[/attachment:2tula28u][attachment=1:2tula28u]Pool pipes 2.jpg[/attachment:2tula28u][attachment=0:2tula28u]New crack in PVC.jpg[/attachment:2tula28u]
 

Attachments

  • pool pipes 1.jpg
    pool pipes 1.jpg
    132 KB · Views: 276
  • Pool pipes 2.jpg
    Pool pipes 2.jpg
    109 KB · Views: 272
  • New crack in PVC.jpg
    New crack in PVC.jpg
    109 KB · Views: 276
Thanks again for the pics!

The line you point to looks to be 2" and, if the leak is directly under the arrow, it's the 45* that failed :evil:

You said previously that the install called for 45*s (rather than 90*s), but Mr. P.B. used a bunch of 90s to get up and over the other pipes :? He also 'jogged' the pipes around, using multiple 45s instead of just a single 90 - sounds to me like the 45 stuff he claimed would reduce head was BS :twisted:

I don't know if you have any recourse with him - but that is NOT the plumbing I'd expect to see from a builder who claims to use 45s over 90s to reduce the total dynamic head!! :hammer:

As you dig a little more, keep us posted and the pics coming - we'll be able to offer a good way to correct the link.


Also, any chance of identifying what pipe is which?
 
Thanks for the comments Ted, I'm about ready to call somebody to fix this but really don't trust anyone - especially the PB. Calling for rain here the next 2 days so next chance to dig would be Saturday.

I wish I knew what pipe is what, like an idiot I never took pictures before they covered everything up when the pool was built. It's hard to see in the picture but there is a rusted piece of something that looks like conduit at the top of the picture that runs across the hole, too.

Also, the 90 degree joint on the repair from 2 years ago has 1 1/2" on it, so I assume that means it's a 1 1/2" diameter piece of sched 40, too?

So what's the vote, should I keep on digging? :shock:
 
That is a mess! You weren't exagerating at all about that!

My vote is to keep digging, but I'm not the one doing the digging and you know your capabilities (and tolerance) more than anyone here. If you're overwhelmled by what you see it may be better on your nerves to call for help. But, if you're handy and capable of doing it your self, you'll save some coin.

Whichever way you decide to go we're here and glad to help. It's not a huge job, it's just going to take a big hole and some getting dirty to fix it.
 
Bama Rambler said:
That is a mess! You weren't exagerating at all about that!

My vote is to keep digging, but I'm not the one doing the digging and you know your capabilities (and tolerance) more than anyone here. If you're overwhelmled by what you see it may be better on your nerves to call for help. But, if you're handy and capable of doing it your self, you'll save some coin.

Whichever way you decide to go we're here and glad to help. It's not a huge job, it's just going to take a big hole and some getting dirty to fix it.

GREAT answer Bama!

Wes, what's your tolerance for keeping with this on your own (plus our advice)? You'll certainly save $$$ doing it yourself and, with the help you get here - you'll know the job is done correctly!

FWIT - pool repairs like this are usually done on a "time and parts" basis. As such, you've already cut the 'time' down considerably by digging the hole yourself (and tell them you'll also do the backfilling) :goodjob:
 
Ted, With you and Bama I might try it myself, but the PB said he would come by with his plumber to talk about it. I'm guessing it would be a $300-$500 job and given the fact that they are the ones that created this mess, I might like to do it myself and know it's done right.

I'm guessing these 2 lines under the mess 'o pipes originate to the left and are Y'd off the main 2" return line to the pool (not sure the correct terminology). I have 5 jets that return the water to the pool so guessing one of these 1 1/2" lines feed 2 of the jets and the other 1 1/2" line feeds the other 3 jets. Does that sound reasonable?

Guessing that one option is to reroute the broken pipe about 6 " lower than it is to get it out from under the weight of the mess 'o pipes and if I do that then I should do the same to the line that was fixed 2 years ago. Otherwise, I could try to get back to the 2" main before the Y and maybe run the 2" line under the mess and then Y it in the area of the break? I've never had to do anything like this so not really sure on how it should be properly done.

I guess I'll need to get more digging done and more pictures before making those decisions. Supposed to be 65 and sunny on Sunday but I'd rather be riding my motorcycle then. My back is killing me from just digging this hole and I'm probably only 25% done.
 

Enjoying this content?

Support TFP with a donation.

Give Support
Thread Status
Hello , This thread has been inactive for over 60 days. New postings here are unlikely to be seen or responded to by other members. For better visibility, consider Starting A New Thread.