Handle is usually removable. You just remove it, install the hairnet. Then reinstall the handle. You may need to poke a small hole through the hairnet with the end of the handle but that doesn't seem to cause any issue with debris collection. The elastic on the hairnet does a good job holding it in place.
Tips and Tricks
- Thread starter JohnT
- Start date
You are using an out of date browser. It may not display this or other websites correctly.
You should upgrade or use an alternative browser.
You should upgrade or use an alternative browser.
Re: A couple of tips I thought everybody knew. Anybody got some
James, they are talking about using a small net you would use for your fish aquarium. You can buy them in the pet section of Walmart. Most of the time they are green. They come in different sizes. If your skimmer is in the middle of your decking you would not want to leave it laying by it but if your skimmer is on the back side of the pool or such then that would work.
Do you have a picture or video on how you do this? I can't seem to visualize this in my head
James, they are talking about using a small net you would use for your fish aquarium. You can buy them in the pet section of Walmart. Most of the time they are green. They come in different sizes. If your skimmer is in the middle of your decking you would not want to leave it laying by it but if your skimmer is on the back side of the pool or such then that would work.
Tips from using some of these tips:
-remove hair net before adding DE, a mistake one will only do once... net caught all the de and had to use finger to clean it all out since I didnt want to tear the net or dump the de out. Took like ten minutes to get the de through, but was a good lesson on how de works inside the filter since I got to see how it clumps to make a thick layer on the net.
- tried using trash can to catch backwash water while using de sock, thinking i could reuse the water in the pool. Fine de went right through sock and made it milky, 32 gallon trash can wasn't nearly enough capacity and was too flimbsy to tilt or move afterward. Will use 50 gallon plastic drums next time. My drain system is 100' away and I will need to trench to the pool before I can backwash into drain. So hauling drums will have to work for now. Salt water pool so I dont want to dump salt into yard.
- Jun 12, 2011
- 3,761
- Pool Size
- 19500
- Surface
- Plaster
- Chlorine
- Salt Water Generator
- SWG Type
- Pureline Crystal Pure 60,000
Alexa Pool Control System
I just spent the last few days completing my Alexa controlled pool and patio system. I can now turn on or off all of the following devices, either by voice command using Alexa, or via an iPhone app from any location:
Spa pump
Heater
Spa light
Pool light
Patio light
Barbecue light.
The total cost of the project was just under $200. It took me about two days to finish, although due to having to order and wait for some items, it was spread over a weeks time. Some basic electrical skills are needed, but nothing too complicated.
Due to the limited budget, I decided to forgo a WiFi hub based system. A hub system would provide better, and more dependable and robust coverage for the devices, albeit at a bit higher cost.
My system has standard deco type wall switches in my pool panel which operate the pool and spa lights.
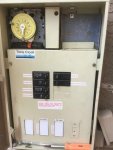
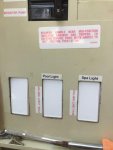
Shopping for hubless standard 110 smart switches brings up a number to choose from, with an average price point right around $25 each. For no particular reason, I chose these:
Smart Switch by MartinJerry | Compatible with Alexa, Smart Home Devices Works with Google Home, No Hub required, Easy installation and App control as Smart Switch On/Off/Timing (2 Pack) - - Amazon.com
Since I was using that brand for wall switches, I elected to stay with the same brand (which also means using the same iPhone app) for my plug-in patio rope lights and barbecue lights.
View attachment 84247
https://www.amazon.com/gp/product/B0776WL59D/ref=oh_aui_detailpage_o05_s01?ie=UTF8&psc=1
With the lighting sorted out, I turned my attention to control of my attached spa. The pump and heater were both wired on a single 220 circuit. I always thought that was a problem since the heater should be turned off before the pump shuts down. In the past that was impossible without a trip to the heater to manually shut it off. I decided that the heater should be on a separate switch, but wired so that the pump must be on for the switch to be active. Being a cheapskate, I decided on re wiring the heater to 110 operation and just adding a third 110v smart switch. I could have left it 220 but that would require a second 220 switch. Re wiring was not a big problem, the manual for the heater had wiring instructions for 220 or 110v. I just pulled the power from one leg of the 220v circuit I would later run to the pump.
Control of the spa pump itself required a 220v DPST smart switch. There seem to be very limited choices in this area. The only hubless 220 switch that I could find that met my needs and my limited budget was this:
https://www.amazon.com/gp/product/B00ZYLTJ16/ref=oh_aui_detailpage_o04_s01?ie=UTF8&psc=1
I had to add one of these:
https://www.amazon.com/gp/product/B0756N989G/ref=oh_aui_detailpage_o04_s00?ie=UTF8&psc=1
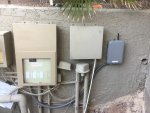
plus some additional items from the local hardware store to mount and connect the WiOn 220v control box.
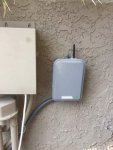
Since the WiOn 220v control and the smart switches use different iPhone apps, it took a bit to get everything online and then to connect it with Alexa Smart Home.
It was all working, but I found that using a hubless system put a bit of strain on the limits of my home WiFi system. Rather than invest in a range booster or a more robust router, I decided to try a more economical approach (did I mention, I’m cheap?) . Since the system seemed very dependable when I was working on it, with the metal door on the panel open, I thought of an alternate approach. For $10, I purchased a 12x12 piece of lexan! Then cut a 10x10 opening in the door immediately above the switches and installed the lexan window.
The WiFi switches now seem very dependable and it all works.
I even grouped all the lights under the command “Patio”
So, now Alexa can be told to turn on (or off)
The Booster Pump
The Heater
The Pool Light
The Spa Light
The Rope Lights
The Barbecue Light
or, I can say “turn on the Patio Lights”, which is all the lights.
Actual total cost for the project was $191.24. And about two days work.
If anyone wants to do something similar and has any questions, just post them or PM me.
I just spent the last few days completing my Alexa controlled pool and patio system. I can now turn on or off all of the following devices, either by voice command using Alexa, or via an iPhone app from any location:
Spa pump
Heater
Spa light
Pool light
Patio light
Barbecue light.
The total cost of the project was just under $200. It took me about two days to finish, although due to having to order and wait for some items, it was spread over a weeks time. Some basic electrical skills are needed, but nothing too complicated.
Due to the limited budget, I decided to forgo a WiFi hub based system. A hub system would provide better, and more dependable and robust coverage for the devices, albeit at a bit higher cost.
My system has standard deco type wall switches in my pool panel which operate the pool and spa lights.


Shopping for hubless standard 110 smart switches brings up a number to choose from, with an average price point right around $25 each. For no particular reason, I chose these:
Smart Switch by MartinJerry | Compatible with Alexa, Smart Home Devices Works with Google Home, No Hub required, Easy installation and App control as Smart Switch On/Off/Timing (2 Pack) - - Amazon.com
Since I was using that brand for wall switches, I elected to stay with the same brand (which also means using the same iPhone app) for my plug-in patio rope lights and barbecue lights.
View attachment 84247
https://www.amazon.com/gp/product/B0776WL59D/ref=oh_aui_detailpage_o05_s01?ie=UTF8&psc=1
With the lighting sorted out, I turned my attention to control of my attached spa. The pump and heater were both wired on a single 220 circuit. I always thought that was a problem since the heater should be turned off before the pump shuts down. In the past that was impossible without a trip to the heater to manually shut it off. I decided that the heater should be on a separate switch, but wired so that the pump must be on for the switch to be active. Being a cheapskate, I decided on re wiring the heater to 110 operation and just adding a third 110v smart switch. I could have left it 220 but that would require a second 220 switch. Re wiring was not a big problem, the manual for the heater had wiring instructions for 220 or 110v. I just pulled the power from one leg of the 220v circuit I would later run to the pump.
Control of the spa pump itself required a 220v DPST smart switch. There seem to be very limited choices in this area. The only hubless 220 switch that I could find that met my needs and my limited budget was this:
https://www.amazon.com/gp/product/B00ZYLTJ16/ref=oh_aui_detailpage_o04_s01?ie=UTF8&psc=1
I had to add one of these:
https://www.amazon.com/gp/product/B0756N989G/ref=oh_aui_detailpage_o04_s00?ie=UTF8&psc=1
plus some additional items from the local hardware store to mount and connect the WiOn 220v control box.

Since the WiOn 220v control and the smart switches use different iPhone apps, it took a bit to get everything online and then to connect it with Alexa Smart Home.
It was all working, but I found that using a hubless system put a bit of strain on the limits of my home WiFi system. Rather than invest in a range booster or a more robust router, I decided to try a more economical approach (did I mention, I’m cheap?) . Since the system seemed very dependable when I was working on it, with the metal door on the panel open, I thought of an alternate approach. For $10, I purchased a 12x12 piece of lexan! Then cut a 10x10 opening in the door immediately above the switches and installed the lexan window.

The WiFi switches now seem very dependable and it all works.
I even grouped all the lights under the command “Patio”
So, now Alexa can be told to turn on (or off)
The Booster Pump
The Heater
The Pool Light
The Spa Light
The Rope Lights
The Barbecue Light
or, I can say “turn on the Patio Lights”, which is all the lights.
Actual total cost for the project was $191.24. And about two days work.
If anyone wants to do something similar and has any questions, just post them or PM me.
Last edited:
OrangeAndBlue
Silver Supporter
- Aug 19, 2017
- 128
- Surface
- Plaster
- Chlorine
- Salt Water Generator
- SWG Type
- Hayward Aqua Rite (T-15)
Wobblerlorri
Bronze Supporter
- Apr 16, 2019
- 2,010
- Pool Size
- 4024
- Surface
- Vinyl
- Chlorine
- Liquid Chlorine
Oooooh, I really like that one! (Using a squirt bottle for water samples)
Here's my tip: when you're vacuuming or scrubbing, get in the pool to do it, temp permitting. You get a better angle of attack with the scrub brush and the vac, plus you get to be in the P-O-O-L!
Here's my tip: when you're vacuuming or scrubbing, get in the pool to do it, temp permitting. You get a better angle of attack with the scrub brush and the vac, plus you get to be in the P-O-O-L!
andrew_guam
Member
Thanks for the great thread, I learned a lot and was also glad to see others using some of the same tricks as me. I had been wondering what the rock left in the skimmer by the previous owner was for (prevent it from floating and/or hold down filter sock), and now have a reason to buy hair nets!
One tip I haven't seen mentioned (or done yet myself) would be to purchase extra speed stir pills so that you can leave one in each test tube.
One tip I haven't seen mentioned (or done yet myself) would be to purchase extra speed stir pills so that you can leave one in each test tube.
Lskul60
Well-known member
Here's a trick I've done with CYA. It's pretty much an alternative to the sock method.
put some CYA in the skimmer, but not actually in the basket itself. Put it on the "shelf" right above the top of the basket.
right here
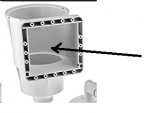
It will sit there, without getting sucked into the skimmer and it will slowly dissipate.
put some CYA in the skimmer, but not actually in the basket itself. Put it on the "shelf" right above the top of the basket.
right here

It will sit there, without getting sucked into the skimmer and it will slowly dissipate.
Last edited:
If you do want to put your CYA in the skimmer you should still put it in a sock. Make sure it does not block the flow of water. Most skimmers do not have a big enough "shelf" to put a big amount of CYA and the pull of the pump will end up pulling it into the filter.
Also if you do put it in the skimmer you need to keep the pump running until it is all dissolved.
Kim
Also if you do put it in the skimmer you need to keep the pump running until it is all dissolved.
Kim

- Jun 12, 2011
- 3,761
- Pool Size
- 19500
- Surface
- Plaster
- Chlorine
- Salt Water Generator
- SWG Type
- Pureline Crystal Pure 60,000
See my post #256 above, with skimmer angel you can’t use hair nets. The handle I posted just unscrews to allow you to put the hair net in.
One thing I just discovered when installing/removing my mesh cover was to add some WD40 or similar to removal pipe tool. This will make the springs glide down onto floor anchors way easier. Not sure if anyone has mentioned this.
Rattus Suffocatus
Silver Supporter
- Jun 5, 2019
- 1,657
- Pool Size
- 14000
- Surface
- Plaster
- Chlorine
- Salt Water Generator
- SWG Type
- CircuPool Universal40
So, if this is useful to any of you, send a box of dog treats to an obnoxious Australian Shepherd puppy named Luna in Arizona.
The dog decided on a day that was windy enough to flap up the solar cover to chew and tug it. Being a "retentive" engineer, the new result by the floating thermometer is an irregular place for it not to float through. My bigger fear is to have it continue to tear.
I did research here and elsewhere on how to mend a solar cover, and except for mixed reviews on "Gorilla Tape" and "FlexSeal" tape it looks like you are more or less SOL.
For chemical resistance, it appears that the solar covers are UV treated Low Density Polyethylene. There isn't a glue in the world that sticks to the them nicely.
So recalling that LDPE melts at a relatively low 240°F, as an experiment, I used a small nozzle I have on a surface mount soldering rework station. Overlapping two pieces, I heated both together until they started to melt and then I pinched them closed with my fingers (yes, uncomfortable). I kept doing that until I had about an inch and a half overlap.
Needless to say if I start to tug the sample apart, I start stretching the non mended part.
There are small handheld heat guns with a similar nozzle size for craft projects that I might try to buy to have a handheld method.. But.. This is about the only way I can see to actually make a permanent mend in a solar cover.
I suspect that once the material has deteriorated the usefulness of this might be limited, though. And, yes you pop most of the bubbles in the process.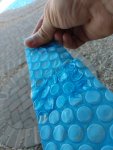

AusPhil
0
I recently bought a small squeeze bottle with a pointy nozzle (like a ketchup bottle in a diner, but smaller and clear). I fill it with pool water then squeeze the water into the test tube until it hits the 10ml or 25 ml exactly. Then I put the little magnetic spinner in (I'm using a SpeedStir) and I'm ready to test. The bottle holds 1 cup of water which is plenty for the 5 or 6 tests I do in a session. I got it at a kitchen supply store. Great timesaver!
In Australia the Clear Choice Labs testing kits come with a water collecting bottle with an angled pointy nozzle to squirt the water into the test tubes.
My tip is to buy a cheap digital scale jewelers type say 200g version, typically these have 0.1 or 0.01 gms resolution and just weigh your water for each test.
Even really salty water is not far from a 1.0 SG value so that a 10ml sample = 10gms, 25ml sample is 25gms.
I have separate test tubes for each test, the speedstir magnets stay in the test tube. I just drop each one on the scale, zero out the tare weight and add water to 10 or 25gm as required.
BMeeley
Bronze Supporter
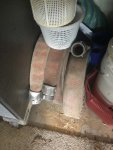
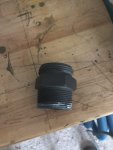
Ask at your local fire station if they have any 1.5" hose they are retiring. I got three 50' lengths and ordered an adapter for the 2 different thread standards. No more tearing, cheap thin vinyl hoses. Could be a better option for you than trenching, unless you already need to address drainage issues.Will use 50 gallon plastic drums next time. My drain system is 100' away and I will need to trench to the pool before I can backwash into drain. So hauling drums will have to work for now. Salt water pool so I dont want to dump salt into yard.
303Michael
Active member
- Nov 12, 2017
- 11,833
- Pool Size
- 12300
- Surface
- Plaster
- Chlorine
- Salt Water Generator
- SWG Type
- Pentair Intellichlor IC-40
Leslie's (pool store) will give you the perfect water sampling squirt bottle for free. You can use it to precisely fill your test vials. Small-ish (for easy storage), but holds enough water to run all the tests.
This time of year, my favorite "tip/trick" is my PVC sample pipe. Sample water should be taken from well below the surface. No fun this time of year to dip your whole arm into 45° water! I use this (24" x 3/4" PVC, with caps on each end, each with 3/8" hole):
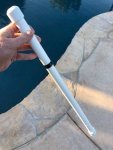
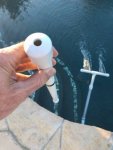
The trick is to hold your thumb over the hole before you slip it into the water, then release your thumb when the other end is at depth, which ensures you're getting water only from below. I go twice. The first time to rinse both the pipe and the sample bottle, the second time to get the sample to test.
(Ignore the PVC "T", that's an unrelated tip for another day.)
This time of year, my favorite "tip/trick" is my PVC sample pipe. Sample water should be taken from well below the surface. No fun this time of year to dip your whole arm into 45° water! I use this (24" x 3/4" PVC, with caps on each end, each with 3/8" hole):


The trick is to hold your thumb over the hole before you slip it into the water, then release your thumb when the other end is at depth, which ensures you're getting water only from below. I go twice. The first time to rinse both the pipe and the sample bottle, the second time to get the sample to test.
(Ignore the PVC "T", that's an unrelated tip for another day.)
Last edited:
For measuring out the typical 10 mL sample, I found that these 10 mL syringes my wife always brought home on accident (she's a nurse) work great. They were graduated up to 10 mL. I usually fill and empty to rinse, then fill, tip upright to put air bubble at top and press until the rubber lines up with the 10 mL mark.
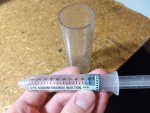
Then I simply empty it into my speedstir container. Nothing could be quicker for measuring out the sample size, except perhaps the Taylor quick measure thingy. As you can see, it measures a perfect 10 mL, every time.
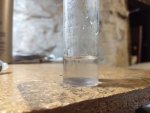

Then I simply empty it into my speedstir container. Nothing could be quicker for measuring out the sample size, except perhaps the Taylor quick measure thingy. As you can see, it measures a perfect 10 mL, every time.

- Jul 16, 2019
- 686
- Pool Size
- 20000
- Surface
- Vinyl
- Chlorine
- Salt Water Generator
- SWG Type
- Hayward Turbo Cell (T-CELL-5)
DUH - brilliant! I work in the veterinary field and always have random size syringes that collect in my pockets, purse, etc. Excellent idea!For measuring out the typical 10 mL sample, I found that these 10 mL syringes my wife always brought home on accident (she's a nurse) work great. They were graduated up to 10 mL. I usually fill and empty to rinse, then fill, tip upright to put air bubble at top and press until the rubber lines up with the 10 mL mark.
View attachment 124561
Then I simply empty it into my speedstir container. Nothing could be quicker for measuring out the sample size, except perhaps the Taylor quick measure thingy. As you can see, it measures a perfect 10 mL, every time.
View attachment 124562
DUH - brilliant! I work in the veterinary field and always have random size syringes that collect in my pockets, purse, etc. Excellent idea!

