Advice needed: Check valve cracked, solution for replacing?

May 1, 2016
16
Flower mound, tx
Sorry for the odd title, been mulling it for 10 minutes now and can't figure out how to be most descriptive. So here's the story:

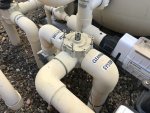
Bought the house almost two years ago, this winter I was stupid and didn't leave one of the manual valves open to a return line and the check valve body busted (bottom side of the red box below). The previous owner must have just had these lines replaced when I moved in, but he left me zero room to remove that check valve without taking out the entire "yellow box" area...as far as I can tell. Are there any pool/plumbing tricks to not having to rip it all out, which would mean not just a new check valve but also a new 3-port? The check valve butts right to the 90 on top which goes right into the 3-port which on its left goes right into something I still don't know what it is (gray threaded piece, may be freeze/pressure guard??).
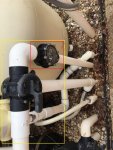
fittings.jpg

Second question, is that check valve placed that high for a reason? That is a return I believe to the spa eyeballs, on the opposite side (to the left) is a return to the spa floor which has a check valve at the same height.
 
1.
If the check valve was not properly glued to the PVC pipe, there is the slimmest possibility that you could carefully cut it off the pipe (like, with a Dremel) and peal off the remaining pieces, but that is a long shot. A proper PVC connection actually fuses the two materials.

2.
There are tools that can ream the inside of a fitting. So you'd cut the pipe just above the check valve, and ream out the elbow, then install the new one (and yes, lower this time). But some of those tools might be more expensive than the three-way.

3.
Some three-way valve fittings are designed so that a pipe can go inside, or a fitting can go outside (or is it pipe that goes on the outside? not sure). If that is the case with yours, you might be able to cut right between the the three-way valve and the elbow. You'd leave the remaining pipe in the valve. Then use a larger elbow to glue onto the outside of the valve's fitting. Then use a reducer on the other side of the elbow to get back down to the size of pipe that'll go into the check valve. The larger elbow will have a larger radius, so you might have to fudge a bit to get the pieces and pipes to align, but since the elbow will be slipping over the three-way, it could align just right. You might be able to find an elbow that has the larger size on one side, and the smaller size on the other, not sure if they make that in that larger size range. If I have this wrong, and it's pipe that slips over a three-way's fitting, you can still make this idea work with the right PVC pieces.

That's all I got.

PVC pipe and fittings and components should ideally be assembled so that you can cut any of it out and put it back together with couplers. That, obviously, is not always accomplished. But you can do it that way moving forward...
 
I just swiped this image from another thread (similar replacement issue). Was that OK? Shows what I was describing. Pipes slipping inside a valve, and elbow slipping over a valve:

JAMpBEpl.jpg

That other thread has a post that describes cutting the outer piece (the check valve, in your case) and heating the outer piece off the pipe. He says he does it, but, again, if it's a proper joint and the pieces are fused together, I'm not sure how that works...
 
I just swiped this image from another thread (similar replacement issue). Was that OK? Shows what I was describing. Pipes slipping inside a valve, and elbow slipping over a valve:

View attachment 73059

That other thread has a post that describes cutting the outer piece (the check valve, in your case) and heating the outer piece off the pipe. He says he does it, but, again, if it's a proper joint and the pieces are fused together, I'm not sure how that works...

Thanks for both your replies, and I'm watching that other thread you got this picture from as well since he will have the same problem I have. After looking at my system I think I'm going to just replumb the entire return side with unions everywhere. The guy before me has slip connectors and junk all over the place. Luckily where this break is at still leaves my pump operable while I order parts.

My larger question now is if my check valves need to be at equal height. If not then I can replace this side right now and then the other side at a later date. If they do need to be equal height then I'll redo the entire return side and raise things about 4" to give me room to get a union between my check valve and the 90-elbow going back to the valve.
 
There is a hydraulics expert that lives here. Maybe he'll check in, or someone can ping him. But I can't imagine why those two check valves would need to be level. I would guess either check valve could be located anywhere within the length of their respective pipe. A check valve is placed between two things for various reasons, but where it is located between those two things shouldn't matter.

I almost chimed in on the other thread. But I'll comment here. This is just instinct, not based on actual trial and error, but the unions seem like overkill, especially in your case, where you have plenty of room for couplers. Couplers glue in, fuse in. If properly done, they are pretty tough and virtually fail-proof. A union has threads and O-rings and moving parts, etc. Unless you know you have to get at something regularly (like a SWG every five years or so), I wouldn't use a union. You're just adding in another set of things that can fail. And adding expense. Yes, one could put unions between everything, but at some point there is a diminishing return...

Then there's the ol' adage "If it a'int broke, don't fix it."


That makes sense too. This house has had nothing but issues with the sprinklers and pool since I moved in..bought someone else's headaches :)

I have always been hesitant to use unions as well for the reasons you listed, more leak points. I'd just love to be able to swap out parts without having to re-engineer the entire system. I'll reconsider using so many of them, the diagram I've drawn up for my parts list has quite a few as I wanted to isolate every valve and check valve with a union. Probably would air-leak myself to death doing that.

Thanks again for your help and guidance.
 
I think cracking a valve body like that is a fluke thing. Use unions where they make sense, use couplers elsewhere else. I don't have a union to study, but I gotta think maybe the flow through a coupler is less affected than flow through a union. It'd be by a tiny amount if any, but if you can improve flow in a pool system (or not impede unnecessarily), then you should...
 
Ah, I hadn't thought about the through volume! Too many would probably make a difference. yeah, this is a freak accident, that valve isn't automated and I just forgot to crack it back open for when the freeze guard kicked in. Won't do that again (I hope).

Do you know where I can find out if my Compool CVA-24 is compatible with other valves? I am looking at the Jandy 4717 but can't find a search here or using google that lists if the two are compatible. I'm guessing not, but thought I'd ask.
 
Do you know where I can find out if my Compool CVA-24 is compatible with other valves? I am looking at the Jandy 4717 but can't find a search here or using google that lists if the two are compatible. I'm guessing not, but thought I'd ask.

Sorry, no, I wouldn't know. Manufacturer support on Monday, maybe?
 
You can use the Compool actuator on a Jandy valve or vice-versa . The Jandy no. is 4424. You can use a 2-1/2" 90 on the outside of the 3 way valve and on a 2-1/2 x 2" check valve. The check valve placement is usually related to the height of the water in the spa to the height back at the equipment area
 

Enjoying this content?

Support TFP with a donation.

Give Support
Thanks kadavis!

Reclayborn, I has only half right. Looks like you're going to have to be careful with the placement of that check valve.* The good news: there are a few ways to replace your check valve, but you're not going to have to replace that three-way valve. The right-sized elbow over the three-way's fitting will solve it. Then it's up to you how to connect the new check valve to the new elbow.

* I'm not going to be able to wrap my head around the placement of that check valve. If water starts to move the wrong way through that pipe, the valve will prevent that, regardless of where it is in the pipe. But there must be something else going on. Maybe something to do with water seeking its own level. I'd love to understand it better if anyone can explain. And if it is critical how that check valve aligns with the spa water, then Reclayborn will want to understand it, too.
 
The height of the check valve is not important. Anywhere in the line will work.

The difference in height of the spa water surface vs the pool water surface determines the pressure keeping the flapper shut regardless of the placement of the valve.

Ideally, the valve should be horizontal or vertical where the flapper opens upwards so that gravity helps the flapper close.

It can be vertical where the flapper opens downwards because there is a spring that pushes the flapper closed but it's not as secure. The instructions say not to install it vertically with the flapper pointing down.
 
Oh! It’s the check that keeps the spa from seeking the pool’s level. I get it now!

OK, then maybe I guessed right about the check valve location after all.

Great point about the orientation of that valve (mine are all horizontal, whew!). If his is turned the wrong way, it’ll be a tough call as to whether the required plumbing (extra 90s and pipes, etc) to get it turned the better way would be worth the trouble and the slight increase in flow resistance to make it a bit more reliable. How does one make that call?
 
Thanks everyone for the info. I have ordered the Jandy valves and check valves. I ordered enough to replace the entire upper structure in case it comes to that. If I only need the one check and 3-way valve then I'll have the extras for when I need them.
 
You'll need at least one more for the solar. I've seen some solar schematics that used two. My solar just uses one, works fine.
 
Thread Status
Hello , This thread has been inactive for over 60 days. New postings here are unlikely to be seen or responded to by other members. For better visibility, consider Starting A New Thread.