You are good then!! Well done!
I hope you can be there when they shoot the gunite. Every once in a while they will have an idea or concern. It is better you decide what happens.
Kim
I hope you can be there when they shoot the gunite. Every once in a while they will have an idea or concern. It is better you decide what happens.
Kim


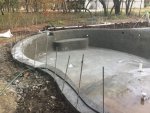
") Looks like they're doing good work and protecting the surrounding area well. Can't wait to see the next stages! Yours is going to be a nice pool.
Looks like they're doing good work and protecting the surrounding area well. Can't wait to see the next stages! Yours is going to be a nice pool.