Travis & Kathy's AGP Installation, Mobile, AL

FlyboyTR

0
LifeTime Supporter
Jul 5, 2009
82
Mobile, AL
Our New Pool...
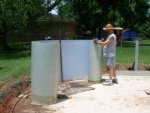
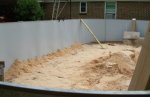
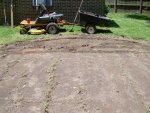
After a lot of searching and reading…we decided to find a used AGP in good condition. A friend of ours decided to sell her house and she had a Solex 16x32 pool. Several days later she was moving the steps and ripped a large hole in the liner bottom along the cove area. I will forego the entertaining story of how the leakage seemed benign at first and within a few minutes she had a raging torrent of water exiting the pool! :shock: After that...she decided to just sell the pool instead of spending the money to replace the liner and the extensive ground work (...goes back to that raging torrent of water...) In our search for a used pool, we had decided we would install a new liner anyway...regardless of the age.[attachment=2:88is4msn]Pool Install 03.JPG[/attachment:88is4msn]
In any case…she decided to sell the pool. It was 3 years old and everything appeared to be in good condition with the exception of the liner. She paid over 4K for it new and had recently had the pump motor rebuilt (although I never could figure out exactly what was done…). We gathered up 7 friends for the following Saturday morning and within 2 hours everything was photographed, broken down, labeled, loaded on two trailers and ready to transport. An hour later is was all unloaded at our humble abode. We are so blessed to have great friends! :cheers:

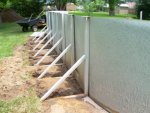
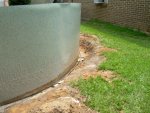
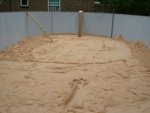
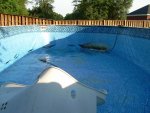
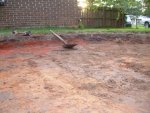
The following two pictures show the pools new home. Just a couple of hours worth of work and Kathy and I will be splashing around like kids. The ground is marked and the initial removal of the sod is shown. [attachment=1:88is4msn]Pool Install 19.JPG[/attachment:88is4msn] [attachment=0:88is4msn]Pool Install 22.JPG[/attachment:88is4msn]
 

Attachments

  • Pool Install 03.JPG
    Pool Install 03.JPG
    231.1 KB · Views: 649
  • Pool Install 19.JPG
    Pool Install 19.JPG
    185 KB · Views: 650
  • Pool Install 22.JPG
    Pool Install 22.JPG
    222.8 KB · Views: 650
The following pictures show the ground prep and installation of the side wall buttresses. Kathy and I did this over the course of a weekend. "...Honey...it only takes a couple of hours!" :blah: At this point we have the sod removed and used a transit to shoot the grades and find the lowest point. Turns out there is going to be a LOT of ground work before anything else can be done! …removing 8-10” of earth over a large area easily becomes a lot of work.[attachment=2:1thakjfv]Pool Install 27.JPG[/attachment:1thakjfv] [attachment=1:1thakjfv]Pool Install 37.JPG[/attachment:1thakjfv]
 

Attachments

  • Pool Install 27.JPG
    Pool Install 27.JPG
    198.2 KB · Views: 641
  • Pool Install 37.JPG
    Pool Install 37.JPG
    243.1 KB · Views: 638
  • Pool Install 50.JPG
    Pool Install 50.JPG
    242 KB · Views: 635
The first two pictures show the installation of the side wall buttresses. Everything is level (to within 1/4"). :goodjob: 
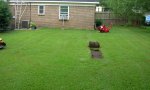
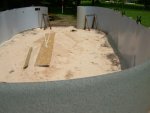
The last picture needs some explanation. Kathy is not angry at the dogs (George & Gracie)…fear not! However…she was actively engaging me in conversation regarding my “couple of hours” :?: estimation regarding the amount of work required for the pool installation.:rant: …needless to say…she has a way of getting my attention!

[attachment=2:33j27gea]Pool Install 53.JPG[/attachment:33j27gea] [attachment=1:33j27gea]Pool Install 65.JPG[/attachment:33j27gea]
Thankfully for us…everyday always ends well. :cheers: …the doctor said the hatchet wounds would be healed in a couple of weeks! :shock:[attachment=0:33j27gea]Pool Install 72.JPG[/attachment:33j27gea]
 

Attachments

  • Pool Install 53.JPG
    Pool Install 53.JPG
    224.3 KB · Views: 632
  • Pool Install 65.JPG
    Pool Install 65.JPG
    222.2 KB · Views: 631
  • Pool Install 72.JPG
    Pool Install 72.JPG
    230.7 KB · Views: 631
Those above ground pools are a lot of hard work. I installed mine pretty much on my own after I got the walls in and had my two kids, under the age of 10 help with the liner install.

I spent 3 weeks, on my own, on the ground prep alone. :shock: My dog decided after I had laid the sand that she would rip through it. After a nice talk with her, she absolutely refused to go on that side of the house until the pool was done. I couldn't even get her to come over while I was working, she didn't want to disturb anything! :mrgreen:

You certainly have your work cut out for you! It's always well worth it to do it yourself in my opinion. It took me 4 days from tracks to wall to liner to fill up to complete mine. :-D I was sore but the lounging in my beautiful pool was well worth the blisters, sore muscles and money saved by doing it myself. :goodjob:

I'm on to doing my inground here in a couple years so that should be fun! :mrgreen:

Good luck with your build and keep us updated! We always get very excited here at TFP watching a good build! :cheers:
 
Sounds like you and Kathy found a sweet deal. :-D

We enjoy following builds and installs and appreciate all the pix - even the one with Kathy as supervisor :shock: :mrgreen:

Good luck and keep us posted.


(btw, if we only lived closer, DH would be right over trying to get some of your beautiful sod)
 
Casey...sounds like you had some built in help! I can see where children would be great for positioning the liner. Glad the dog is enjoying the pool. I'm just wondering what ours are going to do. I've got to read more about Borox and dogs. When you get started...I hope your in-ground project goes well. I'm not sure I'm ready to tackle another pool project anytime soon. After this...I'm done diggin' for a while! :shock:

Butterfly... We assume we found a good deal. $600 for the pool, pump, filter, wedding cake steps, ladder, skimmer nets, poles, pool cleaner, hoses, chemicals, some spiders and a dead mouse. Hopefully it will be an investment in our leisure future! We are heading outside (now that it is the middle of the day...) :hammer: 
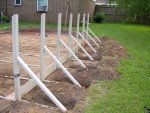
and do some more work. We will continue to take pictures and post them accordingly. We have the liner on order and also plan to install the wall foam kit, foam cove base and a Gorilla liner. I hope all this helps with the longivity of the liner. :?:

Hi Keri! We've been trying to find local folks (close to home) that are doing the BBB. This site has been a great help in helping to get our hot tub water issues taken care of...now we're off to pool land. :cheers:
 
ewww, spiders and a dead mouse :shock:

When you come in for a breather, you may want to do a google search (left bottom of page) on wedding cake steps.

Some folks have had issues with algae growing behind/under them and you may want to read some of the comments before you install the steps.

Good luck with everything! :-D
 
I don't know much about AG pools but, it sounds like you did get a pretty good deal. The steps alone would cost at least half that amount. All pool parts are expensive, IMO. Hoses, poles, nets, cleaners,....all that stuff really adds up. What kind of filter and pump is it? If they are in good working order and adequate, you'll have it made in the shade.
 
I had read about some of the problems folks were having with the wedding cake steps. Thanks for reminding me! :goodjob: I will probably start a new thread under the pump section...but was thinking about installing a 1000-1500 GPH bilge pump, 12 volt powered by a deep cycle marine battery with a small solar panel to keep it charged and a timer to allow it to run a couple of hours each night. I would think that since the water is being exchanged, the potential to sit stagnate under the steps would be greatly reduced. If this works it would be virtually maintenance free and no additional electrical costs.

Considering the cost of a new pool the same size...and all we really needed to add was the liner...we feel like we did good. And yes...I have found that all the parts do add up. ...quickly! :cheers: I don't have the pump and filter info close by but will post it when I can get the data.

We had planned on having an erection party (with the same friends that helped up dismantle the pool) to unfurl the wall and set it in place, sling sand, etc. We talked about it and decided to go ahead and have a two person party and try to get the wall up without help. And in fact... we did get the wall up this afternoon. As soon as we got to the critical spot...thunderstorms rolled through and we had a little wind. It got a little exciting but because of pre-planning everything was ok. I spread 3 yards of sand while Kathy did perimeter work. I will post a few more pictures tomorrow evening. All done for the day. ...cold beer, hot-tub, shower and now ready for our regular gathering at a small Mexican restaurant...I see something green and frozen in my future!

Butterfly... I can do without the spiders :wink: ...but the mouse...Well...I'll just day that it added character...for now! :lol:
 

Enjoying this content?

Support TFP with a donation.

Give Support
We decided to go ahead and erect the walls without the help and assistance of friends. Actually, the wall was a lot easier to unroll and position than it was to pull it and roll it up! I’m not sure who the old guy is with the funny hat…however...it’s solar powered and the fan is nice!

What appears like rust on the outside bottom of the wall is actually red dirt from it’s original installation.
[attachment=2:kip2tfcx]Pool Install-2 01.JPG[/attachment:kip2tfcx]
[attachment=1:kip2tfcx]Pool Install-2 04.JPG[/attachment:kip2tfcx]
[attachment=0:kip2tfcx]Pool Install-2 05.JPG[/attachment:kip2tfcx]
 

Attachments

  • Pool Install-2 01.JPG
    Pool Install-2 01.JPG
    69.5 KB · Views: 433
  • Pool Install-2 04.JPG
    Pool Install-2 04.JPG
    70.8 KB · Views: 434
  • Pool Install-2 05.JPG
    Pool Install-2 05.JPG
    67.8 KB · Views: 434
[attachment=2:3oics8yn]Pool Install-2 06.JPG[/attachment:3oics8yn][attachment=1:3oics8yn]Pool Install-2 07.JPG[/attachment:3oics8yn][attachment=0:3oics8yn]Pool Install-2 09.JPG[/attachment:3oics8yn]
 

Attachments

  • Pool Install-2 06.JPG
    Pool Install-2 06.JPG
    69.9 KB · Views: 433
  • Pool Install-2 07.JPG
    Pool Install-2 07.JPG
    69.4 KB · Views: 432
  • Pool Install-2 09.JPG
    Pool Install-2 09.JPG
    65.9 KB · Views: 431
Walls are up, in place and three yards of sand were spread and partially leveled. Not bad for an afternoon of...time well spent! The next step will be the wall foam, ground cover, foam cove...and then the liner. I plan to let everything sit as is until the liner arrives. The sand piled up against the straight sides are helping to keep the bottom of the wall in place. ...don't want to take any chances on another afternoon thunderstorm blowing through and pushing the walls in! I'll update when we reach the next step. Thanks again for everyone's support and encouragement!

Travis & Kathy :cheers: [attachment=0:1ya2juo9]Pool Install-2 13.JPG[/attachment:1ya2juo9]
 

Attachments

  • Pool Install-2 13.JPG
    Pool Install-2 13.JPG
    68.3 KB · Views: 429
If I could, I'd like to make a suggestion to you about your floor before you put the bottom pad in. If you're adding more sand, I wet mine with the srayer from the hose I pulled my sand with a 4ft level and packed it in with my hands and leveled it. I know, it's a lot of work but let me tell you, I have no foot prints in my pool because of this.

When you go to lay the pad for the floor, wet the sand again so when you walk on it easily, you can walk on the top and it will support your weight. I was very impressed with myself :mrgreen: to figure it out and my pool bottom is as smooth as a baby's bottom because of it! :cool:

Also, the pad becomes very, and I mean very heavy once it get's wet. I didn't spray it with water but it got poured on from a storm the night I laid it and I was so glad I had it in place because the next day, I did the wall foam and the coves and set the liner.

Those are just some things I had done to try and achieve the perfect bottom. I hate lumps, bumps and wrinkles. It's also another reason why I opted out of a professional installation. :goodjob: Keep the pics coming.
 
Casey,
We did the initial leveling with an 8' 2x6 and a 4' level attached to it. It still has a long way to go! Right now we are getting rain everyday...and will for the rest of the week. I'm sure that will help to pack the sand. I was going to build a couple of small tamps (2x6 cut to 12" length with a vertical handle) to help work the sand once we have reached the final stages. I can see where wetting it would help it to pack.

Once the pad is in place...is it advisable to wet the pad (to increase its weight) to prevent it from shifting, etc while positioning the liner? And yes... :!: We want a smooth bottom. :mrgreen:
 
I would say that if it were in place, it wouldn't hurt if it got wet but if it gets wet before it's in it's proper place, it will be a PITA to move! :shock:
 
Casey,
I could see where it would be like trying to handle a wet blanket...not an easy thing to do! I just left the local pool place (it's not the "big" place...just a small operation that tries real hard to answer questions and help folks...rather than trying to sell you everything in the house...) Anyway...He offered me an Aquatrol SWG for $400. Said it was installed and removed prior to use. They were installing a new pool and the folks defaulted on payment...I guess it was reposessed. It is the 18,000 gallon RJ model. I am going to give this some consideration.

Thanks again for your input and help!

Travis :)
 

Enjoying this content?

Support TFP with a donation.

Give Support
Thread Status
Hello , This thread has been inactive for over 60 days. New postings here are unlikely to be seen or responded to by other members. For better visibility, consider Starting A New Thread.