
Austin Owner Build (Raised Pool with Infinity Edge)
- Thread starter GregSS
- Start date
You are using an out of date browser. It may not display this or other websites correctly.
You should upgrade or use an alternative browser.
You should upgrade or use an alternative browser.
looks great
Thanks!
The miter saw trick was a huge time saver. The bottom of my spa looked like it was covered in snow.
I am back on line after the storm and this is the first thread I see! WOW! What an awesome job you did with the piping there. That does look hard! I bet you ARE sore and your hands and arms have to be a mess fitting the pipe in those places  Well done!
Kim
Kim
It has been a while since I last posted so I want to give an update. I finished the rough plumbing (i.e., all of my pipes are sticking out of the pool walls). The plumbing was a pretty big job for one person working after getting home from my regular job and working on the weekends, but I was able to complete what I wanted prior to shotcrete. I also spent a fair amount of time correcting errors in water bowl forms.
One Sunday day I rented a skid steer to move some fill and to move some excavation material that was piled up in my way. The skid steer is a neat little machine--I worked the machine hard for 8 to 10 hours (I also used it to place rocks/gravel in my front yard for landscaping purposes.). I even let my 6 year old son drive the skid steer--he had a blast.
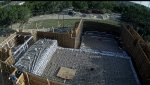
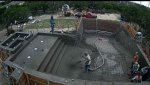
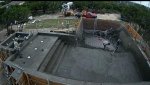
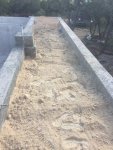
This past Monday, we started shotcrete and the shoot went fine until a car accident caused huge delays in the concrete trucks getting to my house. Even with the delays we were able to shoot 99 yards the first day. On Tuesday, the plan was to finish the shoot. Unfortunately, mother nature was very uncooperative--it poured rain while we were shooting the weir wall and catch basin. The rain made a huge mess of the shotcrete. Today, Wednesday, they were able to finish the shotcrete for this stage of the pool build. Essentially, we shot the pool, one retaining wall, and the floor of the area that will be storage (or a concrete bunker).
The pool took 150 yards--my estimates were WAY off. The retaining wall and storage foundation counted for an additional 30 yards.
All of my cost estimates for this build have been way too low.
The only good news about the rain is that I have not had to water the pool shell. But, I will start watering tomorrow.
Here are a few pictures.
One Sunday day I rented a skid steer to move some fill and to move some excavation material that was piled up in my way. The skid steer is a neat little machine--I worked the machine hard for 8 to 10 hours (I also used it to place rocks/gravel in my front yard for landscaping purposes.). I even let my 6 year old son drive the skid steer--he had a blast.
This past Monday, we started shotcrete and the shoot went fine until a car accident caused huge delays in the concrete trucks getting to my house. Even with the delays we were able to shoot 99 yards the first day. On Tuesday, the plan was to finish the shoot. Unfortunately, mother nature was very uncooperative--it poured rain while we were shooting the weir wall and catch basin. The rain made a huge mess of the shotcrete. Today, Wednesday, they were able to finish the shotcrete for this stage of the pool build. Essentially, we shot the pool, one retaining wall, and the floor of the area that will be storage (or a concrete bunker).
The pool took 150 yards--my estimates were WAY off. The retaining wall and storage foundation counted for an additional 30 yards.
All of my cost estimates for this build have been way too low.
The only good news about the rain is that I have not had to water the pool shell. But, I will start watering tomorrow.
Here are a few pictures.
Attachments

WOW! That looks awesome! It looks like a real pool now! OH no on the accident throwing a curve ball in the trucks getting there! Then the rain!! NOOOO!!!!!!! Glad it all worked out and got done!
Yeah on the costs.....no matter how many times you crunch the numbers something always pops up to push the price tag up.
This is the stage of a build I share my set of links with the new pool owner so they can start reading them and learning how to care for their new pool. (Not that you will have any time to read but...............LOl)
Print these out:
Pool School - Basic Pool Care Schedule
Pool School - Recommended Levels
Bookmark these:
Pool School - Recommended Pool Chemicals
PoolMath
Pool School - ABCs of Pool Water Chemistry
Make sure to ask any and all questions you might have no matter how small! We have all been where you are at one point.
You also need to be thinking about what test kit you are going to get. The one I think is the best bang for the buck is in my siggy below.
Kim
Rented a skid steer...now I am officially jealous. Coming along nice. Sorry to hear shotcrete went over budget, at least you saved a lot doing your own plumbing. I was in the traffic Monday, took me 1.5hrs to get home. A Ferrari was smashed up then due to the traffic back up another accident happened.
WOW! That looks awesome! It looks like a real pool now! OH no on the accident throwing a curve ball in the trucks getting there! Then the rain!! NOOOO!!!!!!! Glad it all worked out and got done!
Yeah on the costs.....no matter how many times you crunch the numbers something always pops up to push the price tag up.
This is the stage of a build I share my set of links with the new pool owner so they can start reading them and learning how to care for their new pool. (Not that you will have any time to read but...............LOl)
Print these out:
Pool School - Basic Pool Care Schedule
Pool School - Recommended Levels
Bookmark these:
Pool School - Recommended Pool Chemicals
PoolMath
Pool School - ABCs of Pool Water Chemistry
Make sure to ask any and all questions you might have no matter how small! We have all been where you are at one point.
You also need to be thinking about what test kit you are going to get. The one I think is the best bang for the buck is in my siggy below.
Kim
Thanks for the links. I purchased the TF-100 kit a while back. But, at this rate it will take me a while to complete the pool.
Rented a skid steer...now I am officially jealous. Coming along nice. Sorry to hear shotcrete went over budget, at least you saved a lot doing your own plumbing. I was in the traffic Monday, took me 1.5hrs to get home. A Ferrari was smashed up then due to the traffic back up another accident happened.
Monday had two bad wrecks: a fatality on Loop 360, which did not affect the concrete trucks and a wreck in Lakeway, which caused the delays in delivering the concrete.
I knew it might be a while but I wanted to make sure to get them to you. I had to pick a part of the build to send them that was not too early or too late. I picked the gunite shoot as it really stands out and the next big step is the plaster so................you got them now LOL
Glad you go the good test kit! You will love using it to manage your water!
Kim
Glad you go the good test kit! You will love using it to manage your water!
Kim
")
- Apr 23, 2017
- 2,400
- Pool Size
- 22000
- Surface
- Plaster
- Chlorine
- Salt Water Generator
- SWG Type
- Hayward Aqua Rite (T-15)
The progress has been very slow. I only work on the project on the weekends--when the weather is good. If I hired out a lot more stuff, the project would proceed much faster. Additionally, since it is winter, I have not be very concerned about moving things along quickly--too cold to swim.
The following is a update on the items I have worked on the past few months.
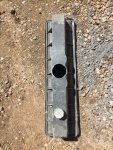
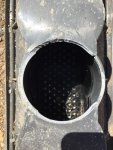
During shotcrete a drain was broken. I believe that the A&A drain needs more reinforcement/plastic at the area that the drain connects to the pipe. However, I want to give a big thumbs up to A&A--they replaced the broken drain at no cost to me (i.e., other than having to pay for shipping back to the distributor). Welcome to part of owner building--having to deal with things getting damaged and broken.
The following is a update on the items I have worked on the past few months.
During shotcrete a drain was broken. I believe that the A&A drain needs more reinforcement/plastic at the area that the drain connects to the pipe. However, I want to give a big thumbs up to A&A--they replaced the broken drain at no cost to me (i.e., other than having to pay for shipping back to the distributor). Welcome to part of owner building--having to deal with things getting damaged and broken.
Attachments
After the forms were pull off from shotcrete, I found voids under some of the pipes. So I purchased high strength concrete to fill in the voids.
I have mostly been working on plumbing and electrical for the nicheless lights.
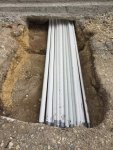
I have used a lot more pipe then I thought that I would.
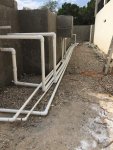
One thing that I am very happy to have remembered is to have "windows" in the retaining walls for the pipes to pass through. The shotcrete at ground level and below grade is upward to 2 feet thick. I have had to drill and hammer out small area of shotcrete and I could not even imagine how long it would take to make a hole through 2 feet of shotcrete.
I have two areas that piping passes through the retaining wall. I forgot to put tape on the ends of the first set of pipe and will have a lot of dirt to clean out of the pipes.
In the pictures, you will see that I used a few DWV 90s. I hope that does not come back to bit me in the rear end. I ran out of schedule 40 fittings in the 3" size--local box stores do not carry fittings that big in schedule 40. The project has used a lot of 3" and 2.5" piping.
I have mostly been working on plumbing and electrical for the nicheless lights.
I have used a lot more pipe then I thought that I would.
One thing that I am very happy to have remembered is to have "windows" in the retaining walls for the pipes to pass through. The shotcrete at ground level and below grade is upward to 2 feet thick. I have had to drill and hammer out small area of shotcrete and I could not even imagine how long it would take to make a hole through 2 feet of shotcrete.
I have two areas that piping passes through the retaining wall. I forgot to put tape on the ends of the first set of pipe and will have a lot of dirt to clean out of the pipes.
In the pictures, you will see that I used a few DWV 90s. I hope that does not come back to bit me in the rear end. I ran out of schedule 40 fittings in the 3" size--local box stores do not carry fittings that big in schedule 40. The project has used a lot of 3" and 2.5" piping.
Attachments


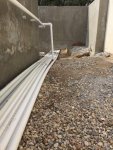
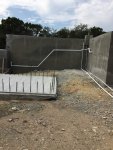
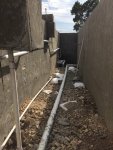
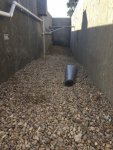
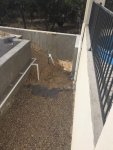
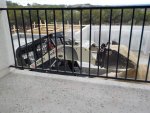
The following pictures are of the area between the pool and one of the retaining walls. The long pipe in the center is for drainage. Specifically, the pipe is perforated on the top and is attached to a down spout from the house gutters. This will redirect water from the pool patio to an area outside of the retaining wall.
To get the gravel and fill over the 9' tall retaining wall I had to rent a BIG bobcat--it was a T650. That thing was incredibly powerful--but is also made a mess because its tracks tear up the ground.
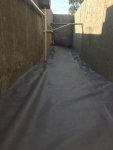
In the pictures you can see that I put a layer of clean washed gravel over the 4" drainage pipe. I unfortunately broke a 90 degree connector when dropping gravel over the retaining wall. So, I had to go to HD and get parts to fix the broken 90 (I have discovered that even when trying to be careful; sometimes things get broken.). Once the repair was completed, I finished putting gravel down and then put landscaping fabric down. The fabric will separate the gravel from the fill but will allow water to drain down and out.
I need to rent a small bobcat to get between the pool and house to lay more gravel and fill.
To get the gravel and fill over the 9' tall retaining wall I had to rent a BIG bobcat--it was a T650. That thing was incredibly powerful--but is also made a mess because its tracks tear up the ground.
In the pictures you can see that I put a layer of clean washed gravel over the 4" drainage pipe. I unfortunately broke a 90 degree connector when dropping gravel over the retaining wall. So, I had to go to HD and get parts to fix the broken 90 (I have discovered that even when trying to be careful; sometimes things get broken.). Once the repair was completed, I finished putting gravel down and then put landscaping fabric down. The fabric will separate the gravel from the fill but will allow water to drain down and out.
I need to rent a small bobcat to get between the pool and house to lay more gravel and fill.
Attachments
Thank goodness for big toys to use! I would have hated to try to do that with out the toys!
That is awesome AA took care of you like that! Nice to hear good stuff about a company!
One thing at a time, one step at a time. Do what you can, when you can. It will get done one day and you can sit back with a cold one in your had and enjoy it!!!
Kim
That is awesome AA took care of you like that! Nice to hear good stuff about a company!
One thing at a time, one step at a time. Do what you can, when you can. It will get done one day and you can sit back with a cold one in your had and enjoy it!!!
Kim
Nice to see an update. Putting in all the fill looks tricky and that is a lot of PVC. Definitely no rush this time of year as finishing before summer is just senseless.
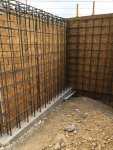
It has been a couple of months since my last update. I have been working (mostly on weekends) on the forms for the retaining walls that were not shot the first go around.
The process has been exhausting (I have done all of the work myself.). I started by setting up strings to determine the location of the retaining walls. I had to set the strings down low and up high to set the elevation of the retaining walls (using a water level was a PITA so I used my laser to level the forms).
Then, I began digging the footers. To dig the footers I used a jackhammer. The rock is relatively "soft" where I am digging but it is still rock and very time consuming to bust up. The footers are 18" to 24" deep and approximately 18" wide, and totaled about 60 feet long. I am not sure how much someone would have charged to dig the footers but I assume even with machines it would have been costly.
After the footers were dug, I started framing up the forms. The wood alone cost more than $1,000 for the forms. It was surprising to me just how much wood was needed for the forming. In the picture you can see the footers and the forms beginning to be installed. To make the framing even more difficult I set the forms up for a rock ledge--I will have stone around the retaining walls and pool that match my house stone.
Attachments
Before I closed up the forms I rented a skidsteer, again, to move fill to an area between the pool and my house foundation. I unfortunately ran out of fill and will have to hand move some of the fill at a later time to some hard to get to places. It was kind of funny driving the skidsteer up high enough that I could look in the house (the back of my patio is 9' off of the ground).
Attachments
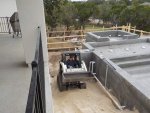
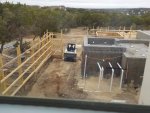
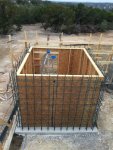
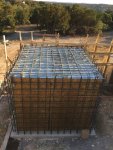
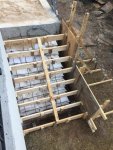
After all of the wood forms were up I started to tackle the rebar and concrete storage area. I spent a significant amount of time learning about retaining wall engineering and engineering of the concrete storage area. It turns out that FEMA has published plans that can be used for storm shelters/safe rooms. I over engineered the retaining walls by a substantial margin. And, I went well above what FEMA recommends for a safe room. I also spent a lot of time learning about various materials used in commercial concrete pours.
For the retaining walls and storage area, I used over 1.5 tons of rebar (a double mat of steel was used all the way around). For the storage area, I found a local vendor that sold concrete deck steel. This type of steel is used often when parking garages are poured. The pictures make things look crooked/leaning but the walls are straight.
I purchased a steel door from HD--those things are pretty expensive. It will be installed once the concrete is shot.
The inside of the storage area has a lot of wood for supports that cannot be seen. I will try to snap a picture latter. The roof on the storage area will be 16,000 pounds of concrete (about 4 yards).
Attachments

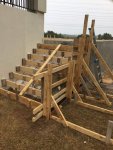
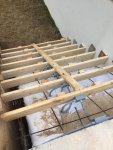
I also have formed stairs for one part of the project. I will have two more sets of stairs to form, but the other two sets of stairs cannot be poured until I finish placing the fill and this go around of shotcrete is done.
In the stairs I have included junction boxes for lighting on the stairs. Figuring out how to attach the junction boxes to the wood was a pain since I could not find an explanation how to do it. I was going to nail the boxes from the back but I would have had nails sticking out when the forms are pulled off. So, I decided to drill holes through the forms at the exact location that a plug or switch would screw into the junction box. This way I will be able to unscrew the screws before pulling for forms.
Again, the pictures make the forms look crooked, but they are level.
Attachments

I can definitely say one thing having done this much work, I do not envy the steel guys. Tying steel everyday would be very hard work. My hands are in terrible shape, and I used gloves the entire time. My hands/finger are cracked from dryness and carpal tunnel has been an issue for me lately. Not to mention having to bend over for extended periods of time is a killer on the back.
While it is difficult to say for certain since I did not get bids, I am guessing that I will save more than $10k to $15k by doing this stage myself.
I am now waiting on shotcrete for this stage I am hoping that we can shoot this coming Saturday. Unfortunately the weather has been uncooperative. I am estimating that it will take 40-45 yards for the walls, storage, and stairs. The storage area alone will take 20 yards.
Thread Status
Hello , This thread has been inactive for over 60 days. New postings here are unlikely to be seen or responded to by other members. For better visibility, consider Starting A New Thread.