Arizona Owner Build - Work in Progress

mbdesa

In The Industry
Apr 9, 2016
32
Phoenix
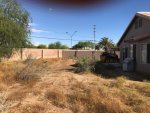
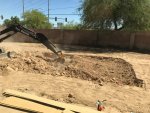
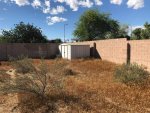
I have been a long time "lurker" on here, but just recently bit the bullet and started my owner build. I connected with a company that specializes in assisting owner builders and they drew up the plans and did the engineering. They also get bids from subs and have them sent to you, and then you negotiate with the subs. So far this process has been simple. I am posting some photos of the progress so far. Feel free to chime in with any hints, suggestions or ideas you have.IMG_7057.jpgIMG_7058.jpgIMG_7098.jpg
 
OhBoy!! Fun days ahead! Welcome out of lurkdom. Sooooo glad you're sharing your pics and build with us. We *love* pics y'know?

Tell us details... size? equipment? everything!! please. Kim :kim: will be along any moment to help you bling it out, lol.

Maddie :flower:
 
Hi,

I was trying to upload my schematic, but I seem to have hit my photo limit, so I will have to figure that one out. Plus, I have a bunch more photos. Here are the specs:

15' x 30' rectangular with baja shelf on one 15' side and bench on other 15' side. 3 to 6' foot depth.

As far as equipment, here is what I have ordered:
Pentair Intelliflo Variable Speed pump
Pentair Clean & Clear Plus Filter
Pentair Easy Touch
Kreepy Krauly Warrior Suction Cleaner
2 Pentair LED Lights
Pentair Wireless Connection Kit

For the interior finish I am doing a Super Sheen (my finisher's proprietary brand of PT Sheen) with 100 Lbs bead per batch. We are still finalizing the interior finish color. They had several finish samples for me to see, and I could tell no difference between their Super Sheen and the PT Sheen, so I figure it is safe to save a few bucks here.
 
We are doing normal chlorine. We considered salt, but decided against it.

The 3' section is a very small area right when you come down the stairs, below the baja shelf, and then it quickly descends to 6'. I wish for the life of me i could upload the schematic and the picture of the dig out completed, but I can't seem to figure it out.

Matt
 
Good idea :) Here we go:

2u965jp.jpg

2uppu90.png
 
Thanks. Yeah, the pictures make the dig look rather shallow, but once I stand in the yard it is actually very deep.

I hadn't thought about that with the lights. Any suggestions on how far apart you would suggest for the lights? I still have time to 'move them', as tomorrow is plumbing, and steel isn't until Thursday. I assume I would have to figure that out before steel day.

Matt
 
I think the lights (if going with two) should be each spaced 10' from each end of the pool. That would make them even and with 10' between them and also 10' from them to the end walls. Does that make sense?

Good call placing the lights facing away from the house.
Maddie :flower:
 

Enjoying this content?

Support TFP with a donation.

Give Support
Maddie has you covered on the lights (good call Maddie!).

I see on the plans you are having "lawn" between the patio and pool. That is not going to be fun in the long run. Think of the dirt and stuff that will be tracked into the house and the pool. I would have concrete or something like pavers in that area.

What will you be putting it around the pool next to the coping?

Kim:kim:
 
Thanks for all of the great feedback everyone. Yes, the grass lawn we changed up a bit. The entire area between the house and the pool is going to be artificial turf. Around the remaining coping, we are still deciding on, but have made a few decisions. To the rear of the pool, we are going to make a "rock garden" so to speak with rows of alternating black and white rocks with cactuses staggered in between. It's kind of a very modern look. Think Palm Springs. The plumber is coming at some point this morning, so I will post some more photos after they go at it :)


Maddie has you covered on the lights (good call Maddie!).

I see on the plans you are having "lawn" between the patio and pool. That is not going to be fun in the long run. Think of the dirt and stuff that will be tracked into the house and the pool. I would have concrete or something like pavers in that area.

What will you be putting it around the pool next to the coping?

Kim:kim:
 
Ok here are some updated pic. Plumber is here finishing, and rebar was well under way when I woke up at 630 AM. One pitfall, excavator didn't notch for the lights, so now I have to track down the excavator to come back, and then have the rebar come back as well.

2m5m5id.jpg

iwurv6.jpg
 
Why oh why don't any PB put unions on the pump? What are you suppose to do when you need to work in it or replace it?? gurrrrrrrrrr

Now that I got that out of my system (I am sure you will be talking to your PB about that) it is time to say that looks AWESOME! It almost looks like a real pool! Have you been bonding with yet? aka watering it. You should water it 2 times a day for about a week depending on your temps. If you get tired of hand watering you can let sprinkler do it for you.

Now is the time I give you your own set of links:

Print these out:
Pool School - Basic Pool Care Schedule

Pool School - Recommended Levels

Bookmark these:
Pool School - Recommended Pool Chemicals

http://www.troublefreepool.com/calc.html

Pool School - ABCs of Pool Water Chemistry

Make sure to ask any and all questions you might have no matter how small! We have all been where you are at one point.

You should think about what test kit you want. Look in my siggy for the best bang for buck test kit.

Kim:kim:
 

Enjoying this content?

Support TFP with a donation.

Give Support
Thread Status
Hello , This thread has been inactive for over 60 days. New postings here are unlikely to be seen or responded to by other members. For better visibility, consider Starting A New Thread.