my pool skimmer replace / install

boutselis

0
Bronze Supporter
Aug 30, 2016
63
palm bay fl
IMG_6033.jpg
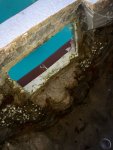
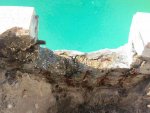
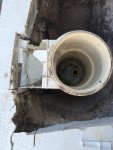
I finally got my skimmer delivered. here is a picture of the old one. And wouldn't you know the plumbing is the wrong size. I have 2" pipes and after I took it out completely I found for some reason they down sized at the skimmer to 1-1/2" . So i'm either going to have to reduce like the original manufacturer did (no idea why they did that, its the only thing on the line) or re plumb that area with 2" pipe. I haven't dug any further but I'm guessing I will find a coupling with a 2" to 1-1/2" reducer on it.

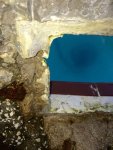
from what I saw on the first picture above I was planing on clearing away the grout and then using a silicone adhesive to stick the new skimmer in the opening after it was plumbed in and then grout in place. But one side is not smooth at all. this was where my leak was or at least most of it. all the way to the left there is something that looks like a crack but its a saw cut.

So now i'm thinking of one of 2 things. rebuilding the area completely or smoothing out the rough area with some fortified cement product and continuing from there as planned.
IMG_6035.jpgIMG_6034.jpg
 
Not fun to dig in and find all things done wrong or weird before you.....you have some good ideas. See what will be the best in the long run and vo from there. i am thinking build up and smooth it out. Might be more work on this end but pay off on the back end.

:kim:
 
IMG_6038.jpg

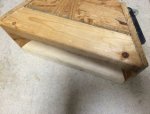
Decided to go with a total new pour. this is the start of my form. its for the throat. I measured the angles of the old one and made the small end so it fits tight into the mouth of the skimmer. I will brush some old oil on this part of the form so the concrete won't stick to it.
I couldn't get much done today. to many other things going on and wouldn't you know it they sent me the threaded skimmer inplace of the slip that I asked for so I needed a different part anyway. I really wanted the full 2 inches but it is still going to be much better than the 1.5 inches I had. I only have a slight decrease in diameter where the threaded coupler goes in to the skimmer. the old one had a reducer and 4" of 1.5" pipe.
I am going to cut the pool wall away tomorrow morning
 
You are going the long way that is also the best way long term! Good job on the form. The oil should do the trick to help lift the from. Bummer on the parts not being what your asked for but you seem to be dealing with it just fine. Adapt to what you have in true DIY fashion!

:kim:
 
You're going to need more than oil to get than form to pop free. Make sure all of your screws are from the inside out, so you can take it out piece by piece if necessary.
thanks. I have done some pretty big forms including culvert walls. I usually use diesel fuel but for such a small job i'm not bothering to get an. a good coat of oil will work on this.
 
IMG_6042.jpgIMG_6043.jpg

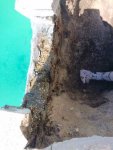
I cut the hole out this morning and did most of the plumbing. I wanted to be gentle with my old pool so I cut instead of jack hammered. good thing to. if you look to the left of the second picture you will see that the original poor wasn't to good and I have a thin area with exposed rebar. I pulled the tile off over this are and there are no crack but I am still going to patch from the back with fortified hydraulic cement.

I cut away concrete until I found some rebar nubs so I would have them sticking out. also cut the whole in a little bit of a trapezoid shape (may not be able to see that) so when the concrete sets it will be kinda like a key wedge. it won't be able to pop up in the future. I may ad a few stainless steel 1/4" concrete hex head screws sticking out so new concrete has plenty to grab onto. of course I'm using fortifier and a bonding slurry I don't want as poor of a job as the original one was.

I can tell it was being repaired over and agin since it was put in. The rest of the pool wall seems to be in good condition. I don't have any lose tiles so things haven't shifted around.

and my concrete pool is very very hard. I have hammered and cut concrete drive ways and walls before. this pool seems to be higher than the standard psi. pretty dense
 
WOW! You are finding all kinds to stuff out about your pool. Nice job. When you say cut.....cut with what? I bet a jackhammer would have done quite a bit of harm. Good thinking.

I like the idea of something sticking up for the new stuff to grab unto.

Thanks for sharing the pictures and your step by step. I am sure someone in the future will find this very helpful!

:kim:
 

Enjoying this content?

Support TFP with a donation.

Give Support
WOW! You are finding all kinds to stuff out about your pool. Nice job. When you say cut.....cut with what? I bet a jackhammer would have done quite a bit of harm. Good thinking.

I like the idea of something sticking up for the new stuff to grab unto.

Thanks for sharing the pictures and your step by step. I am sure someone in the future will find this very helpful!


:kim:
I happen to have a concrete saw. I hardly ever use it but man the once in every 2 years when I need one its awesome to have. I used that to cut at and outward angle on each side so I had the trapezoid shape I described. It only cuts so deep so after that i used a hammer and chisel and my angle grinder. I would cut reliefs with the angle grinder (diamond blade) and then gently chisel out piece by piece. I probably spent an extra hour and a half on demo because I wanted to be gentle. I could have ripped the whole thing out in 20 minutes probably with my small electric hammer

Its important to have things for new concrete to grab onto if You can help it. no mater what companies say about their fortifiers and bonding agents they are not a true replacement for mechanical fastening like rebar and such
 
It is like holding hand to hand VS hand to wrist....one works and one works better!

Time well spent to make sure you do it right. Just look at the mess the others had made by not doing it the right way :(

Yeah on having the right tool at the right time! One of our tool chests is just for "tools hardly ever needed but oh so nice to have when needed".

:kim:
 
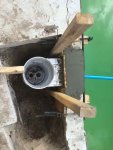
I haven't taken a picture of the finished skimmer. I forgot to. But this is after the concrete was poured. I have since removed the forms and tested it. works great and no leaksIMG_6044.jpgIMG_6045.jpg

If I had listened to the very first professional I spoke with ( he found a reason to contact me EVERY single day for a week. His estimate was only good for 5 days anyway. part of the sales pitch I guess)
I would have spent $4500 fixing a problem that never existed. It was a slim chance to go with that outfit any way.

as it is , after material, I saved $1300 and I isolated and solved my pool leak. Originally I was not going to disrupt the pool wall, thats why I purchased the same skimmer (so it would fit the opening ) but when I saw the surface the old skimmer was attached to I changed my mind. So I wish I would have ordered one with a wider mouth but now that I have a full 2" of flow and not the reduced 1.5 it does work better.

I hope this does benefit some one who wants to replace a skimmer but is un sure how. Tomorrow I will type out the steps I used. maybe some one will find them useful

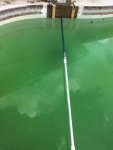
(Yes I know the water is not supposed to be green. A few hot days and we have age to spare in florida)
 
SWEET! No leaks??? That is what it is all about!

Lets do some housekeeping please. Add your pool info to your siggy please........settings (upper right), edit signature (middle left).........pool kind, size (gallons), equipment-size and kind (filter), what test kit, any special features.

Look in my siggy for the SLAM link if you do not have it bookmarked already. I would love to see the finished pool looking like a jewel! :sun:

:kim:
 
SWEET! No leaks??? That is what it is all about!

Lets do some housekeeping please. Add your pool info to your siggy please........settings (upper right), edit signature (middle left).........pool kind, size (gallons), equipment-size and kind (filter), what test kit, any special features.


Look in my siggy for the SLAM link if you do not have it bookmarked already. I would love to see the finished pool looking like a jewel! :sun:

:kim:

I'm sorry but I am way better at building stuff than....... what ever that was that you just said lol. Thats gonna take a bit to figure out for me. Ive been short on time so right now i'm only going to be able to list some pointers for replacing the skimmer. What in the world is a siggy?

By house keeping do you mean that my pool is a mess? I had it off for a few days while the water was low because I had to work on the skimmer in moments of spare time. had a serious algae bloom which is gone now but my water is super cloudy. may be concrete dust but I will need to get the water tested.
 
Here are a few things that may help anyone who wants to replace a skimmer. its really not that hard. If I had a whole day (I didn't) I would have been done in one day easy. But I have done quite a number of different things as far as construction so experience varies. Most of these things will probably sound a little "goes with out saying" to man people but just in case your newer to do it your self projects.....

first: obviously drain the water a few inches below the skimmer and you'll need to remove some tile on either side of the skimmer. REMEMBER ceramic tile will be sharp as glass. tiny chips will stick in your feet and cut you so the pool will need to be vacuumed thoroughly

2: your gonna need to make a plug (I showed more in an earlier picture) for the form. that way there is an opening in the wall. so take some measurements and angles before you demo. so you can build it a little easier.

the third: thing I would recommend is to Cut the concrete in place of hammering it. You would probably be fine with a jack hammer but cutting is much more gentle. You can rent a concrete saw just like a jack hammer. get a combination blade that will cut rebar and concrete. I had my own with a diamond blade which does cut rebar . Rental places may not let you have a diamond blade and metal dulls them more quickly.
You will still need an angle grinder with a diamond blade , a heavy hammer and a chisel. You will have to do some hammering by hand once you cut as much as you can with the concrete saw (it only goes so deep). cut as deep as you can with the angle grinder on each side (inside pool and outside pool) and then put the chisel to it. with the cuts the concrete will pop right off and not stress the pool wall.

4: Make the opening like a trapezoid with the smaller end on top. makes it like a key that cant pop up from the bottom. you may want to expose some of the rebar. little nubs about 3/4 of an inch will help a lot. when your making the opening you'll want to be able to fit 3" or more of concrete on all sides. thin concrete cracks easy. I added some stainless hex head concrete screws in a few areas. the more the concrete has to grab the better. If you do that make sure they screw in and don't get forced in to tight. to tight and the screw is more like a wedge that can split concrete.

5: dry fit the plumbing several times before assembly. I had to remove extra old plumbing because mine wasn't done properly when the pool was made. if the skimmer is off level a little it can be forced (only a little. if its way off something might crack in the future) into level with a brace and it will stay that way after you pour the concrete. get it all put in place and make your forms. I used some clamps and my brush pole to hold the forms in place. some dirt can help fill in the bottom of the form when your ready to place the concrete. but don't be to hasty

6: this is pretty important. to make sure there were no gaps in the bottom I took the outside form /plug off and shoved the concrete under the bottom of the skimmer by hand. I even pried it back a little bit to get plenty under there and pressed the skimmer down into the concrete using a wood block to fix it level. then put the front form back on and packed the rest up by hand. an 80b bag will be more than enough.

a few other things that might help.

I like to take precautions. some of these things may not really be necessary but may also help avoid problems in the future

you want new concrete to bond to old concrete. especially if you don't want leaks. I mentions stainless steel screws for the concrete to grab to as well as exposing rebar. one other thing I did is I used a bonder/ fortifier in the concrete. I not only mixed it in but made a slurry (think super thick paint) and brushed it on the whole area. you need to get the rest of the concrete poured in before the slurry mixture completely sets to be of the most effect.

You also don't want concrete to crack. fortifier helps. not letting it be to thin also helps. In addition I took some fiberglass cloth and pulled off a bunch of fiber glass. its pretty easy to do. you want the strands, not just clumps of cloth. I mixed my concrete by hand (wearing gloves) and put in small amounts of fiber glass strands a little at a time so there were no clumps of fiber glass. the fibers make certain your not going to have any leaks. a few fluffy hand full goes a long way. just don't show it in all at once or you'll just have a wad of fiberglass doing more harm than good.

there are probably a lot of other things I could tell you but they are just common construction tips. if you can safely demo, measure, plumb, and work concrete most everything else is common knowledge

hope this helped you out.

- - - Updated - - -

& how are you actually tying it to the wall?? The throat set in the wall is inadequate. Skimmers move when pump is turned on & off. You have to anchor it to the pool. Best ray


Sent from my iPhone using Tapatalk

GOOD point. If you read what I was writing while you typed that you'll see what I did. I've done a lot of concrete and I am very positive mine it not going any where.
 
siggy=signature.............look at the bottom of this post. You will see my pool info. as well as the colorful words that are links to important areas here at TFP.

-go up to the top of this page to Settings. It is right under the words Pool School-click on settings

-when that opens up look over to the left hand side of the page

-look for the words "edit signature"-click on it

-type in your pool info.-kind of pool (plaster, vinyl) inground or aboveground, filter size and kind, extra features, what test kit you have, etc.

Doing the above is what I was referring to when I said "house keeping" as it helps us help you when you are ready to clear that pool up.

THANKS for sharing your write up! I like how you told why you cut the shape you did. Nice job!

:kim:
 
Thread Status
Hello , This thread has been inactive for over 60 days. New postings here are unlikely to be seen or responded to by other members. For better visibility, consider Starting A New Thread.