We have bubbles but it's not champagne!

FloridaPoolGal

LifeTime Supporter
Jan 8, 2016
119
Altamonte Springs, FL
Pool Size
20000
Surface
Plaster
Chlorine
Liquid Chlorine
FOUND THE LEAK (I think) - see next post.

I am getting air bubbles in the pump trap. I noticed a 2-3 weeks ago I was getting a few bubbles coming out of the pool jet closest to the pump at start-up (after the big burst of bubbles that is normal at start-up). When I noticed the bubbles were lasting longer, I looked things over a little closer and saw bubbles swirling around in the pump trap. The pump trap is full of water and the pump is primed and everything seems to be working fine other than the bubbles. I can't get a good picture of the bubbles swirling in the trap during operation but I included a picture taken right after turning off the pump and a some air is visible in the trap.

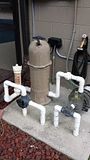
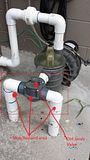
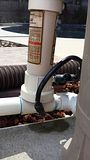
When we were viewing the property prior to purchasing, we told the realtor someone needed to add water to the pool because the pump trap wasn't filling. As it turned out, the water level was fine but air was entering the system due to cracks in the PVC/valves. The owner replaced some of the plumbing (marked on picture inside red circle). The repairs are where the bright blue stuff (adhesive?) is. While taking these pictures I am noticing a couple of other blue areas that must have been repaired around the same time. The pump was replaced by us about six months ago. It was leaking and might have only needed a new gasket but the service guy from the local pool store (25 years in the neighborhood) broke a bolt so the whole thing had to be replaced. Ever heard of spraying some stuff on an old rusty bolt before yanking on it! Still might have broken but at least try.

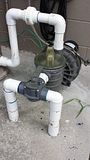
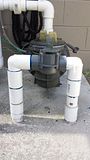
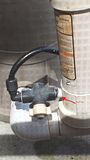
I started with the easy stuff and replaced the pump trap gasket. No change. There is also a small leak in the chlorinator (that I'm not using). A slow drip when the system is under pressure. I included a picture with the leak highlighted. This leak has NOT increased as the bubble issue has increased. It looks like I could just unscrew the hose and put on some new teflon tap to fix the leak but everything is so old I'm afraid to break something else! I would rather remove the entire assembly but there is barely any pipe on the outlet side and seems like it could be a problem.

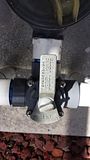
I'm assuming the two pipes joining and entering the pump trap are from the main drain and the skimmer. Should I try to turn the Jandy valve to one side or the other to see if the bubbles stop? To turn the valve, do I have to first turn the button that says, 'unlock?' Do I do the turning when the pump is turned off? Are there any other steps I can take to fine where the air is entering the system? If you want additional pictures of something I haven't shown, please let me know.
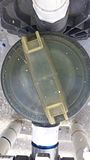
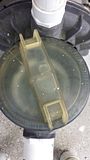
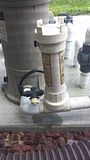
 
Last edited:
I was reading other posts in this forum and saw the suggestion about turning on the pump and watching for a leak. I tried this and found a leak at the coupling on the intake side of the pump trap (photo). I feel water when I turn off the pump. Is there a temp fix I can do to confirm this is the spot causing the bubbles? Is there any way to stop the air leak other than replacing things? There doesn't seem to be any room to do anything.

Note: I went over to Pool School to read up on suction side leaks. I tried the water test on the spot I suspected of being the air leak. No bubbles when running water over the area of the suspected leak so LOCATION OF LEAK HAS BEEN CONFIRMED.

Fixing/replacing that area seems like a problem because there's no room to do anything. Help! How do I fix this?


Last edited:
So here is my workaround until I get someone to help me fix it next week. By 'submerging' the area that is leaking air, I have significantly reduced the amount of bubbles in the trap. The pump was still working fine but I figure fewer bubbles is better. It also seems that hydrating the area has reduced the air leak.


Thank you! All sorts of neat stuff in the catalog.

Is this the item I want from page 146? I see they come in a box of 50! B 21063-160-000 1.5" MIP, 2" SOCKET HI-TEMP UNION 50

Do I have to move the pump (to move the trap) to get access to install the new part?
 
I found the part for $19.99 with free shipping from Pool Supply World. I will have it tomorrow. The company said they were in Phoenix but it looks like the part shipped from Sarasota. It is $40 from InyoPools!

I also bought a 'plain' part today one from Home Depot that looks like the installed one but I grabbed one that is too big. The outside circumference is 7" of the installed white part and 9" for the the one I purchased. The 7" circumference tells me the inner diameter is 2" when I take the wall thickness into account, Circumference/Pi=7"/3.14=2.23". If OD is 2.23", I'm assuming the ID is 2.0".

It appears the non-threaded end of the white part is glued to white PVC pipe coming from the gray valve (i.e. left side of white part in photo). You can see a very short piece between the valve and the white part. Is it possible to remove the white part where it is glued? I'm assuming it's glued because I see blue adhesive. As far as the other end, I assume I just unscrew the white part from the pump trap (or unscrew the pump trap from the white part!).

There is so little PVC pipe between the valve and the white part, what in the heck am I going to do if I can't get the glued on white part off the PVC pipe exiting the gray valve? There is nothing to work with if I just hack-sawed off the white part at the non-threaded end. Help! Is it possible to disengage to PVC parts that have been glued together? Is it possible to chip off the white part?

The good news about the $19.99 part is that it doesn't have to be glued on and is easily removed in the future, if required.

The plumbing guy at Home Depot suggested removing the pump trap (unscrewing off the white part) and the applying some plumbing putty and that might stop the air leak. Anyone have any history with this or have an opinion as to whether you think it will work?

Thanks.
 
Two methods:
A:
1) Cut the pipe flush with the end of the gray valve.
2) Unscrew the 1.5” MTA (white threaded fitting screwed into the pump)
3) Get part number 21063-160-000 (1.5” threaded by 2” slip union).
4) Screw 1.5” threaded part into pump (use sealant and/or Teflon tape).
5) Glue 2” socket part with nut over the end of the gray valve.
6) Join union
You might need to redo from pump to filter if alignment is not exact.
B:
1) Cut the pipe flush with the end of the gray valve.
2) Unscrew the 1.5” MTA (white threaded fitting screwed into the pump)
3) Get a 1.5” schedule 80 cpvc threaded nipple and screw it into the front of the pump(use sealant and/or Teflon tape).
4) Cut off end of threaded nipple leaving only 1.25” sticking out of pump
5) Glue a 1.5” x 2” bushing over the end of the cpvc nipple so that it ends up flush with the pump and has a ¼” gap between it and the gray valve.
6) join with a 2” coupling.
You might need to cut the coupling to fit or redo the plumbing from the pump to the filter.
 
^Gave some good suggestions on how to plumb. *Maybe better than plastic bags would be silicon (that may fix the problem for years actually). The best solution, of course, would be replumb... if you could replumb the entire intake so there is a longer straight run into the pump, that would best (but not necessary). I'm late on this thread and I bet you already have this solved.
 
^Gave some good suggestions on how to plumb. *Maybe better than plastic bags would be silicon (that may fix the problem for years actually). The best solution, of course, would be replumb... if you could replumb the entire intake so there is a longer straight run into the pump, that would best (but not necessary). I'm late on this thread and I bet you already have this solved.

The "water the air leak" technique is definitely only temporary. :) I watched a YouTube video on diagnosing and repairing suction-side leaks and the guy said that patches wouldn't work in 'high pressure' areas. I guess it wouldn't hurt to try it. Seems like there is a good chance it would work because the repair is being sucked onto the pipe during pump operation.

It seems if I re-plump to add a longer run to I also have to redo the plumbing between the pump and the filter since it's a direct run right now with current placement.
No, you're not late to the party. Nothing accomplished yet. I have someone who will help but he is not available until next week. I'm always worried about breaking something else when I try to fix the problem at hand. :hammer:
 

Enjoying this content?

Support TFP with a donation.

Give Support
Two methods:
A:
1) Cut the pipe flush with the end of the gray valve.
2) Unscrew the 1.5” MTA (white threaded fitting screwed into the pump)
3) Get part number 21063-160-000 (1.5” threaded by 2” slip union).
4) Screw 1.5” threaded part into pump (use sealant and/or Teflon tape).
5) Glue 2” socket part with nut over the end of the gray valve.
6) Join union
You might need to redo from pump to filter if alignment is not exact.
B:
1) Cut the pipe flush with the end of the gray valve.
2) Unscrew the 1.5” MTA (white threaded fitting screwed into the pump)
3) Get a 1.5” schedule 80 cpvc threaded nipple and screw it into the front of the pump(use sealant and/or Teflon tape).
4) Cut off end of threaded nipple leaving only 1.25” sticking out of pump
5) Glue a 1.5” x 2” bushing over the end of the cpvc nipple so that it ends up flush with the pump and has a ¼” gap between it and the gray valve.
6) join with a 2” coupling.
You might need to cut the coupling to fit or redo the plumbing from the pump to the filter.

Thanks for the detailed options. I never thought of attaching something OVER the gray valve. Duh! It looks like the white part I bought (like the one that is currently installed) is actually NOT the wrong size. I think I learned today that the inner diameter of the 2" end is really 2.5" so it will fit over the 2" and have some room for adhesive.

My 21063-160-000 will be delivered today.

Can you clarify A: Step 5? Is a 2" socket part with nut another part I should purchase to engage with the 2" slip union?
 
The "water the air leak" technique is definitely only temporary. :) I watched a YouTube video on diagnosing and repairing suction-side leaks and the guy said that patches wouldn't work in 'high pressure' areas. I guess it wouldn't hurt to try it. Seems like there is a good chance it would work because the repair is being sucked onto the pipe during pump operation.

It seems if I re-plump to add a longer run to I also have to redo the plumbing between the pump and the filter since it's a direct run right now with current placement.
No, you're not late to the party. Nothing accomplished yet. I have someone who will help but he is not available until next week. I'm always worried about breaking something else when I try to fix the problem at hand. :hammer:

Silicon usually works for air leaks on suction side (of course replumb is best)... If you do replumb your system, I suggest moving your intake back with some 45 degree elbows (Just like I did it with this system: Pool Pump and Filter Installation - YouTube).... Replumbing the filter side is easy - I would plumb everything up first and then simply add on the top piece last - include a 3-way valve on the top piece while you're at it so you can vacuum to waste (and lower water level) with ease. I think you'd be happier with your system if you did this. Good luck!
 
I got the 21063-160-000 part today and it looks perfect for the repair! Do you agree?

I see why it was $20 since there are multiple parts to it. I have attached a picture showing where it will go. Looks like it will fit perfectly.

If I can unscrew the white part from the pump, all should go well. Actually, I'm thinking the first step is to unbolt the pump and try to turn it before I hacksaw at the blue line. If I can't get the white part out of the pump (is that a reasonable fear?), I guess I will have to purchase a new pump trap.

Does anyone know what brand of pump trap I have? I don't see any markings on it? I measured the interior diameter and it was 5" so I think it might be this, [h=1]Max-E-Glas Dura-Glas Pump Sta-Rite 5 in. Trap C153-53P1.[/h]
 
Here's what I would suggest.

First turn off pump remove the drain plugs.
1) Undo the union between the pump and filter.
2) Cut the pipe flush with the end of the gray valve.
3) Move the pump back a few inches.
4) Unscrew the 1.5" white pvc mta from the pump.
5) Take the union apart.
6) Apply teflon tape to the threads of the union(about 10 wraps). Don't get tape on the oring.
7) Apply sealant over the tape.
8) Screw in the threaded part of the union.
9) Put the union back together.
10) Use pvc primer on the gray valve and union socket.
11) Apply glue to gray valve and socket of union.
12) Slide pump forward until the fittings have good overlap and the union between the pump and filter is lined up.
13) Reconnect union between pump and filter
14) Allow glue to dry.
15) Reinstall drain plugs.
16) Add water to pump.
17) Start system.

Question about 7). Is Magic Lube the type of sealant you are talking about?
14) About how long does it take glue to dry? Minute, hour, day?

I can do this!
 
Just a pipe thread sealant from the plumbing section of the hardware store suitable for pvc.

Under ideal conditions, glue is suffiently set to pressurize in 30 minutes. However, giving the glue overnight to dry can help compensate for any deficiency in the process.

When applying Teflon tape, wrap clockwise.
 
Thread Status
Hello , This thread has been inactive for over 60 days. New postings here are unlikely to be seen or responded to by other members. For better visibility, consider Starting A New Thread.